
时间轴
时间轴
2025-11-30
init
2025-12-01
add devicetree
2025-12-03
add devicetree plugin
本文介绍了Linux设备树的基本概念与核心机制。文章首先阐述了设备树作为硬件描述机制的背景,指出其用于描述硬件设备的特性、连接关系和配置信息,能够降低内核与硬件的耦合度,提高系统可移植性和可维护性。随后,文章详细说明了设备树相关的四个关键组成部分:DTS(设备树源文件)、DTSI(设备树源包含文件)、DTB(设备树二进制文件)和DTC(设备树编译器),并解释了它们各自的作用与关系。此外,文章还介绍了设备树源文件在ARM64体系结构下的存放位置,以及设备树的编译与反编译方法,并提到了通过配置变量将设备树公开给用户空间以便调试的技巧。最后,文章概述了设备树的基本语法,包括根节点、子节点、节点标签、节点名称、单元地址、属性定义和子节点等要素,为读者理解设备树的编写与解析提供了基础。
Linux 驱动笔记
| 目录 | 链接 |
|---|---|
| 1. Linux 驱动框架 | |
| 2. Linux 驱动加载逻辑 | |
| 3. 字符设备基础 | |
| 4. 并发与竞争 | |
| 5. 高级字符设备进阶 | |
| 6. 中断 | |
| 7. 平台总线 | |
| 8. 设备树 | |
| 9. 设备模型 | |
| 10. 热插拔 | |
| 11. pinctrl 子系统 | |
| 12. gpio 子系统 | |
| 13. 输入子系统 | |
| 14. 单总线 | |
| 15. I2C | |
| 16. SPI | |
| 17. UART | |
| 18. PWM | |
| 19. RTC | |
| 20. Watchdog | |
| 21. CAN | |
| 22. 网络设备 | |
| 23. ADC | |
| 24. IIO | |
| 25. USB | |
| 26. LCD |

设备树介绍
背景
设备树(Device Tree)是一种硬件描述机制,用于在嵌入式系统和操作系统中描述硬件设备的特性、连接关系和配置信息。它提供了一种与平台无关的方式来描述硬件,使得内核与硬件之间的耦合度降低,提高了系统的可移植性和可维护性。
在平台总线模型中我们用platform_device结构体来对硬件设备进行描述,这是一种传统的平台总线设备描述方式。
每个platform_device结构表示一个特定的硬件设备,并通过注册到平台总线上来使得内核能够与该设备进行通信和交互。该结构包含设备的名称、资源(如内存地址、中断号等)、设备驱动程序等信息。
然而,随着时间的推移,Linux 内核中的 ARM 部分存在着大量的平台相关配置代码,这些代码通常是杂乱而重复的,导致了维护的困难和工作量的增加。设备树的引入为 ARM 架构上的 Linux 内核带来了革命性的变化。它提供了一种统一的硬件描述方式,使得不同芯片和板级的支持更加简单和灵活。此外,设备树还提供了硬件配置的可视化和可读性,方便开发者理解和调试硬件。
DTS(Device Tree Source):DTS 是设备树的源文件,采用一种类似于文本的语法来描述硬件设备的结构、属性和连接关系。DTS 文件以.dts 为扩展名,通常由开发人员编写。它是人类可读的形式,用于描述设备树的层次结构和属性信息。
DTSI(Device Tree Source Include):DTSI 文件是设备树源文件的包含文件。它扩展了 DTS文件的功能,用于定义可重用的设备树片段。DTSI 文件以.dtsi 为扩展名,可以在多个 DTS 文件中包含和共享。通过使用 DTSI,可以提高设备树的可重用性和可维护性(和 C 语言中头文件的作用相同)。
DTB(Device Tree Blob):DTB 是设备树的二进制表示形式。DTB 文件是通过将 DTS 或 DTSI文件编译而成的二进制文件,以.dtb 为扩展名。DTB 文件包含了设备树的结构、属性和连接信息,被操作系统加载和解析。在运行时,操作系统使用 DTB 文件来动态识别和管理硬件设备。
DTC(Device Tree Compiler):DTC 是设备树的编译器。它是一个命令行工具,用于将 DTS和 DTSI 文件编译成 DTB 文件。DTC 将文本格式的设备树源代码转换为二进制的设备树表示形式,以便操作系统能够加载和解析。DTC 是设备树开发中一个重要的工具。
设备树在源码存放的位置
ARM64 体系结构下的设备树源文件通常存放在arch/arm64/boot/dts/目录及其子目录中。该目录也是设备树源文件的根目录,并包含了针对不同 ARM64 平台和设备的子目录。
在 ARM64 的子目录中,同样会按照硬件平台、设备类型或制造商进行组织和分类。这些子目录的命名可能与特定芯片厂商(如 Qualcomm、NVIDIA、Samsung)有关,由于我们使用的 soc 是瑞芯微的rk3568, 所以匹配的设备树目录为arch/arm64/boot/dts/rockchip。每个子目录中可能包含多个设备树文件,用于描述不同的硬件配置和设备类型。
设备树的编译
在 Linux 内核源码中,DTC(Device Tree Compiler)的源代码和相关工具通常存放在scripts/dtc/目录中
设备树编译
1 | dtc -I dts -O dtb -o output.dtb input.dts |
-I表示输入的文件类型-O表示输出的文件类型-o表示编译后输出文件名
设备树反编译
1 | dtc -I dtb -O dts -o output.dts input.dtb |
Linux中编译
1234 | # 编译所有arm64的DTBARCH=arm64 CROSS_COMPILE=aarch64-none-linux-gnu- make dtbs# 编译单独的dtbARCH=arm64 CROSS_COMPILE=aarch64-none-linux-gnu- make imx6dl-sabrelite.dtb |
为了调试,将DT公开给用户空间可能是有用的。使用
CONFIG_PROC_DEVICETREE配置变量可以实现该目的。然后,可以浏览/proc/devicetree中的DT。
设备树基本语法
根节点
12345678 | /dts-v1/; // 设备树版本信息/ { // 根节点开始 /* 在这里可以添加注释,描述根节点的属性和配置 */} |
子节点
1234 | [label:] node-name@[unit-address] { [properties definitions] [child nodes]}; |
节点标签(Label)(可选):节点标签是一个可选的标识符,用于在设备树中引用该节点。标签允许其他节点直接引用此节点,以便在设备树中建立引用关系。
节点名称(Node Name):节点名称是一个字符串,用于唯一标识该节点在设备树中的位置。节点名称通常是硬件设备的名称,但必须在设备树中是唯一的。
单元地址(Unit Address)(可选):单元地址用于标识设备的实例。它可以是一个整数、一个十六进制值或一个字符串,具体取决于设备的要求。单元地址的目的是区分相同类型的设备的不同实例。
属性定义(Properties Definitions):属性定义是一组键值对,用于描述设备的配置和特性。属性可以根据设备的需求进行定义,例如寄存器地址、中断号、时钟频率等。
子节点(Child Nodes):子节点是当前节点的子项,用于进一步描述硬件设备的子组件或配置。子节点可以包含自己的属性定义和更深层次的子节点,形成设备树的层次结构。
reg属性
reg 属性用于在设备树中指定设备的寄存器地址和大小,提供了与设备树中的物理设备之间的寄存器映射关系。
reg 属性可以在设备节点中有单个值格式和列表值格式这两种常见格式。
- 单个值格式如下所示:
1 | reg = <address size>; |
这种格式适用于描述单个寄存器的情况。其中,address 是设备的起始寄存器地址,可以是一个整数或十六进制值(u32)。size 表示寄存器的大小,即占用的字节数。
例子:
12345 | my_device { compatible = "vendor,device"; reg = <0x1000 0x4>; // 其他属性和子节点的定义} |
- 列表值格式
1 | reg = <address1 size1 address2 size2 ...>; |
当设备具有多个寄存器区域时,可以使用列表值格式的 reg 属性来描述每个寄存器区域的地址和大小。通过这种方式,可以指定多个寄存器的位置和大小,以描述设备的完整寄存器映射。
例子:
12345 | my_device { compatible = "vendor,device"; reg = <0x1000 0x8 0x2000 0x4>; // 其他属性和子节点的定义}; |
每个设备在DT中至少有一个节点。某些属性对于许多设备类型是通用的,特别是位于内核已知总线(SPI、I2C、平台、MDIO等)上的设备。这些属性是reg、
#address-cells和#size-cells,它们的用途是在其所在总线上进行设备寻址。每个可寻址设备都具有reg属性。
也就是说,主要的寻址属性是reg,这是一个通用属性,其含义取决于设备所在的总线。
#address-cells和#size-cells属性
#address-cells和#size-cells属性用于指定在上个小节中要设置的设备树中地址单元和地址大小的位数。它们提供了设备树解析所需的元数据,以正确解释设备的地址和大小信息.
#address-cells和#size-cells中的前缀#是设备树中表示"单元数量(cell count)"的命名约定,不能翻译为 length,它表示的是该属性值用几个 32 位单元(cell)来表示。可寻址设备继承自它们父节点的
#size-cell和#address-cell,父节点代表总线控制器。指定设备中存在#size-cell和#address-cell不会影响设备本身,但影响其子设备。换句话说,在解释给定节点的reg属性之前,必须知道父节点#address-cells和#size-cells的值。父节点可以自由定义适用于设备子节点(孩子)的寻址方案。
#address-cells
属性是一个位于设备树根节点的特殊属性,它指定了设备树中地址单元的位数。地址单元是设备树中用于表示设备地址的单个单位。它通常是一个整数,可以是十进制或十六进制值。它的值告诉解析设备树的软件在解释设备地址时应该使用多少位来表示一个地址单元。
默认情况下,#address-cells的值为 2,表示使用两个单元来表示一个设备地址。这意味着设备的地址将由两个整数(每个整数使用指定位数的位)组成。
例如,对于一个使用两个 32 位整数表示地址的设备(64位),可以在设备树的根节点中设置 #address-cells 属性为 <2>。
#size-cells
#size-cells 属性也是一个位于设备树根节点的特殊属性,它指定了设备树中大小单元的位数。大小单元是设备树中用于表示设备大小的单个单位。它通常是一个整数,可以是十进制或十六进制值。
例子
123456789 | node1 { node1-child { reg = <0x02200000 0x4000>; // 其他属性和子节点的定义 };}; |
- 地址部分:0x02200000 被解释为一个地址单元,地址为 0x02200000。
- 大小部分:0x4000 被解释为一个大小单元,大小为 0x4000。
model属性
在设备树中,model 属性用于描述设备的型号或者名称。它通常作为设备节点的一个属性,用来提供关于设备的标识信息。model 属性是可选的,但在实际应用中经常被使用。
12345 | my_device { compatible = "vendor,device"; model = "My Device XYZ"; // 其他属性和子节点的定义} |
model 属性通常用于标识和区分不同的设备,特别是当设备节点的 compatible 属性相同或相似时。通过使用不同的 model 属性值,可以更加准确地确定所使用的设备类型
status属性
在设备树中,status 属性用于描述设备或节点的状态。它是设备树中常见的属性之一,用于表示设备或节点的可用性或操作状态。
status 属性的值可以是以下几种:
“okay”:表示设备或节点正常工作,可用。
“disabled”:表示设备或节点被禁用,不可用。
“reserved”:表示设备或节点已被保留,暂时不可用。
“fail”:表示设备或节点初始化或操作失败,不可用。
例子:
12345 | my_device { compatible = "vendor,device"; status = "okay"; // 其他属性和子节点的定义} |
compatible 属性
在设备树中,compatible 属性用于描述设备的兼容性信息。它是设备树中重要的属性之一,用于识别设备节点与驱动程序之间的匹配关系。
compatible 属性的值是一个字符串或字符串列表,用于指定设备节点与相应的驱动程序或设备描述符兼容的规则。通常,compatible 属性的值由设备的厂商定义,并且在设备树中使用。
以下是一些常见的 compatible 属性值的示例:
- 单个字符串值:例如
"vendor,device",用于指定设备节点与特定厂商的特定设备兼容。 - 字符串列表:例如
["vendor,device1", "vendor,device2"],用于指定设备节点与多个设备兼容,通常用于设备节点具有多种变体或配置。 - 通配符匹配:例如
"vendor,*",用于指定设备节点与特定厂商的所有设备兼容,不考虑具体的设备标识。
通过使用 compatible 属性,设备树可以提供设备和驱动程序之间的匹配信息。当设备树被操作系统或设备管理软件解析时,会根据设备节点的 compatible 属性值来选择适合的驱动程序进行设备的初始化和配置。
aliases节点
aliases 节点是一个特殊的节点,用于定义设备别名。该节点位于设备树的根部,并具有节点路径/aliases
123456 | aliases { mmc0 = &sdmmc0; mmc1 = &sdmmc1; mmc2 = &sdhci; serial0 = "/simple@fe000000/seria1@11c500";}; |
在别名的定义中,& 符号用于引用设备树中的节点。别名的目的是提供可读性更高的名称,使设备树更易于理解和维护。通过使用别名,可以简化设备节点之间的关联,并减少重复输入设备节点的路径。
aliases 节点中定义的别名只在设备树内部可见,不能在设备树之外引用。 它们主要用于设备树的内部组织和引用,以提高可读性和可维护性。
chosen节点
chosen 节点是设备树中的一个特殊节点,用于传递和存储系统引导和配置的相关信息。具有路径/chosen。
chosen 节点通常包含以下子节点和属性:
- bootargs:用于存储引导内核时传递的命令行参数。它可以包含诸如内核参数、设备树参数等信息。在引导过程中,操作系统或引导加载程序可以读取该属性来获取启动参数。
- stdout-path:用于指定用于标准输出的设备路径。在引导过程中,操作系统可以使用该属性来确定将控制台输出发送到哪个设备,例如串口或显示屏。
- firmware-name:用于指定系统固件的名称。它可以用于标识所使用的引导加载程序或固件的类型和版本。
- linux,initrd-start 和 linux,initrd-end:这些属性用于指定 Linux 内核初始化 RAM 磁盘(initrd): 的起始地址和结束地址。这些信息在引导过程中被引导加载程序使用,以将 initrd 加载到内存中供内核使用。
- 其他自定义属性:chosen 节点还可以包含其他自定义属性,用于存储特定于系统引导和配置的信息。这些属性的具体含义和用法取决于设备树的使用和上下文。
示例
123 | chosen { bootargs = "root=/dev/nfs rw nfsroot=192.168.1.1 console=ttyS0,115200";}; |
通过使用 chosen 节点,系统引导过程中的相关信息可以方便地传递给操作系统或引导加载程序。这样,系统引导和配置的各个组件可以共享和访问这些信息,从而实现更灵活和可配置的系统引导流程。
device_type节点
在设备树中,device_type 节点是用于描述设备类型的节点。它通常作为设备节点的一个属性存在。
device_type 属性的值是一个字符串,用于标识设备的类型。
device_type 节点的存在有助于操作系统或其他软件识别和处理设备。它提供了设备的基本分类信息,使得驱动程序、设备树解析器或其他系统组件能够根据设备的类型执行相应的操作。
常见的设备类型包括但不限于:
- cpu:表示中央处理器。
- memory:表示内存设备。
- display:表示显示设备,如液晶显示屏。
- serial:表示串行通信设备,如串口。
- ethernet:表示以太网设备。
- usb:表示通用串行总线设备。
- i2c:表示使用 I2C (Inter-Integrated Circuit) 总线通信的设备。
- spi:表示使用 SPI (Serial Peripheral Interface) 总线通信的设备。
- gpio:表示通用输入/输出设备。
- pwm:表示脉宽调制设备。
这些只是一些常见的设备类型示例,实际上,设备类型可以根据具体的硬件和设备树的使用情况进行自定义和扩展。
自定义属性
设备树中的自定义属性是用户根据特定需求添加的属性。这些属性可以用于提供额外的信息、配置参数或元数据,以满足设备或系统的特定要求。
例如可以在设备树中自定义一个管脚标号的属性 pinnum
1234 | my_device { compatible = "my_device"; pinnum = <0 1 2 3 4>;}; |
设备树中使用的一些数据类型的定义:
- 文本字符串用双引号表示。可以使用逗号来创建字符串列表。
- 单元格是由尖括号分隔的32位无符号整数。
- 布尔数据不过是空属性。其取值是 true 或 false 取决于属性存在与否。
实例分析
实例分析:中断
arch/arm64/boot/dts/rk3568.dtsi
123456789101112131415161718192021 | pinctrl: pinctrl { compatible = "rockchip,rk3568-pinctrl"; rockchip,grf = <&grf>; rockchip,pmu = <&pmugrf>; ranges; gpio0: gpio0@fdd60000 { compatible = "rockchip,gpio-bank"; reg = <0x0 0xfdd60000 0x0 0x100>; interrupts = <GIC_SPI 33 IRQ_TYPE_LEVEL_HIGH>; clocks = <&pmucru PCLK_GPIO0>, <&pmucru DBCLK_GPIO0>; gpio-controller; interrupt-controller; };}; |
arch/arm64/boot/dts/rockchip/topeet-screen-lcds.dts
12345678910111213141516 | &i2c1 { status = "okay"; ft5x061:ft5x06@38 { status = "disabled"; compatible = "edt,edt-ft5306"; reg = <0x38>; touch-gpio = <&gpio3 RK_PA5 IRQ_TYPE_EDGE_RISING>; interrupt-parent = <&gpio3>; interrupts = <RK_PA5 IRQ_TYPE_LEVEL_LOW>; reset-gpio = <&gpio0 RK_PB6 GPIO_ACTIVE_LOW>; touchscreen-size-x = <800>; touchscreen-size-y = <1280>; };}; |
interrupts 属性
interrupts 属性用于指定设备的中断相关信息。它描述了中断控制器的类型、中断号以及中断触发类型。
12345678910111213 | gpio0: gpio0@fdd60000 { ... interrupts = <GIC_SPI 33 IRQ_TYPE_LEVEL_HIGH>; interrupt-controller; ...};ft5x061:ft5x06@38 { ... interrupt-parent = <&gpio3>; interrupts = <RK_PA5 IRQ_TYPE_LEVEL_LOW>; ... }; |
- 中断控制器类型
interrupts 属性的第一个参数指定了中断控制器的类型。
常见的类型包括 GIC (Generic Interrupt Controller)、IRQ (Basic Interrupt Handling) 等。例如,在给定的代码片段中,GIC_SPI 表示中断控制器的类型为 GIC SPI 中断。中断控制器负责管理系统中的中断信号,它可以是硬件中的专用中断控制器,也可以是处理器内部的中断控制器。
- 中断号
interrupts 属性的第二个参数指定了设备所使用的中断号。中断号是一个唯一标识符,用于区分不同的中断信号源。系统使用中断号来识别中断源并进行相应的中断处理。
中断号可以是一个整数值,也可以是一个宏定义或符号引用。在给定的代码片段中,33 表示该设备使用的中断号为 33。
- 中断触发类型
interrupts 属性的第三个参数指定了中断的触发类型,即中断信号的触发条件。常见的触发类型包括边沿触发和电平触发。电平触发表示中断信号在保持特定电平状态时触发,可以是高电平触发或低电平触发。
在给定的代码片段中,IRQ_TYPE_LEVEL_HIGH 表示中断的触发类型为高电平触发。触发类型的宏定义在内核源码include/dt-bindings/interrupt-controller/irq.h目录下
123456 |
interrupt-controller属性
interrupt-controller属性用于标识当前节点所描述的设备是一个中断控制器。
中断控制器是硬件或软件模块,负责管理和分发中断信号。它接收来自各种设备的中断请求,并根据优先级和配置规则分发中断给相应的处理器或设备。
interrupt-controller属性本身没有特定的属性值,只需出现在节点的属性列表中即可。
interrupt-parent属性
interrupt-parent属性是设备树中用于建立中断信号源与中断控制器之间关联的属性。它指定了中断信号源所属的中断控制器节点,以确保正确的中断处理和分发。
interrupt-parent属性值是一个引用,它指向中断控制器节点的路径或标签。
可以使用路径来引用中断控制器节点,如/interrupt-controller-node,或使用标签来引用中断控制器节点,如&interrupt-controller-label
123456 | ft5x061:ft5x06@38 { ... interrupt-parent = <&gpio3>; interrupts = <RK_PA5 IRQ_TYPE_LEVEL_LOW>; ...}; |
在gpio0中没有
interrupt-parent,但由于在根 DTS 有默认interrupt-parent = GIC,因此 GPIO0 不需要显式写。
#interrupt-cells属性
#interrupt-cells属性用于描述中断控制器中每个中断信号源的中断编号单元的数量。
中断编号单元是指用于表示中断号和其他相关信息的固定大小的单元。通过指定中断编号单元的数量,操作系统可以正确解析和处理中断信息,并将其与中断控制器和中断信号源进行关联。
#interrupt-cells属性的值是一个整数,表示中断编号单元的数量。通常,这个值是一个正整数,例如 1、2 或 3,取决于中断控制器和设备的要求。
123456789101112131415 | gpio0: gpio0@fdd60000 { ... interrupts = <GIC_SPI 33 IRQ_TYPE_LEVEL_HIGH>; ... interrupt-controller; ...};ft5x061:ft5x06@38 { ... interrupt-parent = <&gpio3>; interrupts = <RK_PA5 IRQ_TYPE_LEVEL_LOW>; ...}; |
在 gpio0 的中断控制器为 gic,在 gic 节点中#interrupt-cells属性被设置为 2,这也就是为什么在 gpio0 节点中 interrupts 属性有两个值;
而 ft5x061 的中断控制器为 gpio3,在 gpio3 节点中#interrupt-cells属性被设置为 2,所以 ft5x06 节点的 interrupts 属性只有两个值。
其他SOC设备树对比
NXP
123456789101112131415161718192021 | gpio1: gpio@0209c000 { compatible = "fsl,inx6ul-gpio", "fsl,imx35-gpio"; reg = <0x0209c000 0x4000>; interrupts = <GIC_SPI 66 IRQ_TYPE_LEVEL_HIGH>, <GIC_SPI 67 IRQ_TYPE_LEVEL_HIGH>; gpio-controller; interrupt-controller; edt-ft5x06@38 { compatible = "edt,edt-ft5306", "edt,edt-ft5x06", "edt,edt-ft5406"; pinctrl-names = "default"; pinctrl-0 = <&ts_int_pin &ts_reset_pin>; reg = <0x38>; interrupt-parent = <&gpio1>; interrupts = <9 0>; reset-gpios = <&gpio5 9 GPIO_ACTIVE_LOW>; irq-gpios = <&gpio1 9 GPIO_ACTIVE_LOW>; status = "disabled"; };} |
Samsung
1234567891011121314151617181920212223 | gpio_c: gpioc { compatible = "gpio-controller"; interrupt-controller; };ft5x06: ft5x06038 { compatible = "edt,edt-ft5406"; reg = <0x38>; pinctrl-names = "default"; pinctrl-0 = <&tsc2007_irq>; interrupt-parent = <&gpio_c>; interrupts = <26 IRQ_TYPE_EDGE_FALLING>; pinctrl-0 = <>911_irq>; interrupt-parent = <&gpio_b>; interrupts = <29 IRQ_TYPE_EDGE_FALLING>; reset-gpios = <&gpio_e 30 0>;} |
实例分析:时钟
时钟(Clock)用于描述硬件设备和系统中的时钟源以及时钟相关的配置和连接关系。
时钟在计算机系统中起着至关重要的作用,用于同步和定时各种硬件设备的操作。
时钟可以分为两个主要角色:时钟生产者(clock provider)和时钟消费者(clock consumer)。
时钟生产者
- 定义:时钟生产者是负责生成和提供时钟信号的硬件或软件模块。它可以是时钟控制器、PLL、时钟发生器等。
- 设备树节点:时钟生产者在设备树中以时钟节点的形式表示。
时钟生产者属性
clock-cells
该属性用于指定时钟编号的位数。它是一个整数值,表示时钟编号的位数。
通常情况下,当clock-cells为 0 时表示一个时钟,为 1 表示多个时钟。
123456789101112 | osc24m: osc24m { compatible = "clock"; clock-frequency = <24000000>; clock-output-names = "osc24m"; };// 多个时钟clock: clock { clock-output-names = "clock1", "clock2";}; |
clock-frequency
是设备树中用于指定时钟频率的属性。它用于描述时钟节点所提供的时钟信号的频率,使用 Hertz (Hz) 作为单位。
对于时钟生产者节点,clock-frequency属性表示该节点生成的时钟信号的频率。它用于描述时钟控制器、晶振、PLL 等产生时钟信号的硬件或软件模块的输出频率。
123456 | osc24m: osc24m { compatible = "clock"; clock-frequency = <24000000>; clock-output-names = "osc24m"; }; |
时钟消费者
时钟消费者是依赖时钟信号的硬件设备或模块。它们通过引用时钟生产者节点提供的时钟源来获取时钟信号。
时钟消费者属性
clock
该属性用于指定时钟消费者节点所需的时钟源。它是一个整数数组,每个元素是一个时钟编号,表示时钟消费者需要的一个时钟源。
clock-names
可选属性,用于指定时钟消费者节点所需时钟源的名称。它是一个字符串数组,与 clocks 数组一一对应,用于提供时钟源的描述性名称。
一个时钟消费者示例如下:
1234 | clock: clock { clocks = <&cru CLK_VOP>; clock-names = "clk_vop";}; |
clocks 属性指定了该节点使用的时钟源,引用了cru节点中的CLK_VOP时钟源。clock-names属性指定了时钟源的名称,这里是clk_vop。
assigned-clocks 和 assigned-clock-rates
是设备树中用于描述多路时钟的属性,通常一起使用。
assigned-clocks属性用于标识时钟消费者节点所使用的时钟源。
它是一个整数数组,每个元素对应一个时钟编号。时钟编号是指时钟生产者节点(如时钟控制器)所提供的时钟源的编号。
通过在时钟消费者节点中使用assigned-clocks属性,可以指定该节点所需的时钟源。
assigned-clock-rates属性用于指定每个时钟源的时钟频率。
它是一个整数数组,每个元素对应一个时钟源的频率。时钟频率以 Hz (赫兹) 为单位表示。
assigned-clock-rates属性的元素数量和顺序应与assigned-clocks属性中的时钟编号相对应。
12345 | cru: clock-controller@fdd20000 { assigned-clocks = <&pmucru CLK_RTC_32K>, <&cru ACLK_RKVDEC_PRE>; assigned-clock-rates = <32768>, <300000000>;}; |
clock-indices
clock-indices属性用于指定时钟消费者节点所使用的时钟源的索引值。
它是一个整数数组,每个元素对应一个时钟源的索引。
时钟索引是指时钟生产者节点(如时钟控制器)所提供的时钟源的编号。通过在时钟消费者节点中使用clock-indices属性,可以明确指定该节点所需的时钟源,并按照特定的顺序进行匹配。
1234567891011 | scpi_dvfs: clocks-0 { clock-indices = <0>, <1>, <2>; clock-output-names = "atlclk", "aplclk", "gpuclk";};scpi_clk: clocks-1 { clock-indices = <3>; clock-output-names = "pxlclk";}; |
在第一个节点中atlclk,aplclk,gpuclk三个时钟源的索引就分别被设置为了 0、1、2,在第二个节点中pxlclk时钟源的索引值被设置为了 3.
assigned-clock-parents
用于指定时钟消费者节点所使用的时钟源的父时钟源。
它是一个时钟源引用的数组,每个元素对应一个父时钟源的引用。
在时钟的层次结构中,某些时钟源可能是其他时钟源的父时钟源,即它们提供时钟信号给其他时钟源作为输入。
通过在时钟消费者节点中使用assigned-clock-parents属性,可以明确指定该节点所需的父时钟源,并按照特定的顺序进行匹配
12345 | clock: clock { assigned-clocks = <&clkcon 0>, <&pll 2>; assigned-clock-parents = <&pll 2>; assigned-clock-rates = <115200>, <9600>;}; |
assigned-clocks属性指定了该节点使用的时钟源,引用了两个时钟源节点:clkcon 0和pll 2。
assigned-clock-parents属性指定了这些时钟源的父时钟源,引用了pll 2时钟源节点。
assigned-clock-rates属性指定了每个时钟源的时钟频率,分别是 115200 和 9600。
实例分析:CPU
设备树的 cpus 节点是用于描述系统中的处理器的一个重要节点。它是处理器拓扑结构的顶层节点,包含了所有处理器相关的信息。
节点结构:
cpus 节点是一个容器节点,其下包含了系统中每个处理器的子节点。
每个子节点的名称通常为cpu@X,其中 X 是处理器的索引号。每个子节点都包含了与处理器相关的属性,例如时钟频率、缓存大小等。
处理器属性:
cpu@X子节点中的属性可以包括以下信息:
device_type:指示设备类型为处理器(如 “cpu”)。reg:指定处理器的地址范围,通常是物理地址或寄存器地址。compatible:指定处理器的兼容性信息,用于匹配相应的设备驱动程序。clock-frequency:指定处理器的时钟频率。cache-size:指定处理器的缓存大小。
处理器拓扑关系
除了处理器的基本属性,cpus 节点还可以包含其他用于描述处理器拓扑关系的节点,以提供更详细的处理器拓扑信息。这些节点可以帮助操作系统和软件了解处理器之间的连接关系、组织结构和特性。
cpu-map:描述处理器的映射关系,通常在多核处理器系统中使用。socket:描述多处理器系统中的物理插槽或芯片组。cluster:描述处理器集群,即将多个处理器组织在一起形成的逻辑组。core:描述处理器核心,即一个物理处理器内的独立执行单元。thread:描述处理器线程,即一个物理处理器核心内的线程。(启用了超线程才会有多个,否则一个core只有一个thread)
这些节点的嵌套关系可以在 cpus 节点下形成一个层次结构,反映了处理器的拓扑结构。
单核CPU:
123456789 | cpus { cpu0: cpu@0 { compatible = "arm,cortex-a7"; device_type = "cpu"; // 其他属性... };} |
多核CPU:
1234567891011121314151617181920212223 | cpus { cpu0: cpu@0 { device_type = "cpu"; compatible = "arm,cortex-a9"; }; cpu1: cpu@1 { device_type = "cpu"; compatible = "arm,cortex-a9"; }; cpu2: cpu@2 { device_type = "cpu"; compatible = "arm,cortex-a9"; }; cpu3: cpu@3 { device_type = "cpu"; compatible = "arm,cortex-a9"; };} |
cpus 节点是一个容器节点,包含了 cpu0 子节点。该节点使用了#address-cells和#size-cells属性来指定地址和大小的单元数量。
cpu-map、socket、cluster 节点
cpu-map节点是设备树中用于描述大小核架构处理器的映射关系的节点之一。- 它的父节点必须是
cpus节点,而子节点可以是一个或多个cluster和socket节点。 - 通过
cpu-map节点,可以定义不同核心和集群之间的连接和组织结构。
- 它的父节点必须是
socket节点用于描述处理器插槽(socket)之间的映射关系。- 每个
socket子节点表示一个处理器插槽,可以使用cpu-map-mask属性来指定该插槽使用的核心。 - 通过为每个
socket子节点指定适当的cpu-map-mask,可以定义不同插槽中使用的核心。这样,操作系统和软件可以了解到不同插槽之间的核心分配情况。
- 每个
cluster节点用于描述核心(cluster)之间的映射关系。- 每个
cluster子节点表示一个核心集群,可以使用cpu-map-mask属性来指定该集群使用的核心。 - 通过为每个
cluster子节点指定适当的cpu-map-mask,可以定义每个集群中使用的核心。这样,操作系统和软件可以了解到不同集群之间的核心分配情况
- 每个
一个大小核架构的具体示例
12345678910111213141516171819202122232425262728293031323334353637383940414243444546474849505152535455565758596061 | cpus { cpu-map { cluster0 { core0 { cpu = <&cpu_l0>; }; core1 { cpu = <&cpu_l1>; }; core2 { cpu = <&cpu_l2>; }; core3 { cpu = <&cpu_l3>; }; }; cluster1 { core0 { cpu = <&cpu_b0>; }; core1 { cpu = <&cpu_b1>; }; }; }; cpu_l0: cpu@0 { device_type = "cpu"; compatible = "arm,cortex-a53", "arm,armv8"; }; cpu_l1: cpu@1 { device_type = "cpu"; compatible = "arm,cortex-a53", "arm,armv8"; }; cpu_l2: cpu@2 { device_type = "cpu"; compatible = "arm,cortex-a53", "arm,armv8"; }; cpu_l3: cpu@3 { device_type = "cpu"; compatible = "arm,cortex-a53", "arm,armv8"; }; cpu_b0: cpu@100 { device_type = "cpu"; compatible = "arm,cortex-a72", "arm,armv8"; }; cpu_b1: cpu@101 { device_type = "cpu"; compatible = "arm,cortex-a72", "arm,armv8"; };}; |
这个设备树描述了一个具有多个 CPU 核心的系统,包括四个 Cortex-A53 核心和两个Cortex-A72 核心。
core、thread 节点
core和thread节点通常用于描述处理器核心和线程的配置。
core节点用于描述处理器的核心。一个处理器通常由多个核心组成,每个核心可以独立执行指令和任务。
thread节点用于描述处理器的线程。线程是在处理器核心上执行的基本执行单元,每个核心可以支持多个线程。(除非启动了超线程,否则一个core只有一个thread)
1234567891011121314151617181920212223242526272829303132333435363738394041424344454647484950515253545556575859606162636465666768697071727374757677787980818283 | cpus { cpu-map { socket0 { cluster0 { core0 { thread0 { cpu = <&CPU0>; }; thread1 { cpu = <&CPU1>; }; }; core1 { thread0 { cpu = <&CPU2>; }; thread1 { cpu = <&CPU3>; }; }; }; cluster1 { core0 { thread0 { cpu = <&CPU4>; }; thread1 { cpu = <&CPU5>; }; }; core1 { thread0 { cpu = <&CPU6>; }; thread1 { cpu = <&CPU7>; }; }; }; }; socket1 { cluster0 { core0 { thread0 { cpu = <&CPU8>; }; thread1 { cpu = <&CPU9>; }; }; core1 { thread0 { cpu = <&CPU10>; }; thread1 { cpu = <&CPU11>; }; }; }; cluster1 { core0 { thread0 { cpu = <&CPU12>; }; thread1 { cpu = <&CPU13>; }; }; core1 { thread0 { cpu = <&CPU14>; }; thread1 { cpu = <&CPU15>; }; }; }; }; };}; |
实例分析:GPIO
123456789101112131415161718192021222324 | gpio0: gpio@fdd60000 { compatible = "rockchip,gpio-bank"; reg = <0x0 0xfdd60000 0x0 0x100>; interrupts = <GIC_SPI 33 IRQ_TYPE_LEVEL_HIGH>; clocks = <&pmucru PCLK_GPI00>, <&pmucru DBCLK_GPI00>; gpio-controller; gpio-ranges = <&pinctrl 0 0 32>; interrupt-controller; };ft5x06: ft5x06@38 { status = "disabled"; compatible = "edt,edt-ft5306"; reg = <0x38>; touch-gpio = <&gpio0 RK_PB5 IRQ_TYPE_EDGE_RISING>; interrupt-parent = <&gpio0>; interrupts = <RK_PB5 IRQ_TYPE_LEVEL_LOW>; reset-gpios = <&gpio0 RK_PB6 GPIO_ACTIVE_LOW>; touchscreen-size-x = <800>; touchscreen-size-y = <1280>; touch_type = <1>;}; |
gpio-controller属性
gpio-controller属性用于标识一个设备节点作为 GPIO 控制器。
GPIO 控制器是负责管理和控制 GPIO 引脚的硬件模块或驱动程序。
gpio-controller属性通常作为设备节点的一个属性出现,位于设备节点的属性列表中。
当一个设备节点被标识为 GPIO 控制器时,它通常会定义一组 GPIO 引脚,并提供相关的GPIO 控制和配置功能。其他设备节点可以使用该 GPIO 控制器来控制和管理其 GPIO 引脚。
#gpio-cells属性
#gpio-cells属性用于指定 GPIO 引脚描述符的编码方式。GPIO 引脚描述符是用于标识和配置 GPIO 引脚的一组值,例如引脚编号、引脚属性等。
#gpio-cells属性的属性值是一个整数,表示用于编码GPIO 引脚描述符的单元数。通常这个值为 2。
12345 | ft5x06: ft5x06@38 { ..... reset-gpios = <&gpio0 RK_PB6 GPIO_ACTIVE_LOW>; .....}; |
gpio-ranges属性
背景
每个 GPIO 控制器内部都会给自己的每个引脚一个 本地编号(local number),比如 GPIO 控制器内部编号: 0, 1, 2, 3, … 31
但是在整个系统或者在其他硬件模块中,这些 GPIO 可能有自己的 全局编号(global number) 外部编号: 100, 101, 102, 103, … 131
也就是说,控制器内部编号和外部编号可能不一致。
为了方便其他设备使用 GPIO,需要有一张映射表,把控制器的内部编号映射到系统外部编号,这就是
gpio-ranges的作用。
gpio-ranges属性是设备树中一个用于描述 GPIO 范围映射的属性。它通常用于描述具有大量 GPIO 引脚的 GPIO 控制器,以简化 GPIO 引脚的编码和访问。gpio-ranges属性是一个包含一系列整数值的列表,每个整数值对应于设备树中的一个 GPIO控制器。列表中的每个整数值按照特定的顺序提供以下信息:
- 外部引脚编号的起始值
- GPIO 控制器内部本地编号的起始值
- 引脚范围的大小(引脚数量)
举例:
12345 | ft5x06: ft5x06@38 { ..... reset-gpios = <&gpio0 RK_PB6 GPIO_ACTIVE_LOW>; .....}; |
<&pinctrl>表示引用了名为 pinctrl 的引脚控制器节点0 0 32表示- 外部引脚从 0 开始
- 控制器本地编号从 0 开始
- 共映射了 32 个引脚。
gpio描述属性与gpio-cells
12345 | ft5x06: ft5x06@38 { ..... reset-gpios = <&gpio0 RK_PB6 GPIO_ACTIVE_LOW>; .....}; |
gpio 引脚描述属性个数由#gpio-cells所决定,因为 gpio0 节点中的#gpio-cells属性设置为了2,所以上面设备树 gpio 引脚描述属性个数也为 2。
其中RK_PB6定义在内核源码目录下的include/dt-bindings/pinctrl/rockchip.h头文件中,定义了 RK 引脚名和 gpio 编号的宏定义。
123456789101112131415161718 |
GPIO_ACTIVE_LOW定义在源码目录下的include/dt-bindings/gpio/gpio.h中,表示设置为低电平,同理GPIO_ACTIVE_HIGH就表示将这个 GPIO 设置为高电平,但这里只是对设备的描述,具体的设置还是要跟驱动相匹配。
其他属性
123456789101112131415 | gpio-controller@00000000 { compatible = "foo"; reg = <0x00000000 0x1000>; gpio-controller; ngpios = <18>; gpio-reserved-ranges = <0 4>, <12 2>; gpio-line-names = "MMC-CD", "MMC-WP", "voD eth", "RST eth", "LED R", "LED G", "LED B", "col A", "col B", "col C", "col D", "NMI button", "Row A", "Row B", "Row C", "Row D", "poweroff", "reset";} |
- ngpios 属性
指定了 GPIO 控制器所支持的 GPIO 引脚数量。它表示该设备上可用的 GPIO 引脚的总数。
在这个例子中,ngpios的值为 18,意味着该 GPIO 控制器支持 18个 GPIO 引脚
- gpio-reserved-ranges 属性
定义了保留的 GPIO 范围。每个范围由两个整数值表示,用尖括号括起来。
保留的 GPIO 范围意味着这些 GPIO 引脚不可用或已被其他设备或功能保留。
在这个例子中,有两个保留范围:<0 4>和<12 2>。<0 4>表示从第 0 个引脚开始的连续 4 个引脚被保留,而<12 2>表示从第 12 个引脚开始的连续 2 个引脚被保留。
- gpio-line-names 属性
定义了 GPIO 引脚的名称,以逗号分隔。每个名称对应一个GPIO 引脚。这些名称用于标识和识别每个 GPIO 引脚的作用或连接的设备。
在这个例子中,gpio-line-names属性列出了多个 GPIO 引脚的名称,如 “MMC-CD”、“MMC-WP”、“voD eth” 等等。通过这些名称,可以清楚地了解每个 GPIO 引脚的功能或用途。
示例

从上面的原理图可以得到 LED 灯的引脚网络标号为Working_LEDEN_H_GPIO0_B7,对应的引脚为GPIO0_B7。
然后来查看内核源码目录下的drivers/leds/leds-gpio.c文件,这是 led 的驱动文件,然后找到 compatible 匹配值相关的部分,如下所示:
1234 | static const struct of_device_id of_gpio_leds_match[] = { { .compatible = "gpio-leds", }, {},}; |
可以看到 compatible 匹配值为 gpio-leds。
最后在内核源码目录下的include/dt-bindings/pinctrl/rockchip.h头文件中,定义了 RK 引脚名和 gpio 编号的宏定义,如下所示:
123456789101112131415161718192021222324252627282930313233343536373839404142434445464748 | /* SPDX-License-Identifier: GPL-2.0-or-later *//* * Header providing constants for Rockchip pinctrl bindings. * * Copyright (c) 2013 MundoReader S.L. * Author: Heiko Stuebner <heiko@sntech.de> */ |
include/dt-bindings/gpio/gpio.h文件中定义了引脚极性设置宏定义
123456789101112131415161718192021222324252627282930313233343536373839404142 | /* SPDX-License-Identifier: GPL-2.0 *//* * This header provides constants for most GPIO bindings. * * Most GPIO bindings include a flags cell as part of the GPIO specifier. * In most cases, the format of the flags cell uses the standard values * defined in this header. *//* Bit 0 express polarity *//* Bit 1 express single-endedness *//* Bit 2 express Open drain or open source *//* * Open Drain/Collector is the combination of single-ended open drain interface. * Open Source/Emitter is the combination of single-ended open source interface. *//* Bit 3 express GPIO suspend/resume and reset persistence *//* Bit 4 express pull up *//* Bit 5 express pull down */ |
因此设备树如下:
12345678910111213 | /dts-v1/;/{ model = "This is my devicetree!"; led: led@1 { compatible = "gpio-leds"; gpios = <&gpio0 RK_PB7 GPIO_ACTIVE_HIGH>; };}; |
&gpio0是引脚控制器的引用,RK_PB7是引脚的编号或标识,GPIO_ACTIVE_HIGH表示该 GPIO 引脚的活动电平是高电平
其他SOC对比
NXP
123456789101112131415161718192021 | gpio1: gpio@0209c000 { compatible = "fsl,inx6ul-gpio", "fsl,imx35-gpio"; reg = <0x0209c000 0x4000>; interrupts = <GIC_SPI 66 IRQ_TYPE_LEVEL_HIGH>, <GIC_SPI 67 IRQ_TYPE_LEVEL_HIGH>; gpio-controller; interrupt-controller; edt-ft5x06@38 { compatible = "edt,edt-ft5306", "edt,edt-ft5x06", "edt,edt-ft5406"; pinctrl-names = "default"; pinctrl-0 = <&ts_int_pin &ts_reset_pin>; reg = <0x38>; interrupt-parent = <&gpio1>; interrupts = <9 0>; reset-gpios = <&gpio5 9 GPIO_ACTIVE_LOW>; irq-gpios = <&gpio1 9 GPIO_ACTIVE_LOW>; status = "disabled"; };}; |
samsung
1234567891011121314151617181920212223 | gpio_c: gpioc { compatible = "gpio-controller"; interrupt-controller; };ft5x06: ft5x06038 { compatible = "edt,edt-ft5406"; reg = <0x38>; pinctrl-names = "default"; pinctrl-0 = <&tsc2007_irq>; interrupt-parent = <&gpio_c>; interrupts = <26 IRQ_TYPE_EDGE_FALLING>; pinctrl-0 = <>911_irq>; interrupt-parent = <&gpio_b>; interrupts = <29 IRQ_TYPE_EDGE_FALLING>; reset-gpios = <&gpio_e 30 0>;}; |
实例分析:pinctrl
pinmux介绍
Pinmux(引脚复用)是指在系统中配置和管理引脚功能的过程。在许多现代集成电路中,单个引脚可以具有多个功能,例如作为 GPIO、UART、SPI 或 I2C 等。通过使用引脚复用功能,可以在这些不同的功能之间切换。
引脚复用通过硬件和软件的方式实现。
- 硬件层面
芯片设计会为每个引脚提供多个功能的选择。这些功能通常由芯片厂商在芯片规格文档中定义。通过编程设置寄存器或开关,可以选择某个功能来连接引脚。这种硬件层面的配置通常是由 引脚控制器(Pin Controller) 或 引脚复用控制器(Pin Mux Controller) 负责管理。

- 软件层面
操作系统或设备驱动程序需要了解和配置引脚的功能。它们使用设备树(DeviceTree)或设备树绑定(Device Tree Bindings)来描述和配置引脚的功能。在设备树中,可以指定引脚的复用功能,将其连接到特定的硬件接口或功能。操作系统或设备驱动程序在启动过程中解析设备树,并根据配置对引脚进行初始化和设置。
从上图可以看到UART4_RX_M1对应的引脚可以复用为以下 6 个功能LCDC_D16、VOP_BT1120_D7、GMAC1_RXD0_M0、UART4_RX_M1、PWM8_M0、GPIO3_B1_d,对应的 BGA引脚标号为 AG1
在 BGA(Ball Grid Array,球栅阵列)封装中,引脚标号是用于唯一标识每个引脚的标识符。这些标号通常由芯片制造商定义,并在芯片的规格文档或数据手册中提供。
BGA 芯片的引脚标号通常由字母和数字的组合构成。它们用于在芯片的封装底部的焊盘上进行标记。每个引脚标号都与芯片内部的功能或信号相对应,以便正确连接到印刷电路板(PCB)上的目标位置。RK3568 的引脚标号图如下所示:

可以看到纵向为 A-AH 的 28 个字母类型标号,横向为 1-28 的 28 个字母类型标号,瑞芯微也在对应的 3568 数据手册中加入了根据 BGA 位置制作的复用功能图,部分内容如下图。

其中黑色框代表被保留的引脚,其他有颜色的框一般为电源和地,白色的框代表有具体复用功能的引脚。
使用 pinctrl 设置复用关系
pinctrl(引脚控制)用于描述和配置硬件设备上的引脚功能和连接方式。它是设备树的一部分,用于在启动过程中传递引脚配置信息给操作系统和设备驱动程序,以便正确地初始化和控制引脚。
在设备树中,pinctrl(引脚控制)使用了客户端Client和服务端Server的概念来描述引脚控制的关系和配置。
Client
1234 | node { pinctrl-names = "default"; pinctrl-0 = <&pinctrl_hog_1>;} |
在上例中,pinctrl-names属性定义了一个状态名称:default。
pinctrl-0属性指定了第一个状态 default 对应的引脚配置。
<&pinctrl_hog_1>是一个引脚描述符,它引用了一个名为pinctrl_hog_1的引脚控制器节点。这表示在 default 状态下,设备的引脚配置将使用pinctrl_hog_1节点中定义的配置。
12345 | node { pinctrl-names = "default", "wake up"; pinctrl-0 = <&pinctrl_hog_1>; pinctrl-1 = <&pinctrl_hog_2>;} |
在例子中,pinctrl-names属性定义了两个状态名称:default 和 wake up。
pinctrl-0属性指定了第一个状态 default 对应的引脚配置,引用了pinctrl_hog_1节点。
pinctrl-1属性指定了第二个状态 wake up 对应的引脚配置,引用了pinctrl_hog_2节点。
这意味着设备可以处于两个不同的状态之一,每个状态分别使用不同的引脚配置
1234 | node { pinctrl-names = "default"; pinctrl-0 = <&pinctrl_hog_1 &pinctrl_hog_2>;} |
在这个例子中,pinctrl-names属性仍然定义了一个状态名称:default。
pinctrl-0属性指定了第一个状态 default 对应的引脚配置,但与之前的例子不同的是,它引用了两个引脚描述符:pinctrl_hog_1和pinctrl_hog_2。
这表示在 default 状态下,设备的引脚配置将使用pinctrl_hog_1和pinctrl_hog_2两个节点中定义的配置。
这种方式可以 将多个引脚控制器的配置组合在一起 ,以满足特定状态下的引脚需求。
Server
服务端是设备树中定义引脚配置的部分。它包含引脚组和引脚描述符,为客户端提供引脚配置选择。
服务端在设备树中定义了 pinctrl 节点,其中包含引脚组和引脚描述符的定义。
这里以瑞芯微的 RK3568 为例进行 pinctrl 服务端的讲解,瑞芯微原厂 BSP 工程师为了方便用户通过 pinctrl 设置管脚的复用关系,将包含所有复用关系的配置写在了内核目录下的arch/arm64/boot/dts/rockchip/rk3568-pinctrl.dtsi设备树中:
123456789101112131415161718192021222324252627282930313233 | // SPDX-License-Identifier: (GPL-2.0+ OR MIT)/* * Copyright (c) 2020 Rockchip Electronics Co., Ltd. *//* * This file is auto generated by pin2dts tool, please keep these code * by adding changes at end of this file. */&pinctrl { acodec { /omit-if-no-ref/ acodec_pins: acodec-pins { rockchip,pins = /* acodec_adc_sync */ <1 RK_PB1 5 &pcfg_pull_none>, /* acodec_adcclk */ <1 RK_PA1 5 &pcfg_pull_none>, /* acodec_adcdata */ <1 RK_PA0 5 &pcfg_pull_none>, /* acodec_dac_datal */ <1 RK_PA7 5 &pcfg_pull_none>, /* acodec_dac_datar */ <1 RK_PB0 5 &pcfg_pull_none>, /* acodec_dacclk */ <1 RK_PA3 5 &pcfg_pull_none>, /* acodec_dacsync */ <1 RK_PA5 5 &pcfg_pull_none>; }; }; |
在 pinctrl 节点中就是每个节点的复用功能,然后我们以 uart4 的引脚复用为例
12345678910111213141516171819202122232425262728293031323334 | uart4 { /omit-if-no-ref/ uart4m0_xfer: uart4m0-xfer { rockchip,pins = /* uart4_rxm0 */ <1 RK_PA4 2 &pcfg_pull_up>, /* uart4_txm0 */ <1 RK_PA6 2 &pcfg_pull_up>; }; /omit-if-no-ref/ uart4m0_ctsn: uart4m0-ctsn { rockchip,pins = /* uart4m0_ctsn */ <1 RK_PA7 2 &pcfg_pull_none>; }; /omit-if-no-ref/ uart4m0_rtsn: uart4m0-rtsn { rockchip,pins = /* uart4m0_rtsn */ <1 RK_PA5 2 &pcfg_pull_none>; }; /omit-if-no-ref/ uart4m1_xfer: uart4m1-xfer { rockchip,pins = /* uart4_rxm1 */ <3 RK_PB1 4 &pcfg_pull_up>, /* uart4_txm1 */ <3 RK_PB2 4 &pcfg_pull_up>; }; }; |
其中<3 RK_PB1 4 &pcfg_pull_up>和<3 RK_PB2 4 &pcfg_pull_up>分别表示将 GPIO3 的 PB1 引脚设置为功能 4,将 GPIO3 的 PB2 也设置为功能 4,且电器属性都会设置为上拉。通过查找原理图可以得到两个引脚在 BGA 封装位置分别为 AG1 和 AF2

可以看到功能 4 对应串口 4 的发送端和接收端,pinctrl 服务端的配置和数据手册中的引脚复用功能是一一对应的。
那如果要将RK_PB1和RK_PB2设置为 GPIO 功能要如何设置呢,从上图可以看到 GPIO 对应功能 0,所以可以通过以下 pinctrl 内容将设置RK_PB1和RK_PB2设置为 GPIO 功能(事实上如果不对该管脚进行功能复用该引脚默认就会设置为 GPIO 功能):
<3 RK_PB1 0 &pcfg_pull_up><3 RK_PB2 0 &pcfg_pull_up>
最后来看客户端对 uart4 服务端的引用,具体内容在内核源码目录arch/arm64/boot/dts/rockchip/topeet-rk3568-linux.dts
12345 | &uart4{ status = "okay"; pinctrl-names = "default"; pinctrl-0 = <&uart4m1_xfer>;} |
通过在客户端中引用服务端的引脚描述符,设备树可以将客户端和服务端的引脚配置关联起来。
pinctrl实例编写
sdk 源码目录下的device/rockchip/rk356x/BoardConfig-rk3568-evb1-ddr4-v10.mk默认配置文件可以了解到编译的设备树为rk3568-evb1-ddr4-v10-linux.dts,设备树之间包含关系列表如下所示:

上述设备树是4.x版本的内核
Led 在设备树中已经被正常配置了:
arch/arm64/boot/dts/rockchip/topeet-rk3568-linux.dts
12345678910111213141516171819 | //LED leds { compatible = "pwm-leds"; work { pwms = <&pwm0 0 500000 0>; linux,default-trigger = "heartbeat"; default-state = "on"; }; }; leds { compatible = "gpio-leds"; work { gpios = <&gpio0 RK_PB7 GPIO_ACTIVE_HIGH>; linux,default-trigger = "heartbeat"; default-state = "on"; }; }; |
这里并没有配置 pinctrl ,那为什么 led 最后能正常使用呢,上面我们已经提到了,在rk3568中,当GPIO0_B7引脚没有被复用为任何功能时,默认就是 GPIO 功能,所以即使这里没有 pinctrl led 功能也可以正常使用。
我们可以编写自己的led节点:
123456 | my_led: led { compatible = "topeet,led"; gpios = <&gpio0 RK_PB7 GPIO_ACTIVE_HIGH>; pinctrl-names = "default"; pinctrl-0 = <&rk_led_gpio>;} |
服务端
12345 | rk_led{ rk_led_gpio:rk-led-gpio { rockchip,pins = <0 RK_PB7 RK_FUNC_GPIO &pcfg_pull_none>; };}; |
dtb文件格式解析
设备树 Blob (DTB) 格式是设备树数据的平面二进制编码。它用于在软件程序之间交换设备树数据。例如,在启动操作系统时,固件会将 DTB 传递给操作系统内核。
DTB 格式在单个、线性、无指针数据结构中对设备树数据进行编码。
它由一个小头部和三个可变大小的部分组成:内存保留块、结构块和字符串块。这些应该以该顺序出现在展平的设备树中。因此,设备树结构作为一个整体,当加载到内存地址时,将类似于下图

以下面这个设备树文件为例
1234567891011121314151617181920212223242526272829303132333435363738394041 | /dts-v1/;/ { model = "This is my devicetree!"; chosen { bootargs = "root=/dev/nfs rw nfsroot=192.168.1.1 console=ttyS0,115200"; }; cpu1: cpu@1 { device_type = "cpu"; compatible = "arm,cortex-a35", "arm,armv8"; reg = <0x0 0x1>; }; aliases { led1 = "/gpio@22020101"; }; node1 { gpio@22020102 { reg = <0x20220102 0x40>; }; }; node2 { node1-child { pinnum = <01234>; }; }; gpio@22020101 { compatible = "led"; reg = <0x20220101 0x40>; status = "okay"; };}; |
编译为dtb后用Binary Viewer打开:
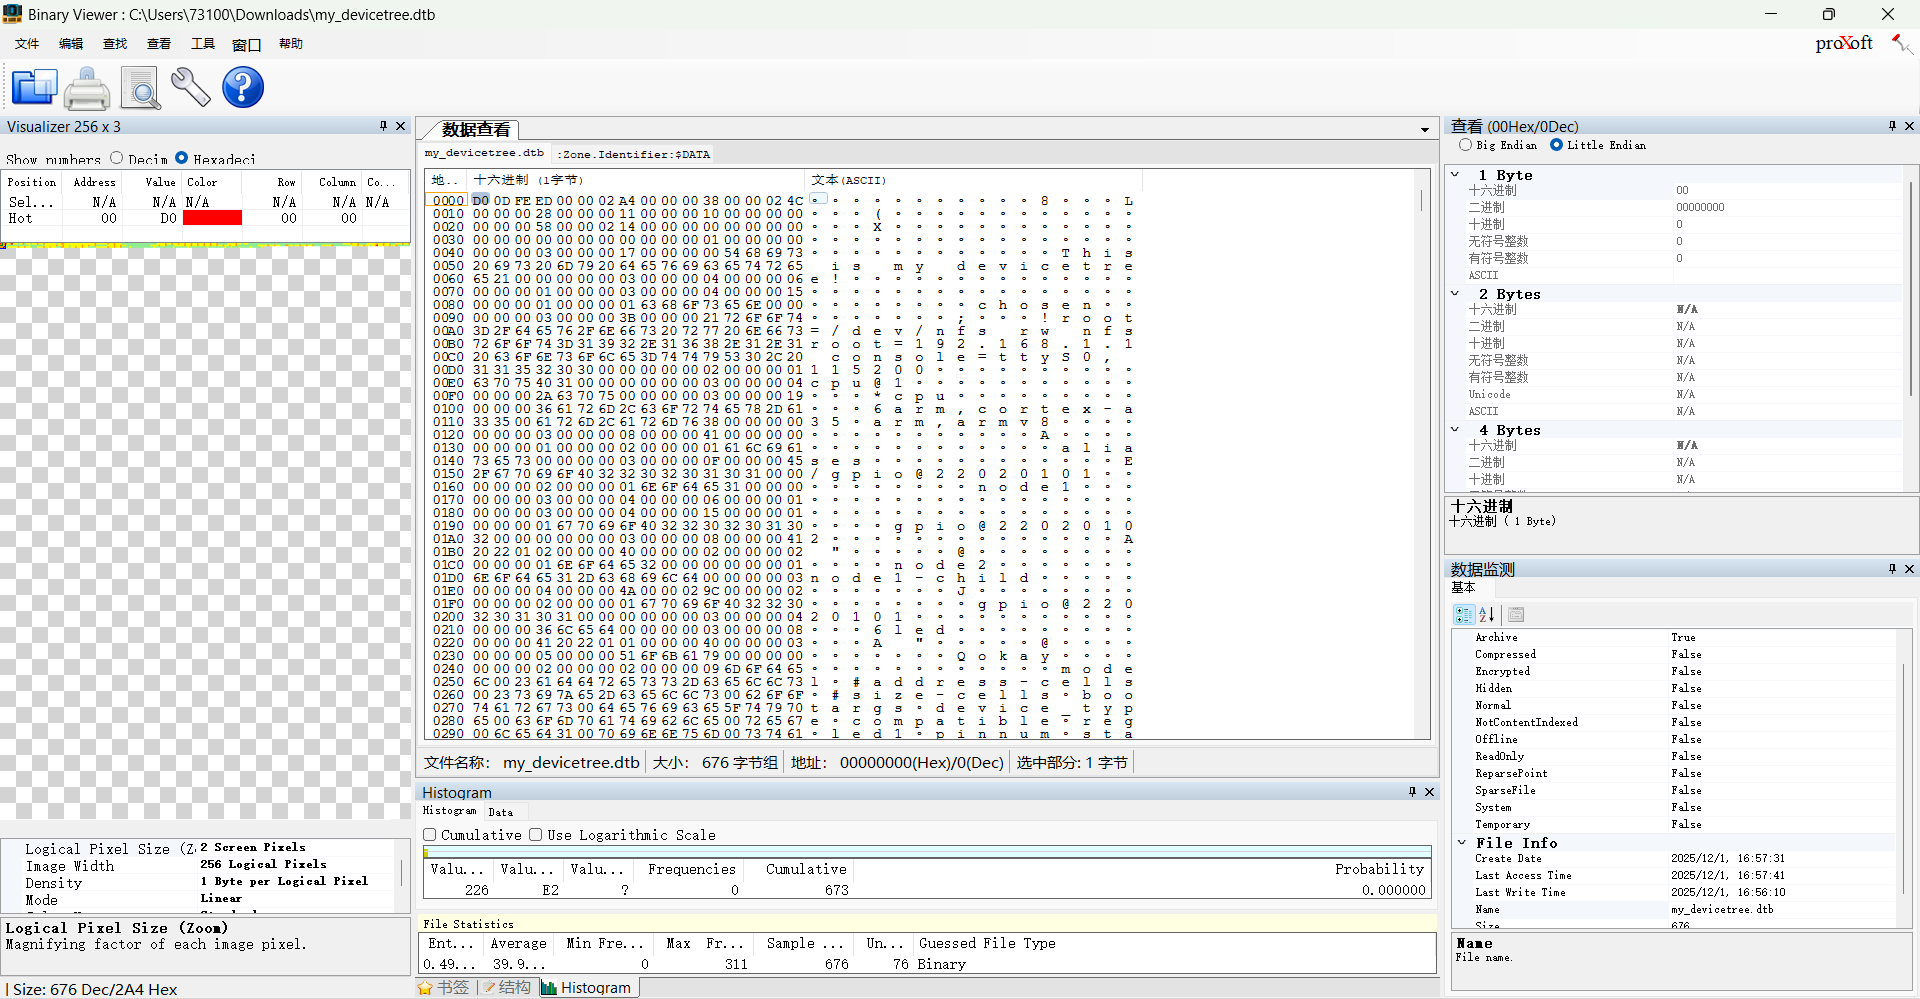
Header
123456789101112131415161718192021 | struct fdt_header { uint32_t magic; // 设备树头部的魔数 uint32_t totalsize; // 设备树文件的总大小 uint32_t off_dt_struct; // 设备树结构体(节点数据)相对于文件开头的偏移量 uint32_t off_dt_strings; // 设备树字符串表相对于文件开头的偏移量 uint32_t off_mem_rsvmap; // 内存保留映射表相对于文件开头的偏移量 uint32_t version; // 设备树版本号 uint32_t last_comp_version; // 最后一个兼容版本号 uint32_t boot_cpuid_phys; // 启动 CPU 的物理 ID uint32_t size_dt_strings; // 设备树字符串表的大小 uint32_t size_dt_struct; // 设备树结构体(节点数据)的大小}; |
| 核心作用分类 | 字段 | 关键说明 |
|---|---|---|
| 文件标识 | magic | DTB 的固定魔数(0xd00dfeed,大端),用于验证文件合法性 |
| 尺寸与偏移定位 | totalsize | DTB 整体大小(含所有块及间隙),确定文件读取范围 |
off_dt_struct | 结构块(存储硬件节点 / 属性)的偏移量,是解析硬件描述的核心入口 | |
off_dt_strings | 字符串块(存储属性名称)的偏移量,配合结构块中的索引获取属性名 | |
off_mem_rsvmap | 内存保留块(标记不可分配内存区域)的偏移量,避免内核内存冲突 | |
size_dt_strings | 字符串块长度,用于读取完整的属性名称集合 | |
size_dt_struct | 结构块长度,用于读取完整的硬件描述数据 | |
| 版本兼容性 | version | 当前 DTB 遵循的格式版本,决定解析逻辑 |
last_comp_version | 向下兼容的最低版本,保障不同版本内核的兼容性 | |
| 硬件关联 | boot_cpuid_phys | 启动 CPU 的物理 ID,与设备树中 CPU 节点的reg属性对应,用于多核系统的核识别 |
内存保留块
内存保留块(Memory Reserved Block)是用于客户端程序的保护和保留物理内存区域的列表。
这些保留区域 不应被用于一般的内存分配,而是用于保护重要数据结构,以防止客户端程序覆盖这些数据 。
- 保留区域列表: 内存保留块是一个由一组 64 位大端整数对构成的列表。每对整数对应一个保留内存区域,其中包含物理地址和区域的大小(以字节为单位)。这些保留区域应该彼此不重叠。
内存保留块中的每个保留区域由一个 64 位大端整数对表示。每对由以下 C 结构表示
1234 | struct fdt_reserve_entry { uint64_t address; uint64_t size;}; |
其中的第一个整数表示保留区域的物理地址,第二个整数表示保留区域的大小(以字节为单位)。每个整数都以 64 位的形式表示,即使在 32 位架构上也是如此。在 32 位 CPU 上,整数的高 32 位将被忽略。
- 保留区域的用途: 客户端程序不应访问内存保留块中的保留区域,除非引导程序提供的其他信息明确指示可以访问。引导程序可以使用特定的方式来指示客户端程序可以访问保留内存的部分内容。引导程序可能会在文档、可选的扩展或特定于平台的文档中说明保留内存的特定用途。
内存保留块为设备树提供了保护和保留物理内存区域的功能。它确保了特定的内存区域在客户端程序运行时不被修改或使用。这样可以确保引导程序和其他关键组件在需要的情况下能够访问保留内存的特定部分,并保护关键数据结构免受意外修改。
结构块
结构块是设备树中描述设备树本身结构和内容的部分。它由一系列带有数据的令牌序列组成,这些令牌按照线性树结构进行组织。
令牌类型
结构块中的令牌分为五种类型,每种类型用于不同的目的。
FDT_BEGIN_NODE (0x00000001)
FDT_BEGIN_NODE标记 表示一个节点的开始 。它后面跟着节点的单元名称作为额外数据。节点名称以以空字符结尾的字符串形式存储,并且可以包括单元地址。节点名称后可能需要填充零字节以对齐,然后是下一个标记,可以是除了FDT_END之外的任何标记。
FDT_END_NODE (0x00000002)
FDT_END_NODE标记 表示一个节点的结束 。该标记没有额外的数据,紧随其后的是下一个标记,可以是除了FDT_PROP之外的任何标记。
FDT_PROP (0x00000003)
FDT_PROP标记 表示设备树中属性的开始 。它后面跟着描述属性的额外数据,该数据首先由属性的长度和名称组成,表示为以下 C 结构
1234 | struct { uint32_t len; uint32_t nameoff;} |
长度表示属性值的字节长度,名称偏移量指向字符串块中存储属性名称的位置。在这个结构之后,属性的值作为字节字符串给出。属性值后可能需要填充零字节以对齐,然后是下一个令牌,可以是除了FDT_END之外的任何标记。
FDT_NOP (0x00000004)
FDT_NOP令牌可以被解析设备树的程序忽略。该令牌没有额外的数据,紧随其后的是下一个令牌,可以是任何有效的令牌。使用FDT_NOP令牌可以覆盖树中的属性或节点定义,从而将其从树中删除,而无需移动设备树 blob 中的其他部分。
树状结构
设备树的结构以线性树的形式表示。每个节点由FDT_BEGIN_NODE标记开始,由FDT_END_NODE标记结束。
节点的属性和子节点在FDT_END_NODE之前表示,因此 子节点的FDT_BEGIN_NODE和FDT_END_NODE令牌嵌套在父节点的令牌中 。
结构块的结束
结构块以单个FDT_END标记结束。该标记没有额外的数据,它位于结构块的末尾,并且是结构块中的最后一个标记。FDT_END标记之后的字节应位于结构块的开头偏移处,该偏移等于设备树 blob 标头中的size_dt_struct字段的值。
字符串块
字符串块用于存储设备树中使用的所有属性名称。它由一系列以空字符结尾的字符串组成,这些字符串在字符串块中简单地连接在一起。
- 字符串连接
字符串块中的字符串以空字符(\0)作为终止符来连接。这意味着每个字符串都以空字符结尾,并且下一个字符串紧跟在上一个字符串的末尾。这种连接方式使得字符串块中的所有字符串形成一个连续的字符序列。
- 偏移量引用
在结构块中,属性的名称是通过偏移量来引用字符串块中的相应字符串的。偏移量是一个无符号整数值,它表示字符串在字符串块中的位置。通过使用偏移量引用,设备树可以节省空间,并且在属性名称发生变化时也更加灵活,因为只需要更新偏移量,而不需要修改结构块中的属性引用。
- 对齐约束
字符串块没有对齐约束,这意味着它可以出现在设备树 blob 的任何偏移处。这使得字符串块的位置在设备树 blob 中是灵活的,并且可以根据需要进行调整,而不会对设备树的解析和处理造成影响。
字符串块是设备树中用于存储属性名称的部分。它由字符串连接而成,并通过偏移量在结构块中进行引用。字符串块的灵活位置使得设备树的表示更加紧凑和可扩展。
dtb展开成device_node

- U-Boot 加载
U-Boot(Universal Bootloader)是一种常用的开源引导加载程序,用于引导嵌入式系统。在系统启动过程中,U-Boot 会将boot.img中的内核和设备树的二进制文件加载到系统内存的特定地址。
- 内核初始化
U-Boot 将内核和设备树的二进制文件加载到系统内存的特定地址后,控制权会转交给内核。在内核初始化的过程中,会解析设备树二进制文件,将其展开为内核可以识别的数据结构,以便内核能够正确地初始化和管理硬件资源。
- 设备树展开
设备树展开是指将设备树二进制文件解析成内核中的设备节点(struct device_node)的过程。内核会读取设备树二进制文件的内容,并根据设备树的描述信息,构建设备树数据结构,例如设备节点、中断控制器、寄存器、时钟等。这些设备树数据结构将在内核运行时用于管理和配置硬件资源
struct device_node定义如下
12345678910111213141516171819202122232425262728293031323334353637383940414243444546 | // include/linux/of.htypedef u32 phandle;typedef u32 ihandle;struct property { char *name; // 属性的名称 int length;// 属性值的长度(字节数) void *value;// 属性值的指针 struct property *next;// 下一个属性节点指针 unsigned long _flags;// 属性的标志位 unsigned int unique_id;// 属性的唯一标识 struct bin_attribute attr;// 内核对象二进制属性};struct of_irq_controller;struct device_node { const char *name; //设备节点的名称 phandle phandle; // 设备节点的句柄 const char *full_name;// 设备节点的完整名称 struct fwnode_handle fwnode;// 设备节点的固件节点句柄 struct property *properties;// 设备节点的属性列表 struct property *deadprops; /* removed properties */ // 已删除的属性列表 struct device_node *parent; // 父设备节点指针 struct device_node *child; // 子设备节点指针 struct device_node *sibling; // 兄弟设备节点指针 struct kobject kobj; // 内核对象(用于 sysfs) unsigned long _flags; // 设备节点的标志位 void *data; // 与设备节点相关的数据指针 unsigned int unique_id;// 设备节点的唯一标识 struct of_irq_controller *irq_trans;// 设备节点的中断控制器}; |
dtb解析过程源码分析
init/main.c
在内核start_kernel()中调用setup_arch(&command_line);进行架构相关的初始化
12345678910111213141516171819202122232425262728293031323334 | // init/main.casmlinkage __visible void __init __no_sanitize_address start_kernel(void){ char *command_line; char *after_dashes; set_task_stack_end_magic(&init_task);// 设置任务栈的魔数 smp_setup_processor_id();// 设置处理器 ID debug_objects_early_init();// 初始化调试对象 cgroup_init_early();// 初始化 cgroup(控制组) local_irq_disable();// 禁用本地中断 early_boot_irqs_disabled = true;// 标记早期引导期间中断已禁用 /* * 中断仍然被禁用。进行必要的设置,然后启用它们。 */ boot_cpu_init();// 初始化引导 CPU page_address_init();// 设置页地址 pr_notice("%s", linux_banner);// 打印 Linux 内核版本信息 early_security_init(); setup_arch(&command_line);// 架构相关的初始化 setup_boot_config(command_line); setup_command_line(command_line);// 设置命令行参数 setup_nr_cpu_ids();// 设置 CPU 个数 setup_per_cpu_areas();// 设置每个 CPU 的区域 smp_prepare_boot_cpu(); /* arch-specific boot-cpu hooks */ boot_cpu_hotplug_init();// 初始化热插拔的引导 CPU build_all_zonelists(NULL);// 构建所有内存区域列表 page_alloc_init();// 初始化页面分配器 ...} |
arch/arm64/kernel/setup.c
而在setup_arch()中下面第21行调用setup_machine_fdt(__fdt_pointer);设置机器的 FDT (平台设备树)
1234567891011121314151617181920212223242526272829303132333435363738394041424344454647484950515253545556575859606162636465 | // arch/arm64/kernel/setup.cvoid __init __no_sanitize_address setup_arch(char **cmdline_p){ init_mm.start_code = (unsigned long) _text; init_mm.end_code = (unsigned long) _etext; init_mm.end_data = (unsigned long) _edata; init_mm.brk = (unsigned long) _end; *cmdline_p = boot_command_line; /* * If know now we are going to need KPTI then use non-global * mappings from the start, avoiding the cost of rewriting * everything later. */ arm64_use_ng_mappings = kaslr_requires_kpti(); early_fixmap_init();// 初始化 early fixmap early_ioremap_init();// 初始化 early ioremap setup_machine_fdt(__fdt_pointer);// 设置机器的 FDT(平台设备树) /* * Initialise the static keys early as they may be enabled by the * cpufeature code and early parameters. */ jump_label_init();// 初始化静态密钥,早期可能会被 cpufeature 代码和早期参数启用 parse_early_param(); /* * Unmask asynchronous aborts and fiq after bringing up possible * earlycon. (Report possible System Errors once we can report this * occurred). */ // 在启动可能的早期控制台后,解除屏蔽异步中断和 FIQ(我们可以立即报告发生的系统错误) local_daif_restore(DAIF_PROCCTX_NOIRQ); /* * TTBR0 is only used for the identity mapping at this stage. Make it * point to zero page to avoid speculatively fetching new entries. */ cpu_uninstall_idmap();// 在这个阶段,TTBR0 仅用于身份映射。将其指向零页面,以避免做出猜测性的新条目获取。 xen_early_init();// Xen 平台的早期初始化 efi_init();// EFI 平台的初始化 if (!efi_enabled(EFI_BOOT) && ((u64)_text % MIN_KIMG_ALIGN) != 0) pr_warn(FW_BUG "Kernel image misaligned at boot, please fix your bootloader!"); arm64_memblock_init();// ARM64 内存块的初始化 paging_init();// 分页初始化 acpi_table_upgrade();// ACPI 表的升级 /* Parse the ACPI tables for possible boot-time configuration */ acpi_boot_table_init();// 解析 ACPI 表以进行可能的引导时配置 if (acpi_disabled) unflatten_device_tree();// 展开设备树 bootmem_init();// 引导内存的初始化 ...} |
setup_machine_fdt(__fdt_pointer)
__fdt_pointer是 dtb 二进制文件加载到内存的地址,该地址由 bootloader 启动 kernel 时透过 x0 寄存器传递过来的
arch/arm64/kernel/head.S
123456789 | // arch/arm64/kernel/head.SSYM_CODE_START_LOCAL(preserve_boot_args) mov x21, x0 // x21=FDT ...SYM_FUNC_START_LOCAL(__primary_switched) ... str_l x21, __fdt_pointer, x5 // Save FDT pointer ... |
arch/arm64/kernel/setup.c
12345678910111213141516171819202122232425262728293031323334 | // arch/arm64/kernel/setup.c// 初始化设置机器的设备树static void __init setup_machine_fdt(phys_addr_t dt_phys){ int size; // 将设备树物理地址映射到内核虚拟地址空间 void *dt_virt = fixmap_remap_fdt(dt_phys, &size, PAGE_KERNEL); const char *name; if (dt_virt)// 如果映射成功 memblock_reserve(dt_phys, size);// 保留设备树占用的内存区域 if (!dt_virt || !early_init_dt_scan(dt_virt)) {// 如果设备树映射失败或者设备树解析失败 pr_crit("\n" "Error: invalid device tree blob at physical address %pa (virtual address 0x%p)\n" "The dtb must be 8-byte aligned and must not exceed 2 MB in size\n" "\nPlease check your bootloader.", &dt_phys, dt_virt); while (true)// 无限循环,等待系统崩溃 cpu_relax(); } /* Early fixups are done, map the FDT as read-only now */ fixmap_remap_fdt(dt_phys, &size, PAGE_KERNEL_RO);// 将设备树映射为只读模式 name = of_flat_dt_get_machine_name();// 获取设备树的机器名 if (!name) return; pr_info("Machine model: %s\n", name);// 输出机器型号信息 dump_stack_set_arch_desc("%s (DT)", name);// 设置栈转储的架构描述为机器型号} |
上面第13行early_init_dt_scan函数对设备树进行兼容性和完整性验证。该函数可能会检查设备树中的一致性标记、版本信息以及必需的节点和属性是否存在。如果验证失败,函数会返回 false。该函数如下:
12345678910111213 | // drivers/of/fdt.cbool __init early_init_dt_scan(void *params){ bool status; status = early_init_dt_verify(params);// 验证设备树的兼容性和完整性 if (!status) return false; early_init_dt_scan_nodes();// 扫描设备树节点 return true;} |
early_init_dt_scan中先调用了early_init_dt_verify对设备树进行校验,验证设备树的兼容性和完整性
1234567891011121314151617181920 | // drivers/of/fdt.cbool __init early_init_dt_verify(void *params){ if (!params)// 验证传入的参数是否为空 return false; /* check device tree validity */ // 检查设备树头部的有效性 // 如果设备树头部无效,返回 false if (fdt_check_header(params)) return false; /* Setup flat device-tree pointer */ initial_boot_params = params;// 设置指向设备树的指针为传入的参数 // 计算设备树的 CRC32 校验值 // 并将结果保存在全局变量 of_fdt_crc32 中 of_fdt_crc32 = crc32_be(~0, initial_boot_params, fdt_totalsize(initial_boot_params)); return true;} |
最后early_init_dt_scan调用了early_init_dt_scan_nodes扫描设备树节点
12345678910111213141516 | // drivers/of/fdt.cvoid __init early_init_dt_scan_nodes(void){ int rc = 0; /* Retrieve various information from the /chosen node */ rc = of_scan_flat_dt(early_init_dt_scan_chosen, boot_command_line);/* 从 /chosen 节点中检索各种信息 */ if (!rc) pr_warn("No chosen node found, continuing without\n"); /* Initialize {size,address}-cells info */ of_scan_flat_dt(early_init_dt_scan_root, NULL);/* 初始化 {size,address}-cells 信息 */ /* Setup memory, calling early_init_dt_add_memory_arch */ of_scan_flat_dt(early_init_dt_scan_memory, NULL);/* 设置内存信息,调用 early_init_dt_add_memory_arch 函数 */} |
函数early_init_dt_scan_nodes被声明为__init,这表示它是在内核初始化阶段被调用,并且在初始化完成后不再需要。该函数的目的是在早期阶段扫描设备树节点,并执行一些初始化操作。
函数中主要调用了of_scan_flat_dt函数,该函数用于扫描平面设备树(flat device tree)。平面设备树是一种
unflatten_device_tree()
该函数用于解析设备树,将紧凑的设备树数据结构转换为树状结构的设备树
1234567891011121314 | // drivers/of/fdt.cvoid __init unflatten_device_tree(void){ /* 解析设备树 */ __unflatten_device_tree(initial_boot_params, NULL, &of_root, early_init_dt_alloc_memory_arch, false); /* Get pointer to "/chosen" and "/aliases" nodes for use everywhere */ /* 获取指向 "/chosen" 和 "/aliases" 节点的指针,以供全局使用 */ of_alias_scan(early_init_dt_alloc_memory_arch); /* 运行设备树的单元测试 */ unittest_unflatten_overlay_base();} |
该函数主要用于解析设备树,并将解析后的设备树存储在全局变量of_root中。
函数首先调用__unflatten_device_tree函数来执行设备树的解析操作。解析后的设备树将使用of_root指针进行存储。
接下来,函数调用of_alias_scan函数。这个函数用于扫描设备树中的/chosen和/aliases节点,并为它们分配内存。这样,其他部分的代码可以通过全局变量访问这些节点。
最后,函数调用unittest_unflatten_overlay_base函数,用于运行设备树的单元测试。
__unflatten_device_tree
123456789101112131415161718192021222324252627282930313233343536373839404142434445464748495051525354555657585960616263646566676869707172737475767778 | //drivers/of/fdt.c/** * __unflatten_device_tree - create tree of device_nodes from flat blob * * unflattens a device-tree, creating the * tree of struct device_node. It also fills the "name" and "type" * pointers of the nodes so the normal device-tree walking functions * can be used. * @blob: The blob to expand * @dad: Parent device node * @mynodes: The device_node tree created by the call * @dt_alloc: An allocator that provides a virtual address to memory * for the resulting tree * @detached: if true set OF_DETACHED on @mynodes * * Returns NULL on failure or the memory chunk containing the unflattened * device tree on success. */void *__unflatten_device_tree(const void *blob, struct device_node *dad, struct device_node **mynodes, void *(*dt_alloc)(u64 size, u64 align), bool detached){ int size; void *mem; pr_debug(" -> unflatten_device_tree()\n"); if (!blob) { pr_debug("No device tree pointer\n"); return NULL; } pr_debug("Unflattening device tree:\n"); pr_debug("magic: %08x\n", fdt_magic(blob)); pr_debug("size: %08x\n", fdt_totalsize(blob)); pr_debug("version: %08x\n", fdt_version(blob)); if (fdt_check_header(blob)) { pr_err("Invalid device tree blob header\n"); return NULL; } /* First pass, scan for size */ size = unflatten_dt_nodes(blob, NULL, dad, NULL);/* 第一遍扫描,计算大小 */ if (size < 0) return NULL; size = ALIGN(size, 4); pr_debug(" size is %d, allocating...\n", size); /* Allocate memory for the expanded device tree */ mem = dt_alloc(size + 4, __alignof__(struct device_node));/* 为展开的设备树分配内存 */ if (!mem) return NULL; memset(mem, 0, size); *(__be32 *)(mem + size) = cpu_to_be32(0xdeadbeef); pr_debug(" unflattening %p...\n", mem); /* Second pass, do actual unflattening */ unflatten_dt_nodes(blob, mem, dad, mynodes);/* 第二遍扫描,实际展开设备树 */ if (be32_to_cpup(mem + size) != 0xdeadbeef) pr_warn("End of tree marker overwritten: %08x\n", be32_to_cpup(mem + size)); if (detached && mynodes) { of_node_set_flag(*mynodes, OF_DETACHED); pr_debug("unflattened tree is detached\n"); } pr_debug(" <- unflatten_device_tree()\n"); return mem;} |
该函数的重点在两次设备树的扫描上,第一遍扫描的目的是计算展开设备树所需的内存大小。
第 46 行:size = unflatten_dt_nodes(blob, NULL, dad, NULL);函数的作用是递归地遍历设备树数据块,并计算展开设备树所需的内存大小。它接受四个参数:
- blob(设备树数据块指针)
- start(当前节点的起始地址,初始为 NULL)
- dad(父节点指针,而
unflatten_device_tree函数中传入的是NULL) - mynodes(用于存储节点指针数组的指针,初始为 NULL)。
第一遍扫描完成后,unflatten_dt_nodes函数会
第 65 行:再次调用了unflatten_dt_nodes(blob, mem, dad, mynodes);函数进行第二遍扫描。通过这样的过程,
unflatten_dt_nodes()
1234567891011121314151617181920212223242526272829303132333435363738394041424344454647484950515253545556575859606162636465666768697071727374757677787980 | // drivers/of/fdt.c/** * unflatten_dt_nodes - Alloc and populate a device_node from the flat tree * @blob: The parent device tree blob * @mem: Memory chunk to use for allocating device nodes and properties * @dad: Parent struct device_node * @nodepp: The device_node tree created by the call * * It returns the size of unflattened device tree or error code */static int unflatten_dt_nodes(const void *blob, void *mem, struct device_node *dad, struct device_node **nodepp){ struct device_node *root;// 根节点 int offset = 0, depth = 0, initial_depth = 0;// 偏移量、深度和初始深度 struct device_node *nps[FDT_MAX_DEPTH];// 设备节点数组 void *base = mem;// 基地址,用于计算偏移量 bool dryrun = !base;// 是否只是模拟运行,不实际处理 if (nodepp) *nodepp = NULL;// 如果指针不为空,将其置为空指针 /* * We're unflattening device sub-tree if @dad is valid. There are * possibly multiple nodes in the first level of depth. We need * set @depth to 1 to make fdt_next_node() happy as it bails * immediately when negative @depth is found. Otherwise, the device * nodes except the first one won't be unflattened successfully. */ /* * 如果 @dad 有效,则表示正在展开设备子树。 * 在第一层深度可能有多个节点。 * 将 @depth 设置为 1,以使 fdt_next_node() 正常工作。 * 当发现负的 @depth 时,该函数会立即退出。 * 否则,除第一个节点外的设备节点将无法成功展开。 */ if (dad) depth = initial_depth = 1; root = dad;// 根节点为 @dad nps[depth] = dad;// 将根节点放入设备节点数组 for (offset = 0; offset >= 0 && depth >= initial_depth; offset = fdt_next_node(blob, offset, &depth)) { if (WARN_ON_ONCE(depth >= FDT_MAX_DEPTH - 1)) continue; // 如果未启用 CONFIG_OF_KOBJ 并且节点不可用,则跳过该节点 if (!IS_ENABLED(CONFIG_OF_KOBJ) && !of_fdt_device_is_available(blob, offset)) continue; // 填充节点信息,并将子节点添加到设备节点数组 if (!populate_node(blob, offset, &mem, nps[depth], &nps[depth+1], dryrun)) return mem - base; if (!dryrun && nodepp && !*nodepp) *nodepp = nps[depth+1];// 将子节点指针赋值给 @nodepp if (!dryrun && !root) root = nps[depth+1];// 如果根节点为空,则将子节点设置为根节点 } if (offset < 0 && offset != -FDT_ERR_NOTFOUND) { pr_err("Error %d processing FDT\n", offset); return -EINVAL; } /* * Reverse the child list. Some drivers assumes node order matches .dts * node order */ if (!dryrun)// 反转子节点列表。一些驱动程序假设节点顺序与 .dts 文件中的节点顺序一致 reverse_nodes(root); return mem - base;// 返回处理的字节数} |
fdt_next_node()函数用来遍历设备树的节点。
从偏移量为 0 开始,只要偏移量大于等于 0 且深度大于等于初始深度,就执行循环。
循环中的每次迭代都会处理一个设备树节点。在每次迭代中,首先检查深度是否超过了最大深度FDT_MAX_DEPTH如果超过了,则跳过该节点。
如果未启用CONFIG_OF_KOBJ并且节点不可用(通过of_fdt_device_is_available()函数判断),则跳过该节点。
随后调用populate_node()函数填充节点信息,并将子节点添加到设备节点数组nps中。populate_node()函数定义如下所示
populate_node
该函数会解析设备节点的属性,并根据需要分配内存来存储属性值。
1234567891011121314151617181920212223242526272829303132333435363738394041424344454647 | // drivers/of/fdt.cstatic bool populate_node(const void *blob, int offset, void **mem, struct device_node *dad, struct device_node **pnp, bool dryrun){ struct device_node *np;// 设备节点指针 const char *pathp;// 节点路径字符串指针 unsigned int l, allocl;// 路径字符串长度和分配的内存大小 pathp = fdt_get_name(blob, offset, &l);// 获取节点路径和长度 if (!pathp) { *pnp = NULL; return false; } allocl = ++l;// 分配内存大小为路径长度加一,用于存储节点路径字符串 np = unflatten_dt_alloc(mem, sizeof(struct device_node) + allocl, __alignof__(struct device_node));// 分配设备节点内存 if (!dryrun) { char *fn; of_node_init(np);// 初始化设备节点 np->full_name = fn = ((char *)np) + sizeof(*np);// 设置设备节点的完整路径名 memcpy(fn, pathp, l);// 将节点路径字符串复制到设备节点的完整路径名中 if (dad != NULL) { np->parent = dad;// 设置设备节点的父节点 np->sibling = dad->child;// 设置设备节点的兄弟节点 dad->child = np;// 将设备节点添加为父节点的子节点 } } populate_properties(blob, offset, mem, np, pathp, dryrun);// 填充设备节点的属性信息 if (!dryrun) { np->name = of_get_property(np, "name", NULL);// 获取设备节点的名称属性 if (!np->name) np->name = "<NULL>"; } *pnp = np;// 将设备节点指针赋值给*pnp return true;} |
在populate_node函数中首先会调用unflatten_dt_alloc函数分配设备节点内存。
分配的内存大小为sizeof(struct device_node) + allocl字节, 并使用__alignof__(struct device_node)对齐,然后调用populate_properties函数填充设备节点的属性信息。
这里
np->name = of_get_property(np, "name", NULL);获取设备节点的名称属性存放在struct device_node的name属性中
device_node转为platform_device
在平台总线模型中,device 部分是用platform_device结构体来描述硬件资源的,所以内核最终会将内核认识的device_node树转换platform_device,但是
并不是所有的 device_node 都会被转换成 platform_device
只有满足要求的才会转换成platform_device,转换成platform_device的节点可以在/sys/bus/platform/devices下查看。
转换规则
规则如下:
- 遍历根节点下包含 compatible 属性的子节点,对于每个子节点,创建一个对应的
platform_device。 - 遍历根节点下包含 compatible 属性为
simple-bus、simple-mfd或isa的节点以及它们的子节点。如果它们子节点包含 compatible 属性值则会给该子节点创建一个对应的platform_device。 - 检查节点的 compatible 属性是否包含
arm或primecell。如果是,则不将该节点转换为platform_device,而是将其识别为 AMBA 设备。
对于规则2:
某些节点虽然本身是“总线”或“容器”,但不直接对应硬件设备,而是用来组织子设备。这些节点的 compatible 值通常是:
simple-bus:通用简单总线(如 AMBA APB/AHB 外的普通内存映射总线)simple-mfd:多功能设备(Multi-Function Device)容器isa:ISA 总线(老式 PC)
对于这类节点它们自己通常不创建platform_device,但会递归遍历它们的所有子节点,只要子节点有 compatible 属性,就为该子节点创建platform_device
目的:支持设备树中的“总线嵌套”结构。例如 SoC 内部的外设挂在一个 simple-bus 节点下。
对于规则3:
如果一个节点的 compatible 字符串中包含arm,xxx或primecell(如arm,pl011、arm,pl081),说明它是 ARM PrimeCell 外设,属于 AMBA 总线设备(APB/AHB)。这类设备:
- 不会被注册为
platform_device,而是由 AMBA 总线子系统(amba_bus_type)专门处理 - 使用
amba_device结构,而非platform_device
原因:ARM PrimeCell 设备有标准寄存器布局(如 CID/PID),AMBA 子系统会自动探测并验证,比通用platform_device更安全高效。
示例
示例1:
123456789101112131415161718192021222324252627282930313233343536373839 | /dts-v1/;/ { model = "This is my devicetree!"; chosen { bootargs = "root=/dev/nfs rw nfsroot=192.168.1.1 console=ttyS0,115200"; }; cpu1: cpu@1 { device_type = "cpu"; compatible = "arm,cortex-a35", "arm,armv8"; reg = <0x0 0x1>; }; aliases { led1 = "/gpio@22020101"; }; node1 { gpio@22020102 { reg = <0x20220102 0x40>; }; }; node2 { node1-child { pinnum = <01234>; }; }; gpio@22020101 { compatible = "led"; reg = <0x20220101 0x40>; status = "okay"; };} |
在上面的设备树中,总共有chosen、cpu1: cpu@1、aliases、node1、node2、gpio@22020101这六个节点,其中前五个节点都没有 compatible 属性,所以并不会被转换为platform_device,而最后一个gpio@22020101节点符合规则一,在根节点下,且有 compatible 属性,所以最后会转换为platform_device。
示例2:
1234567891011121314151617181920212223242526272829303132333435363738394041 | /dts-v1/;/ { model = "This is my devicetree!"; chosen { bootargs = "root=/dev/nfs rw nfsroot=192.168.1.1 console=ttyS0,115200"; }; cpu1: cpu@1 { device_type = "cpu"; compatible = "arm,cortex-a35", "arm,armv8"; reg = <0x0 0x1>; }; aliases { led1 = "/gpio@22020101"; }; node1 { compatible = "simple-bus"; gpio@22020102 { reg = <0x20220102 0x40>; }; }; node2 { node1-child { pinnum = <01234>; }; }; gpio@22020101 { compatible = "led"; reg = <0x20220101 0x40>; status = "okay"; };}; |
这里在node1节点中添加了 compatible 属性,但是这个 compatible 属性值为simple-bus,我们需要继续看他的子节点,子节点gpio@22020102并没有 compatible 属性值,所以这里的node1节点不会被转换。
示例3:
12345678910111213141516171819202122232425262728293031323334353637383940414243 | /dts-v1/;/ { model = "This is my devicetree!"; chosen { bootargs = "root=/dev/nfs rw nfsroot=192.168.1.1 console=ttyS0,115200"; }; cpu1: cpu@1 { device_type = "cpu"; compatible = "arm,cortex-a35", "arm,armv8"; reg = <0x0 0x1>; }; aliases { led1 = "/gpio@22020101"; }; node1 { compatible = "simple-bus"; gpio@22020102 { compatible = "gpio"; reg = <0x20220102 0x40>; }; }; node2 { node1-child { pinnum = <01234>; }; }; gpio@22020101 { compatible = "led"; reg = <0x20220101 0x40>; status = "okay"; };}; |
这里在 node1 节点的子节点gpio@22020102中添加了 compatible 属性,node1 节点的 compatible 属性值为simple-bus,然后需要继续看他的子节点,子节点gpio@22020102的 compatible 属性值为 gpio,所以这里的gpio@22020102节点会被转换成platform_device
示例4:
12345678910111213141516171819202122232425262728293031323334353637383940414243444546 | /dts-v1/;/ { model = "This is my devicetree!"; chosen { bootargs = "root=/dev/nfs rw nfsroot=192.168.1.1 console=ttyS0,115200"; }; cpul: cpu@1 { device_type = "cpu"; compatible = "arm,cortex-a35", "arm,armv8"; reg = <0x0 0x1>; amba { compatible = "simple-bus"; ranges; dmac_peri: dma-controller@ff250000 { compatible = "arm,p1330", "arm,primecell"; reg = <0x0 0xff250000 0x0 0x4000>; interrupts = <GIC_SPI 2 IRQ_TYPE_LEVEL_HIGH>, <GIC_SPI 3 IRQ_TYPE_LEVEL_HIGH>; arm,pl330-broken-no-flushp; arm,p1330-periph-burst; clocks = <&cru ACLK DMAC_PERI>; clock-names = "apb_pclk"; }; dmac_bus: dma-controller@ff600000 { compatible = "arm,p1330", "arm,primecell"; reg = <0x0 0xff600000 0x0 0x4000>; interrupts = <GIC_SPI 0 IRQ_TYPE_LEVEL_HIGH>, <GIC_SPI 1 IRQ_TYPE_LEVEL_HIGH>; arm,pl330-broken-no-flushp; arm,pl330-periph-burst; clocks = <&cru ACLK_DMAC_BUS>; clock-names = "apb_pclk"; }; }; };}; |
amba 节点的 compatible 值为simple-bus,不会被转换为platform_device,而是作为父节点用于组织其他设备,所以需要来查看他的子节点。
dmac_peri: dma-controller@ff250000节点: 该节点的 compatible 属性包含arm,p1330和arm,primecell,根据规则 3,该节点不会被转换为platform_device,而是被识别为 AMBA设备。
dmac_bus: dma-controller@ff600000节点: 该节点的 compatible 属性包含arm,p1330和arm,primecell,根据规则 3,该节点不会被转换为platform_device,而是被识别为 AMBA 设备。
源码分析
of_platform_default_populate_init()
先来看of_platform_default_populate_init,它使用arch_initcall_sync(of_platform_default_populate_init);将该函数注册到启动阶段调用
123456789101112131415161718192021222324252627282930313233343536 | // drivers/of/platform.cstatic int __init of_platform_default_populate_init(void){ struct device_node *node; // 暂停设备链接供应商同步状态 device_links_supplier_sync_state_pause(); // 如果设备树尚未填充,则返回错误码 if (!of_have_populated_dt()) return -ENODEV; /* * Handle certain compatibles explicitly, since we don't want to create * platform_devices for every node in /reserved-memory with a * "compatible", */ /* * 显式处理某些compatibles,因为我们不想为/reserved-memory 中的每个具有“compatible”的节点创建platform_device。 */ for_each_matching_node(node, reserved_mem_matches) of_platform_device_create(node, NULL, NULL); // 查找节点 "/firmware" node = of_find_node_by_path("/firmware"); if (node) { // 使用该节点进行设备树平台设备的填充 of_platform_populate(node, NULL, NULL, NULL); of_node_put(node); } /* Populate everything else. */ of_platform_default_populate(NULL, NULL, NULL);// 填充其他设备 return 0;}arch_initcall_sync(of_platform_default_populate_init); |
arch_initcall_sync是 Linux 内核中的一个函数,用于在内核初始化过程中执行架构相关的初始化函数。它属于内核的初始化调用机制,用于确保在系统启动过程中适时地调用特定架构的初始化函数。
在 Linux 内核的初始化过程中,各个子系统和架构会注册自己的初始化函数。这些初始化函数负责完成特定子系统或架构相关的初始化工作,例如初始化硬件设备、注册中断处理程序、设置内存映射等。而 arch_initcall_sync函数则用于调用与当前架构相关的初始化函数。
当内核启动时, 调用rest_init()函数来启动初始化过程 。 在初始化过程中 ,arch_initcall_sync函数会被调用,以确保所有与当前架构相关的初始化函数按照正确的顺序执行。这样可以保证在启动过程中,特定架构相关的初始化工作得到正确地完成。
而 of_platform_default_populate_init函数的作用是在内核初始化过程中自动解析设备树,并根据设备树中的设备节点创建对应的platform_device结构。它会遍历设备树中的设备节点,并为每个设备节点创建一个对应的platform_device结构,然后将其注册到内核中,使得设备驱动程序能够识别和操作这些设备。
of_platform_default_populate_init函数最终调用of_platform_default_populate填充其他设备
12345678 | // drivers/of/platform.cint of_platform_default_populate(struct device_node *root, const struct of_dev_auxdata *lookup, struct device *parent){ return of_platform_populate(root, of_default_bus_match_table, lookup, parent);} |
该函数的作用是调用of_platform_populate函数来填充设备树中的平台设备,并使用默认的设备匹配表of_default_bus_match_table,设备匹配表内容如下所示:
12345678910 | // drivers/of/platform.cconst struct of_device_id of_default_bus_match_table[] = { { .compatible = "simple-bus", }, { .compatible = "simple-mfd", }, { .compatible = "isa", }, { .compatible = "arm,amba-bus", }, {} /* Empty terminated list */}; |
上述的设备匹配表就是第 2 条规则:
遍历根节点下包含 compatible 属性为 simple-bus、simple-mfd 或 isa 的节点以及它们的子节点。如果它们子节点包含 compatible 属性值则会给该子节点创建一个对应的 platform_device。
函数将自动根据设备树节点的属性匹配相应的设备驱动程序,并填充内核的平台设备列表。
of_platform_populate()
of_platform_populate函数的定义如下:
1234567891011121314151617181920212223242526272829303132333435363738394041424344454647484950515253545556 | // drivers/of/platform.c/** * of_platform_populate() - Populate platform_devices from device tree data * @root: parent of the first level to probe or NULL for the root of the tree * @matches: match table, NULL to use the default * @lookup: auxdata table for matching id and platform_data with device nodes * @parent: parent to hook devices from, NULL for toplevel * * Similar to of_platform_bus_probe(), this function walks the device tree * and creates devices from nodes. It differs in that it follows the modern * convention of requiring all device nodes to have a 'compatible' property, * and it is suitable for creating devices which are children of the root * node (of_platform_bus_probe will only create children of the root which * are selected by the @matches argument). * * New board support should be using this function instead of * of_platform_bus_probe(). * * Returns 0 on success, < 0 on failure. */int of_platform_populate(struct device_node *root, const struct of_device_id *matches, const struct of_dev_auxdata *lookup, struct device *parent){ struct device_node *child; int rc = 0; // 如果 root 不为空,则增加 root 节点的引用计数;否则,在设备树中根据路径查找 root 节点 root = root ? of_node_get(root) : of_find_node_by_path("/"); if (!root) return -EINVAL; pr_debug("%s()\n", __func__); pr_debug(" starting at: %pOF\n", root); // 暂停设备链接供应商同步状态 device_links_supplier_sync_state_pause(); // 遍历 root 节点的所有子节点 for_each_child_of_node(root, child) { // 创建平台设备并添加到设备树总线 rc = of_platform_bus_create(child, matches, lookup, parent, true); if (rc) { of_node_put(child); break; } } // 恢复设备链接供应商同步状态 device_links_supplier_sync_state_resume(); // 设置 root 节点的 OF_POPULATED_BUS 标志 of_node_set_flag(root, OF_POPULATED_BUS); // 释放 root 节点的引用计数 of_node_put(root); return rc;}EXPORT_SYMBOL_GPL(of_platform_populate); |
of_platform_populate通过调用rc = of_platform_bus_create(child, matches, lookup, parent, true);创建platform_device。
of_platform_bus_create()
of_platform_bus_create定义如下:
123456789101112131415161718192021222324252627282930313233343536373839404142434445464748495051525354555657585960616263646566676869707172737475767778 | // drivers/of/platform.c/** * of_platform_bus_create() - Create a device for a node and its children. * @bus: device node of the bus to instantiate * @matches: match table for bus nodes * @lookup: auxdata table for matching id and platform_data with device nodes * @parent: parent for new device, or NULL for top level. * @strict: require compatible property * * Creates a platform_device for the provided device_node, and optionally * recursively create devices for all the child nodes. */static int of_platform_bus_create(struct device_node *bus, const struct of_device_id *matches, const struct of_dev_auxdata *lookup, struct device *parent, bool strict){ const struct of_dev_auxdata *auxdata; struct device_node *child; struct platform_device *dev; const char *bus_id = NULL; void *platform_data = NULL; int rc = 0; /* Make sure it has a compatible property */ /* 确保设备节点具有 compatible 属性 */ if (strict && (!of_get_property(bus, "compatible", NULL))) { pr_debug("%s() - skipping %pOF, no compatible prop\n", __func__, bus); return 0; } /* Skip nodes for which we don't want to create devices */ /* 跳过不想创建设备的节点 */ if (unlikely(of_match_node(of_skipped_node_table, bus))) { pr_debug("%s() - skipping %pOF node\n", __func__, bus); return 0; } if (of_node_check_flag(bus, OF_POPULATED_BUS)) { pr_debug("%s() - skipping %pOF, already populated\n", __func__, bus); return 0; } auxdata = of_dev_lookup(lookup, bus); if (auxdata) { bus_id = auxdata->name; platform_data = auxdata->platform_data; } if (of_device_is_compatible(bus, "arm,primecell")) { /* * Don't return an error here to keep compatibility with older * device tree files. */ /* * 在此处不返回错误以保持与旧设备树文件的兼容性。 */ of_amba_device_create(bus, bus_id, platform_data, parent); return 0; } dev = of_platform_device_create_pdata(bus, bus_id, platform_data, parent); if (!dev || !of_match_node(matches, bus)) return 0; for_each_child_of_node(bus, child) { pr_debug(" create child: %pOF\n", child); rc = of_platform_bus_create(child, matches, lookup, &dev->dev, strict); if (rc) { of_node_put(child); break; } } of_node_set_flag(bus, OF_POPULATED_BUS); return rc;} |
of_platform_bus_create通过调用of_match_node(of_skipped_node_table, bus)匹配想要跳过的节点,of_skipped_node_table定义如下
1234 | static const struct of_device_id of_skipped_node_table[] = { { .compatible = "operating-points-v2", }, {} /* Empty terminated list */}; |
operating-points-v2
这是一个 设备树绑定(Device Tree Binding),用于描述 CPU 或设备的 工作性能状态(Operating Performance Points, OPP),例如不同频率/电压组合。它不是硬件设备,而是一个 数据表(描述性能状态)通常作为子节点出现在 CPU、GPU 或 SoC 设备节点下。
123456789101112131415 | cpu@0 { compatible = "arm,cortex-a53"; ... operating-points-v2 { compatible = "operating-points-v2"; opp00 { opp-hz = /bits/ 64 <1000000000>; opp-microvolt = <900000>; }; opp01 { opp-hz = /bits/ 64 <1500000000>; opp-microvolt = <1000000>; }; };}; |
随后of_platform_bus_create调用of_platform_device_create_pdata函数创建平台设备,并将其赋值给变量dev。然后,检查设备节点 bus 是否与给定的匹配表matches匹配。如果平台设备创建失败或者设备节点不匹配,那么返回 0。
最后of_platform_bus_create使用for_each_child_of_node(bus, child), 遍历设备节点 bus 的每个子节点 child,并递归调用of_platform_bus_create函数来创建子节点的平台设备。
of_platform_device_create_pdata()
of_platform_device_create_pdata定义如下
123456789101112131415161718192021222324252627282930313233343536373839404142434445464748 | // drivers/of/platform.c/** * of_platform_device_create_pdata - Alloc, initialize and register an of_device * @np: pointer to node to create device for * @bus_id: name to assign device * @platform_data: pointer to populate platform_data pointer with * @parent: Linux device model parent device. * * Returns pointer to created platform device, or NULL if a device was not * registered. Unavailable devices will not get registered. */static struct platform_device *of_platform_device_create_pdata( struct device_node *np, const char *bus_id, void *platform_data, struct device *parent){ struct platform_device *dev; /* 检查设备节点是否可用或已填充 */ if (!of_device_is_available(np) || of_node_test_and_set_flag(np, OF_POPULATED)) return NULL; /* 分配平台设备结构体 */ dev = of_device_alloc(np, bus_id, parent); if (!dev) goto err_clear_flag; /* 设置平台设备的一些属性 */ dev->dev.coherent_dma_mask = DMA_BIT_MASK(32); if (!dev->dev.dma_mask) dev->dev.dma_mask = &dev->dev.coherent_dma_mask; dev->dev.bus = &platform_bus_type; dev->dev.platform_data = platform_data; of_msi_configure(&dev->dev, dev->dev.of_node); /* 将平台设备添加到设备模型中 */ if (of_device_add(dev) != 0) { platform_device_put(dev); goto err_clear_flag; } return dev;err_clear_flag: of_node_clear_flag(np, OF_POPULATED);/* 清除设备节点的已填充标志 */ return NULL;} |
of_platform_device_create_pdata函数调用of_device_alloc分配一个平台设备结构体,并将设备节点指针、设备标识符和父设备指针传递给它。如果分配失败,则跳转到err_clear_flag标签处进行错误处理。
第29 ~ 34行of_platform_device_create_pdata设置平台设备的一些属性:
- 它将
coherent_dma_mask属性设置为 32 位的 DMA 位掩码 - 检查
dma_mask属性是否为 NULL。如果dma_mask为 NULL,则将其指向coherent_dma_mask。 - 设置平台设备的总线类型为
platform_bus_type,并将平台数据指针存储在platform_data属性中。 - 调用
of_msi_configure和of_reserved_mem_device_init_by_idx来配置设备的 MSI 和保留内存信息
of_device_alloc函数定义如下
of_device_alloc()
12345678910111213141516171819202122232425262728293031323334353637383940414243444546474849505152535455 | /** * of_device_alloc - Allocate and initialize an of_device * @np: device node to assign to device * @bus_id: Name to assign to the device. May be null to use default name. * @parent: Parent device. */struct platform_device *of_device_alloc(struct device_node *np, const char *bus_id, struct device *parent){ struct platform_device *dev; int rc, i, num_reg = 0, num_irq; struct resource *res, temp_res; dev = platform_device_alloc("", PLATFORM_DEVID_NONE); if (!dev) return NULL; /* count the io and irq resources */ while (of_address_to_resource(np, num_reg, &temp_res) == 0) num_reg++; num_irq = of_irq_count(np); /* Populate the resource table */ if (num_irq || num_reg) { res = kcalloc(num_irq + num_reg, sizeof(*res), GFP_KERNEL); if (!res) { platform_device_put(dev); return NULL; } dev->num_resources = num_reg + num_irq; dev->resource = res; for (i = 0; i < num_reg; i++, res++) { rc = of_address_to_resource(np, i, res); WARN_ON(rc); } if (of_irq_to_resource_table(np, res, num_irq) != num_irq) pr_debug("not all legacy IRQ resources mapped for %pOFn\n", np); } dev->dev.of_node = of_node_get(np); dev->dev.fwnode = &np->fwnode; dev->dev.parent = parent ? : &platform_bus; if (bus_id) dev_set_name(&dev->dev, "%s", bus_id); else of_device_make_bus_id(&dev->dev); return dev;}EXPORT_SYMBOL(of_device_alloc); |
可以看到调用了platform_device_alloc("", PLATFORM_DEVID_NONE)创建的platform_device的name为空
设备树下 platform_device 和 platform_driver 匹配
of_match_table
在平台总线模型中只有满足下面三个条件之一才会正确匹配并加载 probe 初始化函数:
platform_driver.driver.of_match_table与设备树中的compatible中的值匹配platform_driver.id_table与设备树中的compatible中的值匹配platform_driver.driver.name与platform_device.name匹配
对于匹配的优先级,从下面的platform_match函数可以看出:
- 优先使用设备树匹配,即
platform_driver.driver.of_match_table - 然后是ACPI匹配
- 然后是
platform_driver中的id_table匹配。 - 最后fall-back到
return (strcmp(pdev->name, drv->name) == 0);,即匹配platform_device.name和platform_driver.driver.name,而这个name是一个历史遗留字段,设备树解析后从struct device_node转为struct platform_device时将此name设置为了空(of_device_alloc),即通过设备树生成的struct platform_device不会使用这个字段。
但是platform_driver.driver.name必须设置,否则会 kernel panic,因为strcmp(pdev->name, drv->name)这句代码使用strcmp,而drv->name为NULL时会报错。
123456789101112131415161718192021222324252627282930313233343536373839 | // drivers/base/platform.c/** * platform_match - bind platform device to platform driver. * @dev: device. * @drv: driver. * * Platform device IDs are assumed to be encoded like this: * "<name><instance>", where <name> is a short description of the type of * device, like "pci" or "floppy", and <instance> is the enumerated * instance of the device, like '0' or '42'. Driver IDs are simply * "<name>". So, extract the <name> from the platform_device structure, * and compare it against the name of the driver. Return whether they match * or not. */static int platform_match(struct device *dev, struct device_driver *drv){ struct platform_device *pdev = to_platform_device(dev); struct platform_driver *pdrv = to_platform_driver(drv); /* When driver_override is set, only bind to the matching driver */ if (pdev->driver_override) return !strcmp(pdev->driver_override, drv->name); /* Attempt an OF style match first */ if (of_driver_match_device(dev, drv)) return 1; /* Then try ACPI style match */ if (acpi_driver_match_device(dev, drv)) return 1; /* Then try to match against the id table */ if (pdrv->id_table) return platform_match_id(pdrv->id_table, pdev) != NULL; /* fall-back to driver name match */ return (strcmp(pdev->name, drv->name) == 0);} |
而of_driver_match_device函数定义如下:
1234567891011 | // include/linux/of_device.h/** * of_driver_match_device - Tell if a driver's of_match_table matches a device. * @drv: the device_driver structure to test * @dev: the device structure to match against */static inline int of_driver_match_device(struct device *dev, const struct device_driver *drv){ return of_match_device(drv->of_match_table, dev) != NULL;} |
of_driver_match_device调用了of_match_device函数,第一个参数传入drv->of_match_table,该函数定义如下
123456789101112131415161718 | // drivers/of/device.c/** * of_match_device - Tell if a struct device matches an of_device_id list * @matches: array of of device match structures to search in * @dev: the of device structure to match against * * Used by a driver to check whether an platform_device present in the * system is in its list of supported devices. */const struct of_device_id *of_match_device(const struct of_device_id *matches, const struct device *dev){ if ((!matches) || (!dev->of_node)) return NULL; return of_match_node(matches, dev->of_node);}EXPORT_SYMBOL(of_match_device); |
of_match_device又调用了of_match_node函数,of_match_node中使用自旋锁对__of_match_node进行加锁,__of_match_node是真正的匹配函数
123456789101112131415161718192021222324252627282930313233343536373839404142 | // drivers/of/base.c** * of_match_node - Tell if a device_node has a matching of_match structure * @matches: array of of device match structures to search in * @node: the of device structure to match against * * Low level utility function used by device matching. */const struct of_device_id *of_match_node(const struct of_device_id *matches, const struct device_node *node){ const struct of_device_id *match; unsigned long flags; raw_spin_lock_irqsave(&devtree_lock, flags); match = __of_match_node(matches, node); raw_spin_unlock_irqrestore(&devtree_lock, flags); return match;}EXPORT_SYMBOL(of_match_node);staticconst struct of_device_id *__of_match_node(const struct of_device_id *matches, const struct device_node *node){ const struct of_device_id *best_match = NULL; int score, best_score = 0; if (!matches) return NULL; for (; matches->name[0] || matches->type[0] || matches->compatible[0]; matches++) { score = __of_device_is_compatible(node, matches->compatible, matches->type, matches->name); if (score > best_score) { best_match = matches; best_score = score; } } return best_match;} |
__of_match_node调用__of_device_is_compatible匹配,传入的参数依次为:
struct device_node *nodestruct of_device_id *matches的compatible,type,name
12345678910111213141516171819202122232425262728293031323334353637383940414243444546474849505152535455565758596061626364656667 | /** * __of_device_is_compatible() - Check if the node matches given constraints * @device: pointer to node * @compat: required compatible string, NULL or "" for any match * @type: required device_type value, NULL or "" for any match * @name: required node name, NULL or "" for any match * * Checks if the given @compat, @type and @name strings match the * properties of the given @device. A constraints can be skipped by * passing NULL or an empty string as the constraint. * * Returns 0 for no match, and a positive integer on match. The return * value is a relative score with larger values indicating better * matches. The score is weighted for the most specific compatible value * to get the highest score. Matching type is next, followed by matching * name. Practically speaking, this results in the following priority * order for matches: * * 1. specific compatible && type && name * 2. specific compatible && type * 3. specific compatible && name * 4. specific compatible * 5. general compatible && type && name * 6. general compatible && type * 7. general compatible && name * 8. general compatible * 9. type && name * 10. type * 11. name */static int __of_device_is_compatible(const struct device_node *device, const char *compat, const char *type, const char *name){ struct property *prop; const char *cp; int index = 0, score = 0; /* Compatible match has highest priority */ if (compat && compat[0]) { prop = __of_find_property(device, "compatible", NULL); for (cp = of_prop_next_string(prop, NULL); cp; cp = of_prop_next_string(prop, cp), index++) { if (of_compat_cmp(cp, compat, strlen(compat)) == 0) { score = INT_MAX/2 - (index << 2); break; } } if (!score) return 0; } /* Matching type is better than matching name */ if (type && type[0]) { if (!__of_node_is_type(device, type)) return 0; score += 2; } /* Matching name is a bit better than not */ if (name && name[0]) { if (!of_node_name_eq(device, name)) return 0; score++; } return score;} |
可以看到of_device_id的compatible属性优先级最高,其次是type属性,最后是name属性。根据这三个属性计算分数score,分数越高匹配度越高。
而platform_driver结构体嵌套的driver结构体的of_match_table属性 是一个指向const struct of_device_id结构的指针,用于描述设备树节点和驱动程序之间的匹配规则。
12345678910 | // include/linux/mod_devicetable.h/* * Struct used for matching a device */struct of_device_id { char name[32]; char type[32]; char compatible[128]; const void *data;}; |
struct of_device_id
数组的最后一个元素必须是一个空的结构体,以标记数组的结束
示例:
12345 | static const struct of_device_id my_driver_match[] = { { .compatible = "vendor,device-1" }, { .compatible = "vendor,device-2" }, { },}; |
示例
| 设备树层级 | 设备树名称 | 设备树名称 |
|---|---|---|
| 顶层设备树 | rk3568-evb1-ddr4-v10-linux.dts | rk3568-evb1-ddr4-v10-linux.dts |
| 第二级设备树 | rk3568-evb1-ddr4-v10.dtsi | rk3568-linux.dtsi |
| 第三级设备树 | rk3568.dtsi rk3568-evb.dtsi topeet_screen_choose.dtsi topeet_rk3568_lcds.dtsi |
rk3568-evb1-ddr4-v10-linux.dts是顶层设备树
添加:
rk3568-evb1-ddr4-v10-linux.dts
1234567891011121314151617181920212223242526272829303132333435363738394041424344454647484950515253545556 | // SPDX-License-Identifier: (GPL-2.0+ OR MIT)/* * Copyright (c) 2020 Rockchip Electronics Co., Ltd. * *//{ topeet{ compatible = "simple-bus"; myLed{ compatible = "my devicetree"; reg = <0xFDD60000 0x00000004>; }; };};&vp0 { cursor-win-id = <ROCKCHIP_VOP2_CLUSTER0>;};&vp1 { cursor-win-id = <ROCKCHIP_VOP2_CLUSTER1>;};&uart7 { status ="okay"; pinctrl-name = "default"; pinctrl-0 = <&uart7m1_xfer>;};&uart4 { status = "okay"; pinctrl-names = "default"; pinctrl-0 = <&uart4m1_xfer>;};&uart9 { status = "okay"; pinctrl-names = "default"; pinctrl-0 = <&uart9m1_xfer>;};&can1 { status = "okay"; compatible = "rockchip,canfd-1.0"; assigned-clocks = <&cru CLK_CAN1>; assigned-clock-rates = <150000000>; //If can bitrate lower than 3M,the clock-rates should set 100M,else set 200M. pinctrl-names = "default"; pinctrl-0 = <&can1m1_pins>;}; |
驱动
123456789101112131415161718192021222324252627282930313233343536373839404142434445464748495051525354555657585960616263646566676869707172 | // 平台设备的初始化函数static int my_platform_probe(struct platform_device *pdev){ printk(KERN_INFO "my_platform_probe: Probing platform device\n"); // 添加设备特定的操作 // ... return 0;}// 平台设备的移除函数static int my_platform_remove(struct platform_device *pdev){ printk(KERN_INFO "my_platform_remove: Removing platform device\n"); // 清理设备特定的操作 // ... return 0;}const struct of_device_id of_match_table_id[] = { {.compatible="my devicetree"},};// 定义平台驱动结构体static struct platform_driver my_platform_driver = { .probe = my_platform_probe, .remove = my_platform_remove, .driver = { .name = "my_platform_device", .owner = THIS_MODULE, .of_match_table = of_match_table_id, },};// 模块初始化函数static int __init my_platform_driver_init(void){ int ret; // 注册平台驱动 ret = platform_driver_register(&my_platform_driver); if (ret) { printk(KERN_ERR "Failed to register platform driver\n"); return ret; } printk(KERN_INFO "my_platform_driver: Platform driver initialized\n"); return 0;}// 模块退出函数static void __exit my_platform_driver_exit(void){ // 注销平台驱动 platform_driver_unregister(&my_platform_driver); printk(KERN_INFO "my_platform_driver: Platform driver exited\n");}module_init(my_platform_driver_init);module_exit(my_platform_driver_exit);MODULE_LICENSE("GPL");MODULE_AUTHOR("even629"); |
of操作
获取设备树节点
of_find_by_name()
of_find_node_by_name是 Linux 内核中用于通过节点名称查找设备树节点的函数
| 项目 | 说明 |
|---|---|
| 函数定义 | struct device_node *of_find_node_by_name(struct device_node *from, const char *name); |
| 头文件 | #include <linux/of.h> |
| 参数 from | 起始查找节点: NULL:从设备树根节点开始查找 非 NULL:从该节点之后继续查找同名节点 |
| 参数 name | 要查找的设备树节点名称(设备树节点的 node name,不是 compatible) |
| 功能 | 在设备树中查找名称匹配的节点,返回对应的device_node结构体指针 |
| 返回值 | 找到:返回匹配节点的struct device_node *;未找到:返回NULL |
of_find_node_by_path()
| 项目 | 说明 |
|---|---|
| 函数定义 | struct device_node *of_find_node_by_path(const char *path); |
| 头文件 | #include <linux/of.h> |
| 参数 path | 设备树节点的绝对路径字符串,例如:/soc/gpio@ff720000、/topeet/myLed |
| 功能 | 根据设备树节点的绝对路径查找对应节点,返回匹配的struct device_node结构体指针 |
| 返回值 | 成功:返回指向struct device_node的指针;失败:返回 NULL |
of_get_parent()
| 项目 | 说明 |
|---|---|
| 函数定义 | struct device_node *of_get_parent(const struct device_node *node); |
| 头文件 | #include <linux/of.h> |
| 参数 node | 要获取父节点的设备树节点指针 |
| 功能 | 获取指定节点的父节点,并返回其对应的device_node结构体指针 |
| 返回值 | 成功:返回父节点的struct device_node指针;失败或无父节点:返回 NULL |
of_get_next_child()
| 项目 | 说明 |
|---|---|
| 函数定义 | struct device_node *of_get_next_child(const struct device_node *node, struct device_node *prev); |
| 头文件 | #include <linux/of.h> |
| 参数 node | 当前设备树节点指针,用于指定要遍历其子节点的父节点 |
| 参数 prev | 上一个子节点的指针;如果为NULL,则返回第一个子节点 |
| 功能 | 遍历设备树节点的子节点;逐个返回指定节点的所有子节点 |
| 返回值 | 成功:返回指向下一个子节点的struct device_node指针;无更多子节点:返回 NULL |
for_each_child_of_node()
| 项目 | 说明 |
|---|---|
| 宏定义 | for_each_child_of_node(parent, child) |
| 头文件 | #include <linux/of.h> |
| 参数 parent | 父设备树节点指针(struct device_node *) |
| 参数 child | 子节点指针变量(struct device_node *),用于遍历 |
| 功能 | 遍历指定父节点的所有子节点 |
| 返回值 | 无(宏,用于 for 循环) |
示例:
12345678910 | struct device_node *np = pdev->dev.of_node;struct device_node *sub_np;for_each_child_of_node(np, sub_np) { /* sub_np将依次指向每个sub-node */ [...] int size; of_property_read_u32(client->dev.of_node,"size", &size); [...]} |
of_find_compatible_node()
| 项目 | 说明 |
|---|---|
| 函数定义 | struct device_node *of_find_compatible_node(struct device_node *from, const char *type, const char *compatible); |
| 头文件 | #include <linux/of.h> |
| 参数 from | 指定开始查找的节点;若为NULL,则从设备树根节点开始搜索 |
| 参数 type | 要匹配的设备类型字符串,可用于匹配节点的device_type属性;通常可设为NULL |
| 参数 compatible | 设备树中需要匹配的compatible属性字符串 |
| 功能 | 在设备树中查找第一个与指定 compatible 字符串匹配的节点;返回值可用于继续查找下一个匹配节点 |
| 返回值 | 成功:返回匹配节点的struct device_node*;失败或不存在:返回 NULL |
of_find_matching_node_and_match()
| 项目 | 说明 |
|---|---|
| 函数定义 | struct device_node *of_find_matching_node_and_match(struct device_node *from, const struct of_device_id *matches, const struct of_device_id **match); |
| 头文件 | #include <linux/of.h> |
| 参数 from | 指定从哪个节点开始查找: 传 NULL表示从设备树根节点开始查找;传上一次返回的节点可继续查找下一个匹配节点 |
| 参数 matches | 指向一个 of_device_id[]匹配表,匹配表中包含用于匹配设备树节点compatible或type的条件 |
| 参数 match | 输出参数,用于返回此次匹配到的 of_device_id条目指针;可以为 NULL |
| 功能 | 在设备树中根据matches匹配表查找符合条件的节点,同时可返回对应匹配项 |
| 返回值 | 成功:返回匹配到的struct device_node *;失败:返回 NULL |
示例:
1234567891011 | static const struct of_device_id my_match_table[] = { { .compatible = "vendor,device" }, { /* sentinel */ }};const struct of_device_id *match;struct device_node *np;// 从根节点开始查找匹配的节点np = of_find_matching_node_and_match(NULL, my_match_table, &match) |
首先定义了一个of_device_id匹配表my_match_table,其中包含了一个兼容性字符串为vendor,device的匹配项。然后,我们使用of_find_matching_node_and_match函数从根节点开始查找匹配的节点。
示例
设备树:
1234567891011121314 | /{ test_device{ compatible = "simple-bus"; myLed{ compatible = "my devicetree"; reg = <0xFDD60000 0x00000004>; }; };}; |
驱动:
12345678910111213141516171819202122232425262728293031323334353637383940414243444546474849505152535455565758596061 | static const struct of_device_id mynode_of_match[] = { { .compatible = "my devicetree" }, {} };static int my_platform_driver_probe(struct platform_device *pdev){ struct device_node *mydev_node; pr_info("my_platform_driver_probe: Probing platform device\n"); // 通过node name查找设备树接单 mydev_node = of_find_node_by_name(NULL, "myLed"); pr_info("[of_find_node_by_name]: device node is %s\n", mydev_node->name); // 通过节点路径查找设备树节点 mydev_node = of_find_node_by_path("/test_device/myLed"); pr_info("[of_find_node_by_path]: device node is %s\n", mydev_node->name); // 获取父节点 mydev_node = of_get_parent(mydev_node); pr_info("[of_find_node_by_path]: device node is %s\n", mydev_node->name); // 获取子节点 mydev_node = of_get_next_child(mydev_node, NULL); pr_info("[of_get_next_child]: device node is %s\n", mydev_node->name); // 使用compatible 查找节点 mydev_node = of_find_compatible_node(NULL, NULL, "my devicetree"); pr_info("[of_find_compatible_node]: device node is %s\n", mydev_node->name); // 使用of_device_id匹配表查找匹配的节点 mydev_node = of_find_matching_node_and_match(NULL, mynode_of_match, NULL); pr_info("[of_find_matching_node_and_match]: device node is %s\n", mydev_node->name); return 0;}static int my_platform_driver_remove(struct platform_device *pdev){ return 0;}static const struct of_device_id match_table[] = { { .compatible = "my devicetree" }, {} };static struct platform_driver my_platform_driver ={ .driver = { .owner = THIS_MODULE, .name = "my_platform_driver", .of_match_table = match_table, }, .probe = my_platform_driver_probe, .remove = my_platform_driver_remove,};module_platform_driver(my_platform_driver);MODULE_LICENSE("GPL");MODULE_AUTHOR("even629<asqwgo@outlook.com>");MODULE_DESCRIPTION("This is a test sample for of api"); |
测试:
12345678 | root@topeet:/root# insmod of_api_test.ko[ 1230.073568] my_platform_driver_probe: Probing platform device[ 1230.074042] [of_find_node_by_name]: device node is myLed[ 1230.074156] [of_find_node_by_path]: device node is myLed[ 1230.074163] [of_find_node_by_path]: device node is test_device[ 1230.074170] [of_get_next_child]: device node is myLed[ 1230.074461] [of_find_compatible_node]: device node is myLed[ 1230.074717] [of_find_matching_node_and_match]: device node is myLed |
获取设备树属性
of_find_property()
| 项目 | 说明 |
|---|---|
| 函数定义 | struct property *of_find_property(const struct device_node *np, const char *name, int *lenp); |
| 头文件 | #include <linux/of.h> |
| 参数 np | 要查找属性的设备树节点(struct device_node指针) |
| 参数 name | 要查找的属性名称字符串,例如compatible、reg、status |
| 参数 lenp | 指向int类型的指针,用于返回属性值的字节长度;如果不需要获取长度,可以传入 NULL |
| 功能 | 在指定节点np下查找名称为name的属性,并可返回属性值长度 |
| 返回值 | 成功:返回属性结构体指针struct property *;失败(未找到属性或参数无效):返回 NULL |
of_property_count_elems_of_size()
| 项目 | 说明 |
|---|---|
| 函数定义 | int of_property_count_elems_of_size(const struct device_node *np, const char *propname, int elem_size); |
| 头文件 | #include <linux/of.h> |
| 参数 np | 设备树节点指针(struct device_node *),表示要读取属性的节点 |
| 参数 propname | 属性名称字符串,例如reg、gpios等 |
| 参数 elem_size | 单个元素的大小(单位:字节),例如:sizeof(u32)→ 计算属性中 32 位整数的数量 |
| 功能 | 计算指定属性中的元素个数(按照给定的元素大小划分) |
| 返回值 | 成功:返回属性中包含的元素数量 属性不存在或无内容:返回 0 其他错误:返回 负数错误码(例如 -EINVAL) |
of_property_read_u32_index()
| 项目 | 说明 |
|---|---|
| 函数定义 | int of_property_read_u32_index(const struct device_node *np, const char *propname, u32 index, u32 *out_value); |
| 头文件 | #include <linux/of.h> |
| 参数 np | 设备树节点指针(struct device_node *),表示要读取属性的节点 |
| 参数 propname | 属性名称字符串,例如reg、gpios等 |
| 参数 index | 属性元素的索引(从 0 开始),指定要读取第几个元素 |
| 参数 out_value | 指向u32类型变量的指针,用于存储读取到的值 |
| 功能 | 从指定属性中获取指定索引位置的 32 位无符号整数(u32) |
| 返回值 | 成功:返回 0,out_value保存读取值失败:返回负数错误码,(属性不存在或读取失败) |
of_property_read_u64_index()
| 项目 | 说明 |
|---|---|
| 函数定义 | static inline int of_property_read_u64_index(const struct device_node *np, const char *propname, u32 index, u64 *out_value); |
| 头文件 | #include <linux/of.h> |
| 参数 np | 设备树节点指针(struct device_node *),表示要读取属性的节点 |
| 参数 propname | 属性名称字符串,例如reg、gpios等 |
| 参数 index | 属性元素的索引(从 0 开始),指定要读取第几个元素 |
| 参数 out_value | 指向u64类型变量的指针,用于存储读取到的值 |
| 功能 | 从指定属性中获取指定索引位置的 64 位无符号整数(u64) |
| 返回值 | 成功:返回 0,out_value保存读取值失败:返回负数错误码,例如属性不存在或读取失败 |
of_property_read_variable_u32_array()
| 项目 | 说明 |
|---|---|
| 函数定义 | int of_property_read_variable_u32_array(const struct device_node *np, const char *propname, u32 *out_values, size_t SZ_min, size_t SZ_max); |
| 头文件 | #include <linux/of.h> |
| 参数 np | 设备树节点指针(struct device_node *),表示要读取属性的节点 |
| 参数 propname | 属性名称字符串,例如reg、gpios等 |
| 参数 out_values | 指向u32类型数组的指针,用于存储读取到的值 |
| 参数 SZ_min | 指定数组的最小元素数量 |
| 参数 SZ_max | 指定数组的最大元素数量 |
| 功能 | 从指定属性中读取可变长度的u32数组,并存储到out_values |
| 返回值 | 成功:返回实际读取到的数组元素数量 失败:返回负数错误码,例如属性不存在或读取失败 |
- 从指定属性中读取变长的 u8 数组
12 | int of_property_read_variable_u8_array(const struct device_node *np, const char *propname, u8 *out_values,size_t SZ_min, size_t SZ_max) |
- 从指定属性中读取变长的 u16 数组
12 | int of_property_read_variable_u16_array(const struct device_node *np, const char *propname, u16*out_values, size_t SZ_min, size_t SZ_max) |
- 从指定属性中读取变长的 u64 数组
12 | int of_property_read_variable_u64_array(const struct device_node *np, const char *propname, u64*out_values, size_t SZ_min, size_t SZ_max) |
of_property_read_string()
| 项目 | 说明 |
|---|---|
| 函数定义 | static inline int of_property_read_string(const struct device_node *np, const char *propname, const char **out_string); |
| 头文件 | #include <linux/of.h> |
| 参数 np | 设备树节点指针(struct device_node *),表示要读取属性的节点 |
| 参数 propname | 属性名称字符串,例如compatible、status等 |
| 参数 out_string | 指向字符串指针的指针,用于存储读取到的字符串 |
| 功能 | 从指定属性中读取字符串值 |
| 返回值 | 成功:返回 0 失败:返回负数错误码,例如属性不存在或读取失败 |
of_property_read_bool()
| 项目 | 说明 |
|---|---|
| 函数定义 | static inline bool of_property_read_bool(const struct device_node *np, const char *propname); |
| 头文件 | #include <linux/of.h> |
| 参数 np | 设备树节点指针(struct device_node *),表示要读取属性的节点 |
| 参数 propname | 属性名称字符串,例如gpio-active-low、enable等 |
| 功能 | 判断指定节点中是否存在某个布尔类型属性 |
| 返回值 | 存在该属性:返回 true 不存在:返回 false |
示例
设备树:
1234567891011121314 | /{ test_device{ compatible = "simple-bus"; myLed{ compatible = "my devicetree"; reg = <0xFDD60000 0x00000004>; }; };}; |
驱动:
123456789101112131415161718192021222324252627282930313233343536373839404142434445464748495051525354555657585960616263646566676869707172737475 | static int my_platform_driver_probe(struct platform_device *pdev){ struct device_node *mydev_node; int i, num; u32 out_value_u32; u64 out_value_u64; u32 out_value_u32_array[2]; const char *value_compatible; struct property *my_prop; pr_info("my_platform_driver_probe: Probing platform device\n"); // 通过名字查找设备树节点 mydev_node = of_find_node_by_name(NULL, "myLed"); pr_info("[of_find_node_by_name]: device node is %s\n", mydev_node->name); // 查找compatible 属性 my_prop = of_find_property(mydev_node, "compatible", NULL); pr_info("[of_find_property]: property name is %s\n", my_prop->name); // 获取reg 属性的元素的数量 num = of_property_count_elems_of_size(mydev_node, "reg", sizeof(u32)); pr_info("[of_property_count_elems_of_size]: reg elem size is %d\n", num); // 读取 reg 属性的值 u32 for (i = 0; i < num; i++) { of_property_read_u32_index(mydev_node, "reg", i, &out_value_u32); pr_info("[of_property_read_u32_index]: reg u32 value: 0x%X\n", out_value_u32); } // 读取 reg 属性的值 u64 of_property_read_u64_index(mydev_node, "reg", 0, &out_value_u64); pr_info("[of_property_read_u64_index]: reg u64 value: 0x%llX\n", out_value_u64); // 读取 reg 属性为一个数组 of_property_read_variable_u32_array(mydev_node, "reg", out_value_u32_array, 1, 2); pr_info("[of_property_read_variable_u32_array]: array[0] is 0x%X\n", out_value_u32_array[0]); pr_info("[of_property_read_variable_u32_array]: array[1] is 0x%X\n", out_value_u32_array[1]); // 读取 compatible 属性的字符串值 of_property_read_string(mydev_node, "compatible", &value_compatible); pr_info("[of_property_read_string]: compatible string is %s\n", value_compatible); return 0;}static int my_platform_driver_remove(struct platform_device *pdev){ return 0;}static const struct of_device_id of_match_table[] = { { .compatible = "my devicetree" }, {} };static struct platform_driver my_platform_driver={ .driver={ .owner = THIS_MODULE, .name = "my_platform_driver", .of_match_table = of_match_table, }, .probe = my_platform_driver_probe, .remove = my_platform_driver_remove,};module_platform_driver(my_platform_driver);MODULE_LICENSE("GPL");MODULE_AUTHOR("even629<asqwgo@outlook.com>");MODULE_DESCRIPTION("this is a test sample for devicetree api: of_property"); |
测试:
1234567891011 | root@topeet:/root# insmod of_api_property_test.ko[ 1173.158496] my_platform_driver_probe: Probing platform device[ 1173.158912] [of_find_node_by_name]: device node is myLed[ 1173.158922] [of_find_property]: property name is compatible[ 1173.158929] [of_property_count_elems_of_size]: reg elem size is 2[ 1173.158935] [of_property_read_u32_index]: reg u32 value: 0xFDD60000[ 1173.158941] [of_property_read_u32_index]: reg u32 value: 0x4[ 1173.158947] [of_property_read_u64_index]: reg u64 value: 0xFDD6000000000004[ 1173.158954] [of_property_read_variable_u32_array]: array[0] is 0xFDD60000[ 1173.158958] [of_property_read_variable_u32_array]: array[1] is 0x4[ 1173.158964] [of_property_read_string]: compatible string is my devicetree |
ranges属性
platform_get_resource 获取设备树资源的前提
由于设备树在系统启动的时候都会转化为 platform 设备,我们可以接在驱动中使用在平台总线中的platform_get_resource函数直接获取platform_device资源
示例:
设备树:
1234567891011121314 | /{ test_device{ compatible = "simple-bus"; myLed{ compatible = "my devicetree"; reg = <0xFDD60000 0x00000004>; }; };}; |
驱动:
1234567891011121314151617181920212223242526272829303132333435363738394041424344454647484950515253545556575859606162636465666768697071 | // 平台设备的初始化函数struct resource *myresources;static int my_platform_probe(struct platform_device *pdev){ printk(KERN_INFO "my_platform_probe: Probing platform device\n"); // 获取平台设备的资源 myresources = platform_get_resource(pdev, IORESOURCE_MEM, 0); if (myresources == NULL) { // 如果获取资源失败,打印 value_compatible 的值 printk("platform_get_resource is error\n"); } printk("reg valus is %llx\n", myresources->start); return 0;}// 平台设备的移除函数static int my_platform_remove(struct platform_device *pdev){ printk(KERN_INFO "my_platform_remove: Removing platform device\n"); // 清理设备特定的操作 // ... return 0;}const struct of_device_id of_match_table_id[] = { { .compatible = "my devicetree" },};// 定义平台驱动结构体static struct platform_driver my_platform_driver = { .probe = my_platform_probe, .remove = my_platform_remove, .driver = { .name = "my_platform_device", .owner = THIS_MODULE, .of_match_table = of_match_table_id, },};// 模块初始化函数static int __init my_platform_driver_init(void){ int ret; // 注册平台驱动 ret = platform_driver_register(&my_platform_driver); if (ret) { printk(KERN_ERR "Failed to register platform driver\n"); return ret; } printk(KERN_INFO "my_platform_driver: Platform driver initialized\n"); return 0;}// 模块退出函数static void __exit my_platform_driver_exit(void){ // 注销平台驱动 platform_driver_unregister(&my_platform_driver); printk(KERN_INFO "my_platform_driver: Platform driver exited\n");}module_init(my_platform_driver_init);module_exit(my_platform_driver_exit);MODULE_LICENSE("GPL");MODULE_AUTHOR("topeet"); |
这种方法会加载失败。原因是platform_get_resource返回NULL
123456789101112131415161718192021222324 | // drivers/base/platform.c/** * platform_get_resource - get a resource for a device * @dev: platform device * @type: resource type * @num: resource index * * Return: a pointer to the resource or NULL on failure. */struct resource *platform_get_resource(struct platform_device *dev, unsigned int type, unsigned int num){ u32 i; for (i = 0; i < dev->num_resources; i++) { struct resource *r = &dev->resource[i]; if (type == resource_type(r) && num-- == 0) return r; } return NULL;}EXPORT_SYMBOL_GPL(platform_get_resource); |
返回 NULL 的情况有两种可能性,一种是没进入上面的 for 循环直接返回了 NULL,另外一种是进入了 for 循环,但是类型匹配不正确,跳出 for循环之后再返回 NULL。
这里的类型一定是匹配的,所以我们就来寻找为什么没有进入 for 循环,这里只有一种可能,也就是dev->num_resources 为 0。
我们来看of_platform_device_create_pdata这个函数
123456789101112131415161718192021222324252627282930313233343536373839404142434445464748495051 | // drivers/of/platform.c/** * of_platform_device_create_pdata - Alloc, initialize and register an of_device * @np: pointer to node to create device for * @bus_id: name to assign device * @platform_data: pointer to populate platform_data pointer with * @parent: Linux device model parent device. * * Returns pointer to created platform device, or NULL if a device was not * registered. Unavailable devices will not get registered. */static struct platform_device *of_platform_device_create_pdata( struct device_node *np, const char *bus_id, void *platform_data, struct device *parent){ struct platform_device *dev; /* 检查设备节点是否可用或已填充 */ if (!of_device_is_available(np) || of_node_test_and_set_flag(np, OF_POPULATED)) return NULL; /* 分配平台设备结构体 */ dev = of_device_alloc(np, bus_id, parent); if (!dev) goto err_clear_flag; /* 设置平台设备的一些属性 */ dev->dev.coherent_dma_mask = DMA_BIT_MASK(32); if (!dev->dev.dma_mask) dev->dev.dma_mask = &dev->dev.coherent_dma_mask; dev->dev.bus = &platform_bus_type; dev->dev.platform_data = platform_data; of_msi_configure(&dev->dev, dev->dev.of_node); /* 将平台设备添加到设备模型中 */ if (of_device_add(dev) != 0) { platform_device_put(dev); goto err_clear_flag; } return dev;err_clear_flag: /* 清除设备节点的已填充标志 */ of_node_clear_flag(np, OF_POPULATED); return NULL;} |
函数调用of_device_alloc分配一个平台设备结构体,并将设备节点指针、设备标识符和父设备指针传递给它,正是该函数决定的resource.num
of_device_alloc函数如下:
1234567891011121314151617181920212223242526272829303132333435363738394041424344454647484950515253545556 | // drivers/of/platform.c/** * of_device_alloc - Allocate and initialize an of_device * @np: device node to assign to device * @bus_id: Name to assign to the device. May be null to use default name. * @parent: Parent device. */struct platform_device *of_device_alloc(struct device_node *np, const char *bus_id, struct device *parent){ struct platform_device *dev; int rc, i, num_reg = 0, num_irq; struct resource *res, temp_res; dev = platform_device_alloc("", PLATFORM_DEVID_NONE); if (!dev) return NULL; /* count the io and irq resources */ while (of_address_to_resource(np, num_reg, &temp_res) == 0) num_reg++; num_irq = of_irq_count(np); /* Populate the resource table */ if (num_irq || num_reg) { res = kcalloc(num_irq + num_reg, sizeof(*res), GFP_KERNEL); if (!res) { platform_device_put(dev); return NULL; } dev->num_resources = num_reg + num_irq; dev->resource = res; for (i = 0; i < num_reg; i++, res++) { rc = of_address_to_resource(np, i, res); WARN_ON(rc); } if (of_irq_to_resource_table(np, res, num_irq) != num_irq) pr_debug("not all legacy IRQ resources mapped for %pOFn\n", np); } dev->dev.of_node = of_node_get(np); dev->dev.fwnode = &np->fwnode; dev->dev.parent = parent ? : &platform_bus; if (bus_id) dev_set_name(&dev->dev, "%s", bus_id); else of_device_make_bus_id(&dev->dev); return dev;}EXPORT_SYMBOL(of_device_alloc); |
在第 32 行dev->num_resources = num_reg + num_irq;即 reg 的 number 和 irq 的 number,由于在设备树中并没有添加中断相关的属性num_irq为 0,而num_reg由第20行通过这个函数of_address_to_resource(np, num_reg, &temp_res) == 0循环计数获得num_rg
123 | /* count the io and irq resources */while (of_address_to_resource(np, num_reg, &temp_res) == 0) num_reg++; |
of_address_to_resource函数定义如下:
123456789101112131415161718192021222324252627 | // drivers/of/address.c/** * of_address_to_resource - Translate device tree address and return as resource * * Note that if your address is a PIO address, the conversion will fail if * the physical address can't be internally converted to an IO token with * pci_address_to_pio(), that is because it's either called too early or it * can't be matched to any host bridge IO space */int of_address_to_resource(struct device_node *dev, int index, struct resource *r){ const __be32 *addrp; u64 size; unsigned int flags; const char *name = NULL; addrp = of_get_address(dev, index, &size, &flags); if (addrp == NULL) return -EINVAL; /* Get optional "reg-names" property to add a name to a resource */ of_property_read_string_index(dev, "reg-names", index, &name); return __of_address_to_resource(dev, addrp, size, flags, name, r);}EXPORT_SYMBOL_GPL(of_address_to_resource); |
第 18 行,获取 reg 属性的地址、大小和类型,在设备树中 reg 属性已经存在了,所以这里会正确返回。
第 23 行,读取reg-names属性,由于设备树中没有定义这个属性,所以该函数不会有影响。
最后具有决定性作用的函数就是返回的__of_address_to_resource函数了,跳转到该函数的定义如下所示
12345678910111213141516171819202122232425 | // drivers/of/address.cstatic int __of_address_to_resource(struct device_node *dev, const __be32 *addrp, u64 size, unsigned int flags, const char *name, struct resource *r){ u64 taddr; if (flags & IORESOURCE_MEM) taddr = of_translate_address(dev, addrp); else if (flags & IORESOURCE_IO) taddr = of_translate_ioport(dev, addrp, size); else return -EINVAL; if (taddr == OF_BAD_ADDR) return -EINVAL; memset(r, 0, sizeof(struct resource)); r->start = taddr; r->end = taddr + size - 1; r->flags = flags; r->name = name ? name : dev->full_name; return 0;} |
reg 属性的 flags 为IORESOURCE_MEM,所以又会执行第 9 行的of_translate_address函数,跳转到该函数,该函数的定义如下所示
12345678910111213141516 | // drivers/of/address.cu64 of_translate_address(struct device_node *dev, const __be32 *in_addr){ struct device_node *host; u64 ret; ret = __of_translate_address(dev, of_get_parent, in_addr, "ranges", &host); if (host) { of_node_put(host); return OF_BAD_ADDR; } return ret;}EXPORT_SYMBOL(of_translate_address); |
该函数的重点在第 7 行,上述函数实际上是__of_translate_address函数的封装,其中 传入的第三个参数ranges 是我们要关注的重点,继续跳转到该函数的定义,具体内容如下所示:
123456789101112131415161718192021222324252627282930313233343536373839404142434445464748495051525354555657585960616263646566676869707172737475767778798081828384858687888990919293949596979899100101102103104105106107108 | // drivers/of/address.c/* * Translate an address from the device-tree into a CPU physical address, * this walks up the tree and applies the various bus mappings on the * way. * * Note: We consider that crossing any level with #size-cells == 0 to mean * that translation is impossible (that is we are not dealing with a value * that can be mapped to a cpu physical address). This is not really specified * that way, but this is traditionally the way IBM at least do things * * Whenever the translation fails, the *host pointer will be set to the * device that had registered logical PIO mapping, and the return code is * relative to that node. */static u64 __of_translate_address(struct device_node *dev, struct device_node *(*get_parent)(const struct device_node *), const __be32 *in_addr, const char *rprop, struct device_node **host){ struct device_node *parent = NULL; struct of_bus *bus, *pbus; __be32 addr[OF_MAX_ADDR_CELLS]; int na, ns, pna, pns; u64 result = OF_BAD_ADDR; pr_debug("**translation for device %pOF**\n", dev); /* Increase refcount at current level */ of_node_get(dev); *host = NULL; /* Get parent & match bus type */ parent = get_parent(dev); if (parent == NULL) goto bail; bus = of_match_bus(parent); /* Count address cells & copy address locally */ bus->count_cells(dev, &na, &ns); if (!OF_CHECK_COUNTS(na, ns)) { pr_debug("Bad cell count for %pOF\n", dev); goto bail; } memcpy(addr, in_addr, na * 4); pr_debug("bus is %s (na=%d, ns=%d) on %pOF\n", bus->name, na, ns, parent); of_dump_addr("translating address:", addr, na); /* Translate */ for (;;) { struct logic_pio_hwaddr *iorange; /* Switch to parent bus */ of_node_put(dev); dev = parent; parent = get_parent(dev); /* If root, we have finished */ if (parent == NULL) { pr_debug("reached root node\n"); result = of_read_number(addr, na); break; } /* * For indirectIO device which has no ranges property, get * the address from reg directly. */ iorange = find_io_range_by_fwnode(&dev->fwnode); if (iorange && (iorange->flags != LOGIC_PIO_CPU_MMIO)) { result = of_read_number(addr + 1, na - 1); pr_debug("indirectIO matched(%pOF) 0x%llx\n", dev, result); *host = of_node_get(dev); break; } /* Get new parent bus and counts */ pbus = of_match_bus(parent); pbus->count_cells(dev, &pna, &pns); if (!OF_CHECK_COUNTS(pna, pns)) { pr_err("Bad cell count for %pOF\n", dev); break; } pr_debug("parent bus is %s (na=%d, ns=%d) on %pOF\n", pbus->name, pna, pns, parent); /* Apply bus translation */ if (of_translate_one(dev, bus, pbus, addr, na, ns, pna, rprop)) break; /* Complete the move up one level */ na = pna; ns = pns; bus = pbus; of_dump_addr("one level translation:", addr, na); } bail: of_node_put(parent); of_node_put(dev); return result;} |
第 34 ~ 37 行,获取父节点和匹配的总线类型
第 40 行,获取address-cell和size-cells分别存入 int 类型的变量 na 和 ns 中
第 52 行是一个 for 循环,循环中在 92 行使用of_translate_one函数进行转换,其中rprop参数表示要转换的资源属性,该参数的值为传入的字符串"ranges",然后我们继续跳转到该函数,该函数的具体内容如下所示:
123456789101112131415161718192021222324252627282930313233343536373839404142434445464748495051525354555657585960616263646566 | // drivers/of/address.cstatic int of_translate_one(struct device_node *parent, struct of_bus *bus, struct of_bus *pbus, __be32 *addr, int na, int ns, int pna, const char *rprop){ const __be32 *ranges; unsigned int rlen; int rone; u64 offset = OF_BAD_ADDR; /* * Normally, an absence of a "ranges" property means we are * crossing a non-translatable boundary, and thus the addresses * below the current cannot be converted to CPU physical ones. * Unfortunately, while this is very clear in the spec, it's not * what Apple understood, and they do have things like /uni-n or * /ht nodes with no "ranges" property and a lot of perfectly * useable mapped devices below them. Thus we treat the absence of * "ranges" as equivalent to an empty "ranges" property which means * a 1:1 translation at that level. It's up to the caller not to try * to translate addresses that aren't supposed to be translated in * the first place. --BenH. * * As far as we know, this damage only exists on Apple machines, so * This code is only enabled on powerpc. --gcl * * This quirk also applies for 'dma-ranges' which frequently exist in * child nodes without 'dma-ranges' in the parent nodes. --RobH */ ranges = of_get_property(parent, rprop, &rlen); if (ranges == NULL && !of_empty_ranges_quirk(parent) && strcmp(rprop, "dma-ranges")) { pr_debug("no ranges; cannot translate\n"); return 1; } if (ranges == NULL || rlen == 0) { offset = of_read_number(addr, na); memset(addr, 0, pna * 4); pr_debug("empty ranges; 1:1 translation\n"); goto finish; } pr_debug("walking ranges...\n"); /* Now walk through the ranges */ rlen /= 4; rone = na + pna + ns; for (; rlen >= rone; rlen -= rone, ranges += rone) { offset = bus->map(addr, ranges, na, ns, pna); if (offset != OF_BAD_ADDR) break; } if (offset == OF_BAD_ADDR) { pr_debug("not found !\n"); return 1; } memcpy(addr, ranges + na, 4 * pna); finish: of_dump_addr("parent translation for:", addr, pna); pr_debug("with offset: %llx\n", (unsigned long long)offset); /* Translate it into parent bus space */ return pbus->translate(addr, offset, pna);} |
在该函数的第 30 行使用of_get_property函数获取"ranges"属性,但由于在我们添加的设备树节点中并没有该属性,所以这里的 ranges 值就为 NULL,第 34 行的条件判断成立,也就会返回 1。
接下来再根据这个返回值继续分析上级函数:
of_translate_one函数返回 1 之后,上一级的_of_translate_address的返回值就为OF_BAD_ADDR;
再上一级的of_translate_address返回值也是OF_BAD_ADDR;
继续向上查找__of_address_to_resource函数会返回-EINVAL;
of_address_to_resource返回-EINVAL,所以num_reg为 0;
到这里关于为什么platform_get_resource函数获取资源失败的问题就找到了,只是因为在其设备树中的父节点并没有这个名为ranges这个属性,所以只需添加ranges属性即可。
ranges属性介绍
ranges属性是一种用于描述设备之间地址映射关系的属性。它在设备树(Device Tree)中使用,用于描述子设备地址空间如何映射到父设备地址空间。设备树是一种硬件描述语言,用于描述嵌入式系统中的硬件组件和它们之间的连接关系。
设备树中的每个设备节点都可以具有ranges属性,其中包含了地址映射的信息。
下面是常见的格式:
1 | ranges = <child-bus-address parent-bus-address length>; |
或者
1 | ranges; |
- child-bus-address
子设备地址空间的起始地址。
它指定了子设备在父设备地址空间中的位置。具体的字长由ranges所在节点的#address-cells属性决定。
- parent-bus-address
父设备地址空间的起始地址。
它指定了父设备中用于映射子设备的地址范围。具体的字长由ranges的父节点的#address-cells属性决定。
- length
映射的大小。它指定了子设备地址空间在父设备地址空间中的长度。具体的字长由ranges的父节点的#size-cells属性决定。
当ranges属性的值为空时,表示子设备地址空间和父设备地址空间具有完全相同的映射,即 1:1 映射。这通常用于描述内存区域,其中子设备和父设备具有相同的地址范围。
当ranges属性的值不为空时,按照指定的映射规则将子设备地址空间映射到父设备地址空间。具体的映射规则取决于设备树的结构和设备的特定要求。
示例
123456789101112131415161718192021 | /dts-v1/;/ { compatible = "acme,coyotes-revenge"; .... external-bus { ranges = <0 0 0x10100000 0x10000 1 0 0x10160000 0x10000 2 0 0x30000000 0x30000000>; // Chipselect 1, Ethernet // Chipselect 2, i2c controller // Chipselect 3, NOR Flash ....... }; ......}; |
在external-bus节点中#address-cells属性值为 2 表示child-bus-address由两个值表示,也就是 0 和 0,父节点的#address-cells属性值和#size-cells属性值为 1,表示parent-bus-address和length都由 1 个表示,也就是0x10100000和0x10000,该ranges值表示将子地址空间(0x0-0xFFFF)映射到父地址空间0x10100000 - 0x1010FFFF,这里的例子为带参数ranges属性映射,不带参数的ranges属性为 1:1 映射,较为简单,这里不再进行举例。
在嵌入式系统中,不同的设备可能连接到相同的总线或总线控制器上,它们需要在物理地址空间中进行正确的映射,以便进行数据交换和通信。
例如,一个设备可能通过总线连接到主处理器或其他设备,而这些设备的物理地址范围可能不同。ranges 属性就是用来描述这种地址映射关系的。
设备分类
内存映射型设备
内存映射型设备是指可以通过内存地址进行直接访问的设备。这类设备在物理地址空间中的一部分被映射到系统的内存地址空间中,使得 CPU 可以通过读写内存地址的方式与设备进行通信和控制。
- 特点:
- 直接访问:内存映射型设备可以被 CPU 直接访问,类似于访问内存中的数据。这种直接访问方式提供了高速的数据传输和低延迟的设备操作。
- 内存映射:设备的寄存器、缓冲区等资源被映射到系统的内存地址空间中,使用读写内存的方式与设备进行通信。
- 读写操作:CPU 可以通过读取和写入映射的内存地址来与设备进行数据交换和控制操作。
在设备树中,内存映射型设备的设备树举例如下所示:
1234567891011121314151617181920212223 | /dts-v1/;/ { ranges; serial@101f0000 { compatible = "arm,pl011"; reg = <0x101f0000 0x1000>; }; gpio@101f3000 { compatible = "arm,pl061"; reg = <0x101f3000 0x1000 0x101f4000 0x10>; }; spi@10115000 { compatible = "arm,pl022"; reg = <0x10115000 0x1000>; };}; |
非内存映射型设备
非内存映射型设备是指不能通过内存地址直接访问的设备。这类设备可能采用其他方式与CPU 进行通信,例如通过 I/O 端口、专用总线或特定的通信协议。
- 特点:
- 非内存访问:非内存映射型设备不能像内存映射型设备那样直接通过内存地址进行访问。它们可能使用独立的 I/O 端口或专用总线进行通信。
- 特定接口:设备通常使用特定的接口和协议与 CPU 进行通信和控制,例如 SPI、I2C、UART 等。
- 驱动程序:非内存映射型设备通常需要特定的设备驱动程序来实现与 CPU 的通信和控制。
在设备树中,非内存映射型设备的设备树举例如下所示:
12345678910111213141516171819202122232425262728293031323334 | /dts-v1/;/ { compatible = "acme,coyotes-revenge"; .... external-bus { ranges = <0 0 0x10100000 0x10000 1 0 0x10160000 0x10000 2 0 0x30000000 0x30000000>; // Chipselect 1, Ethernet // Chipselect 2, i2c controller // Chipselect 3, NOR Flash ethernet@0,0 { compatible = "smc,smc91c111"; reg = <0 0 0x1000>; }; i2c@1,0 { compatible = "acme,a1234-i2c-bus"; reg = <1 0 0x1000>; rtc@58 { compatible = "maxim,ds1338"; reg = <0x58>; }; }; };}; |
映射地址计算
接下来以上面列举的非内存映射型设备的设备树中的ethernet@0节点为例,计算该网卡设备的映射地址。
首先,找到ethernet@0所在的节点,并查看其 reg 属性。在给定的设备树片段中,ethernet@0的 reg 属性为<0 0 0x1000>。在根节点中,#address-cells的值为 1,表示地址由一个单元格组成。
接下来,根据ranges属性进行地址映射计算。在external-bus节点的ranges属性中,有三个映射条目:
- 第一个映射条目为
0 0 0x10100000 0x10000,表示外部总线的地址范围为0x10100000到0x1010FFFF。该映射条目的第一个值为 0,表示与external-bus节点的第一个子节点(ethernet@0,0)相关联。 - 第二个映射条目:
1 0 0x10160000 0x10000,表示外部总线的地址范围为0x10160000到0x1016FFFF。该映射条目的第一个值为 1,表示与external-bus节点的第二个子节点(i2c@1,0)相关联。 - 第三个映射条目:
2 0 0x30000000 0x30000000,表示外部总线的地址范围为0x30000000到0x5FFFFFFF。该映射条目的第一个值为 2,表示与external-bus节点的第三个子节点相关联。
由于ethernet@0与external-bus的第一个子节点相关联,并且它的reg属性为<0 0 0x1000>,我们可以进行以下计算:
ethernet@0的物理起始地址 = 外部总线地址起始值 = 0x10100000
ethernet@0的物理结束地址 = 外部总线地址起始值 + (ethernet@0的 reg 属性的第二个值-1)= $$ 0x10100000 + 0xFFF = 0x10100FFF $$
因此,ethernet@0的物理地址范围为0x10100000 - 0x10100FFF,
命名资源的概念
当驱动程序期望某种类型的资源列表时,由于编写开发板设备树的人通常不是写驱动程序的人,因此不能保证该列表是以驱动程序期望的方式排序。例如,驱动程序可能期望其设备节点具有2条IRQ线路,一条用于索引0处的Tx事件,另一条用于索引1处的Rx。
如果这种顺序得不到满足驱动就会发生异常行为。为了避免这种不匹配,引入了命名资源(clock、irq、dma、reg等)的概念。它由定义资源列表和命名组成,因此无论索引是什么,给定的名称总将与资源相匹配。
命名资源的相应属性如下。
reg-names:reg属性中的内存区域列表。clock-names:clocks属性中命名clocks。interrupt-names:为interrupts属性中的每个中断指定一个名称。dma-names:用于dma属性。
例如
1234567891011 | fake_device { compatible = "packt,fake-device"; reg = <0x4a064000 0x800>, <0x4a0648000x200>, <0x4a064c00 0x200>; reg-names = "config", "ohci", "ehci"; interrupts = <0 66 IRQ_TYPE_LEVEL_HIGH>, <0 67 IRQ_TYPE_LEVEL_HIGH>; interrupt-names = "ohci", "ehci"; clocks = <&clks IMX6QDL_CLK_UART_IPG>, <&clks IMX6QDL_CLK_UART_SERIAL>; clock-names = "ipg", "per"; dmas = <&sdma 25 4 0>, <&sdma 26 4 0>; dma-names = "rx", "tx";}; |
驱动程序中提取每个命名资源的代码如下所示:
123456789101112131415 | struct resource *res1, *res2;res1 = platform_get_resource_byname(pdev,IORESOURCE_MEM, "ohci");res2 = platform_get_resource_byname(pdev,IORESOURCE_MEM, "config");struct dma_chan *dma_chan_rx, *dma_chan_tx;dma_chan_rx = dma_request_slave_channel(&pdev->dev, "rx");dma_chan_tx = dma_request_slave_channel(&pdev->dev, "tx");int txirq, rxirq;txirq = platform_get_irq_byname(pdev, "ohci");rxirq = platform_get_irq_byname(pdev, "ehci");structclk *clck_per, *clk_ipg;clk_ipg = devm_clk_get(&pdev->dev, "ipg");clk_ipg = devm_clk_get(&pdev->dev, "pre"); |
访问 reg 属性
在这里,驱动程序将占用内存区域,并将其映射到虚拟地址空间。
12345678910111213 | struct resource *res;void __iomem *base;res = platform_get_resource(pdev,IORESOURCE_MEM, 0);/* * 这里这个函数作用相当于使用request_mem_region(res->start,resource_size(res), pdev->name) * 和 ioremap(iores->start, resource_size(iores)请求和映射内存区域 **/base = devm_ioremap_resource(&pdev->dev, res);if (IS_ERR(base)) return PTR_ERR(base); |
获取中断资源
irq_of_parse_and_map()
| 项目 | 说明 |
|---|---|
| 函数定义 | unsigned int irq_of_parse_and_map(struct device_node *dev, int index); |
| 头文件 | #include <linux/of_irq.h> |
| 参数 dev | 设备树节点指针(struct device_node *),表示要解析中断号的设备节点 |
| 参数 index | 索引号,表示从设备节点的interrupts属性中获取第几个中断号 |
| 功能 | 从设备节点的interrupts属性中解析和映射对应的中断号 |
| 返回值 | 成功:返回无符号整数表示解析和映射的中断号 失败:通常返回 0 或无效中断号(具体错误处理依赖平台实现) |
irqd_get_trigger_type()
| 项目 | 说明 |
|---|---|
| 函数定义 | u32 irqd_get_trigger_type(struct irq_data *d); |
| 头文件 | #include <linux/irq.h> |
| 参数 d | 指向中断数据结构(struct irq_data *),表示要获取触发类型的中断 |
| 功能 | 从中断数据结构中获取对应中断的触发类型 |
| 返回值 | 成功:返回一个无符号 32 位整数,表示中断触发类型(如电平触发或边沿触发)不会失败,因为总是返回一个有效的触发类型定义宏 |
irq_get_irq_data()
| 项目 | 说明 |
|---|---|
| 函数定义 | struct irq_data *irq_get_irq_data(unsigned int irq); |
| 头文件 | #include <linux/irq.h> |
| 参数 irq | 中断号,表示要获取中断数据结构的中断号 |
| 功能 | 根据中断号获取对应的中断数据结构 |
| 返回值 | 成功:返回指向struct irq_data的指针;失败:返回 NULL |
gpio_to_irq()
| 项目 | 说明 |
|---|---|
| 函数定义 | int gpio_to_irq(unsigned int gpio); |
| 头文件 | #include <linux/gpio.h> |
| 参数 gpio | GPIO 编号,表示要获取中断号的 GPIO |
| 功能 | 根据 GPIO 编号获取对应的中断号 |
| 返回值 | 成功:返回对应的中断号(整数); 失败:返回负数错误码 |
of_irq_get()
| 项目 | 说明 |
|---|---|
| 函数定义 | int of_irq_get(struct device_node *dev, int index); |
| 头文件 | #include <linux/of_irq.h> |
| 参数 dev | 设备节点,表示要获取中断号的设备节点 |
| 参数 index | 索引号,表示从interrupts属性中获取第几个中断号 |
| 功能 | 从设备节点的interrupts属性中获取对应的中断号 |
| 返回值 | 成功:返回对应的中断号(整数); 失败:返回负数错误码 |
platform_get_irq()
| 项目 | 说明 |
|---|---|
| 函数定义 | int platform_get_irq(struct platform_device *dev, unsigned int num); |
| 头文件 | #include <linux/platform_device.h> |
| 参数 dev | 平台设备,表示要获取中断号的平台设备 |
| 参数 num | 索引号,表示从设备中获取第几个中断号 |
| 功能 | 根据平台设备和索引号获取对应的中断号 |
| 返回值 | 成功:返回对应的中断号(整数); 失败:返回负数错误码 |
例子
123456789101112131415161718192021222324252627282930 | // SPDX-License-Identifier: (GPL-2.0+ OR MIT)/* * Copyright (c) 2020 Rockchip Electronics Co., Ltd. * *//{ test_device{ ranges; compatible = "simple-bus"; myLed{ compatible = "my devicetree"; reg = <0xFDD60000 0x00000004>; }; myirq{ compatible = "my irq"; interrupt-parent=<&gpio3>; interrupts = <RK_PA5 IRQ_TYPE_LEVEL_LOW>; }; };}; |
驱动代码
1234567891011121314151617181920212223242526272829303132333435363738394041424344454647484950515253545556575859606162636465 | static int my_platform_driver_probe(struct platform_device *pdev){ int irq; struct irq_data *my_irq_data; struct device_node *mydev_node; u32 trigger_type; pr_info("my_platform_probe: Probing platform device\n"); // 获取设备节点 mydev_node = pdev->dev.of_node; // 解析和映射中断 irq = irq_of_parse_and_map(mydev_node, 0); pr_info("[irq_of_parse_and_map]: irq is %d\n", irq); // 获取中断数据结构 my_irq_data = irq_get_irq_data(irq); // 获取中断出发类型 trigger_type = irqd_get_trigger_type(my_irq_data); pr_info("[irqd_get_trigger_type]: trigger_type is %d\n", trigger_type); // 将 gpio转为中断号 irq = gpio_to_irq(101); pr_info("[gpio_to_irq]: irq is %d\n", irq); // 从设备节点获取中断号 irq = of_irq_get(mydev_node, 0); pr_info("[of_irq_get]: irq is %d\n", irq); // 获取平台设备的中断号 irq = platform_get_irq(pdev, 0); pr_info("[platform_get_irq]: irq is %d\n", irq); return 0;}static int my_platform_driver_remove(struct platform_device *pdev){ return 0;}static const struct of_device_id of_match_table[] = { { .compatible = "my irq" }, {} };static struct platform_driver my_platform_drv = { .driver = { .owner = THIS_MODULE, .name = "my platform driver", .of_match_table = of_match_table, }, .probe = my_platform_driver_probe, .remove = my_platform_driver_remove,};module_platform_driver(my_platform_drv);MODULE_LICENSE("GPL");MODULE_AUTHOR("even629<asqwgo@outlook.com>");MODULE_DESCRIPTION("This is a test sample for platform irq"); |
测试:
123456789 | root@topeet:/root# insmod of_api_irq_test.ko[ 7138.032958] of_api_irq_test: loading out-of-tree module taints kernel.[ 7138.033958] my_platform_probe: Probing platform device[ 7138.033994] [irq_of_parse_and_map]: irq is 94[ 7138.034002] [irqd_get_trigger_type]: trigger_type is 8[ 7138.034013] [gpio_to_irq]: irq is 94[ 7138.034025] [of_irq_get]: irq is 94[ 7138.034037] [platform_get_irq]: irq is 94 |
参考文档:dts-bindings
Documentation/devicetree/bindings目录是 Linux 内核源码中的一个重要目录,用于存储设备树(Device Tree)的 bindings 文档。设备树是一种描述硬件平台和设备配置的数据结构,它以一种可移植和独立于具体硬件的方式描述了设备的属性、寄存器配置、中断信息等。
bindings 目录中的文档提供了有关设备树的各种设备和驱动程序的详细说明和用法示例。这些文档对于开发人员来说非常重要,因为它们提供了在设备树中描述硬件和配置驱动程序所需的属性和约定。
Documentation/devicetree/bindings目录的一些常见子目录和其内容的概述:
arm:包含与 ARM 体系结构相关的设备和驱动程序的 bindings 文档。clock:包含与时钟设备和时钟控制器相关的 bindings 文档。dma:包含与直接内存访问(DMA)控制器和设备相关的 bindings 文档。gpio:包含与通用输入输出(GPIO)控制器和设备相关的 bindings 文档。i2c:包含与 I2C 总线和设备相关的 bindings 文档。interrupt-controller:包含与中断控制器相关的 bindings 文档。media:包含与多媒体设备和驱动程序相关的 bindings 文档。mfd:包含与多功能设备(MFD)子系统和设备相关的 bindings 文档。networking:包含与网络设备和驱动程序相关的 bindings 文档。power:包含与电源管理子系统和设备相关的 bindings 文档。spi:包含与 SPI 总线和设备相关的 bindings 文档。usb:包含与 USB 控制器和设备相关的 bindings 文档。video:包含与视频设备和驱动程序相关的 bindings 文档。
每个子目录中的文档通常以.txt或.yaml的扩展名保存,使用文本或 YAML 格式编写。这些文档提供了有关设备树中属性的详细说明、属性的语法、可选值和用法示例。它们还描述了设备树的约定和最佳实践,以帮助开发人员正确地配置和描述硬件设备和驱动程序。
yaml格式是遵循json-schema编写的Devicetree绑定,参考:

设备树插件
Linux4.4 以后引入了动态设备树(Dynamic DeviceTree)。设备树插件(Device Tree Overlay)是一种用于设备树(Device Tree)的扩展机制。设备树是一种用于描述硬件设备的数据结构,广泛应用于嵌入式系统中,特别是基于 Linux 内核的系统中。
设备树插件允许在运行时动态修改设备树的内容,以便添加,修改或删除设备节点和属性。它提供了一种灵活的方式来配置和管理硬件设备,而无需重新编译整个设备树。通过使用设备树插件,开发人员可以在不重新启动系统的情况下对硬件进行配置更改。
设备树插件(Dynamic DeviceTree)通常以一种文本格式定义,称为设备树源文件(DeviceTree Source, DTS)。DTS 文件描述了设备树的结构和属性,包括设备节点,寄存器地址,中断信息等。设备树插件可以通过加载和解析设备树文件,并将其合并到现有的设备树中,从而实现对设备树的动态修改。
应用场景
使用设备树插件,可以实现一些常见的配置变化,比如添加外部设备,禁用不需要的设备,修改设备属性等。这对于嵌入式系统的开发和调试非常有用,特别是面对多种硬件配置或需要频繁更改硬件配置的情况下
设备树插件语法
overlay.dts
- 头部声明
12 | /dts-v1/;/plugin/; |
- 插件节点名称用于定义要添加,修改或删除的设备节点及其属性。它使用与设备树源文件相同的语法,但在节点名称前面使用特定的修饰符来指示插件的操作
比如下面这个节点:
12345678 | //arch/arm64/boot/dts/rockchip/topeet-rk3568-linux.dts //485 使能引脚 rk_485_ctl: rk-485-ctl { compatible = "topeet,rs485_ctl"; gpios = <&gpio0 RK_PC6 GPIO_ACTIVE_HIGH>; pinctrl-names = "default"; pinctrl-0 = <&rk_485_gpio>; }; |
如果在设备树插件中要为这个节点添加overlay_node节点:
有以下几种表达方式:
12345678910111213141516171819202122232425262728293031323334353637 | /dts-v1/;/plugin/;// 方法1&{/rk-485-ctl}{ overlay_node{ status = "okay"; };};// 方法2&rk_485_ctl{ overlay_node{ status = "okay"; };};// 方法3/{ fragment@0{ target-path="/rk-485-ctl"; __overlay__{ overlay_node{ status = "okay"; }; }; }; fragment@1{ target=<&rk_485_ctl>; __overlay__{ overlay_node{ status = "okay"; }; }; };}; |
设备树插件的编译和设备树编译一样的。
1 | dtc -I dts -O dtb overlay.dts -o overlay.dtbo |
移植设备树驱动插件
我们将探讨如何移植设备树插件到 iTOP-RK3568 开发板上。移植设备树插件主要包括以下几个步骤
- 配置内核支持挂载 configfs 虚拟文件系统。
- 配置内核支持设备树插件
- 移植设备树插件驱动
配置内核支持挂载 configfs 虚拟文件系统
12345 | $ make ARCH=arm64 menuconfig# 路径如下File System-> Pseudo filesystems -> -*- UserSpace-driven configuration filesystem |
启动用后检查内核是否挂载了虚拟文件系统,如果没有运行下面命令挂载
1 | $ mount -t configfs none /sys/kernel/config |
配置内核支持设备树插件
12345678910111213141516 | $ make ARCH=arm64 menuconfig# 路径如下Device Driver -> -*- Device Tree and Open Firmware support -> --- Device Tree and Open Firmware support [*] Enable dtc generation of symbols for overlays support # 为主设备树生成符号,供 overlay 引用 [ ] Device Tree runtime unit tests # 内核设备树子系统的运行时测试 [*] Device Tree overlays # 支持运行时动态加载设备树覆盖File System -> <*> Overlay filesystem support # 启用 OverlayFS 核心支持。 [*] Overlayfs: turn on redirect directory feature by default # Redirect directory(重定向目录) 是 OverlayFS 的一项优化特性。 [*] Overlayfs: follow redirects even if redirects are turned off # 即使挂载时 禁用了 redirect 功能(redirect_dir=off),内核仍会 尝试识别并遵循已存在的重定向元数据。用于兼容已存在的重定向。 [*] Overlayfs: turn on inodes index feature by default # Inode index(索引) 功能用于解决“stale inode”问题。用于保证 inode 一致性,支持 hardlink [*] Overlayfs: auto enable inode number mapping # 自动为 upper 层中的文件分配 全局唯一且持久的 inode 编号(通过索引机制)。依赖于上面的 inode index 功能。如果没有这个,每次挂载 OverlayFS,同一文件的 inode 号可能变化 [*] Overlayfs: turn on metadata only copy up feature by default # Metadata-only copy up(仅元数据复制) 是一项性能优化。修改属性时不复制整个文件 |
保存配置:
12 | cp .config arch/arm64/configs/rockchip_linux_defconfig../build.sh kernel |
移植设备树插件驱动
github上已有编写好的设备树插件驱动,我们只要将此驱动编译成驱动模块或者编译进内核即可

编译:
12 | $ git clone https://github.com/ikwzm/dtbocfg.git$ make KERNEL_SRC=/home/zhaohang/repository/linux/rk3568_linux_5.10/kernel ARCH=arm64 CROSS_COMPILE=/home/zhaohang/repository/linux/rk3568_linux_5.10/prebuilts/gcc/linux-x86/aarch64/gcc-arm-10.3-2021.07-x86_64-aarch64-none-linux-gnu/bin/aarch64-none-linux-gnu- |
编译生成dtbocfg.ko拷贝到开发板即可。
加载设备树插件
加载设备树插件(首先要有设备树插件驱动,通过cat proc/filesystems检查 configfs 是否挂载成功)
进入系统目录/sys/kernel/config/device-tree/overlays/
123456789101112131415161718192021 | $ insmod dtbocfg.ko[ 430.997017] dtbocfg: loading out-of-tree module taints kernel.[ 430.997630] dtbocfg: 0.1.1[ 430.997675] dtbocfg: OK$ cd /sys/kernel/config/device-tree/overlays/# 创建一个内核对象$ mkdir test$ cd test$ lsdtbo status$ cat /root/overlay.dtb > dtbo# 使能 dtbo$ echo 1 > status# 此时我们可以使用以下命令看到加载的节点$ ls /proc/device-tree/rk-485-ctl/overlay_node/# 如果我们想删掉使用 dtbo 修改的节点,删除创建的内核对象test即可$ cd /sys/kernel/config/device-tree/overlays/$ rmdir test |
可以创建多个,如果多个都修改相同的属性,按最后一个overlay的
12345678910 | $ cd /sys/kernel/config/device-tree/overlays/# 创建一个内核对象$ mkdir test1# 用另一个设备树覆盖...# 删除时会恢复到test加载后的设备树$ rmdir test1 |
改变集
设备树插件(dtbo)里面的节点也要被转换成device_node,有的device_node也要被转换成platform_device。不过在进行转换之前,of_overlay_fdt_apply函数会先创建一个改变集。然后根据这个改变集去进行修改。
创建改变集的目的是为了方便对设备树进行修改和复原。
改变集是一个描述设备树变化的数据结构,它记录了对设备树的修改操作,如添加、删除或修改节点。通过创建改变集,我们可以在运行时对设备树进行动态修改,而无需修改原始的设备树源文件。
- 通过创建改变集,我们可以方便地定义需要进行的修改操作,而不必直接操作设备树的底层结构。这提供了一种高层次的抽象,使我们能够以更简洁和可读的方式描述设备树的变化。
- 同时,改变集也可以被保存、传递和应用到其他设备树上,方便在不同系统或环境中进行设备树的配置和定制。
- 此外,改变集还可以用于设备树的复原。在某些情况下,我们可能需要在运行时撤销对设备树的修改并恢复到原始状态。通过应用反向的改变集,我们可以还原设备树,使其回到修改之前的状态,实现修改的复原。
因此,创建改变集提供了一种方便、可控和可复原的方式来修改设备树。
虚拟文件系统ConfigFS介绍
在 Linux 内核中,有几个常用的虚拟文件系统,虚拟文件系统提供了一个内核抽象层,使得应用程序可以通过统一的文件访问接口操作不同类型的文件和设备。它简化了应用程序的开发和维护,提供了更高的可移植性和灵活性,并提供了管理文件系统和访问底层硬件的功能。
procfs
虚拟文件系统,提供了对系统内核运行时状态的访问接口。它以文件和目录的形式表示内核中的进程,设备,驱动程序和其他系统信息。通过读取和写入 procfs 中的文件,可以获取和修改有关系统状态的信息。
sysfs
虚拟文件系统,用于表示系统中的设备,驱动程序和其他内核对象。它提供一种统一的接口,通过文件和目录来访问和配置这些对象的属性和状态。Sysfs 常用于设备驱动程序和系统管理工具,用于查看和控制系统的硬件和内核对象。
configfs
虚拟文件系统,用于动态配置和管理内核对象。它提供了一种以文件和目录的形式访问内核对象的接口,允许用户在运行时添加,修改和删除内核对象,而无需重新编译内核或重新启动系统。ConfigFS 常用于配置和管理设备,驱动程序和子系统
这些虚拟文件系统在功能上有一些区别:
procfs主要用于访问和管理进程信息,提供了有关进程,内核参数和系统状态的信息。sysfs主要用于表示和配置系统中的设备,驱动程序和其他内核对象,提供了一种统一的接口来访问和控制这些对象的属性和状态。configfs主要用于动态配置和管理内核对象,提供了一种以文件和目录的形式访问内核对象的接口,允许在运行时添加,修改和删除内核对象。

要实现上述的功能,用户空间需要和内核进行交互,也就是将dtbo加载到内存里面去。sysfs虚拟文件系统的作用是将内核中的数据、属性以文件的方式导出到用户空间。导出到用户空间以后,读这些文件表示读取设备的文件,写这些文件就表示控制设备。
configfs作用的英文解释为 Userspace-driven kernel object configuration,翻译过来就是用户空间配置内核对象。
所以configfs与sysfs恰恰相反,sysfs导出内核对象给用户空间,configfs是从用户空间去配置内核对象,并且不需要重新编译内核或者修改内核代码。所以configfs更适合设备树插件这个技术。
ConfigFS核心数据结构
ConfigFS 的核心数据结构主要包括以下几个部分:
configfs_subsystem
configfs_subsystem是一个顶层的数据结构,用于表示整个 ConfigFS 子系统。它包含了根配置项组的指针,以及 ConfigFS 的其他属性和状态信息。
config_group
config_group是一种特殊类型的配置项,表示一个配置项组。它可以包含一组相关的配置项,形成一个层次结构。config_group结构包含了父配置项的指针,以及指向子配置项的链表。
config_item
这是 ConfigFS 中最基本的数据结构,用于表示一个配置项。每个配置项都是一个内核对象,可以是设备、驱动程序、子系统等。config_item结构包含了配置项的类型、名称、属性、状态等信息,以及指向父配置项和子配置项的指针。
这些数据结构之间的关系可以形成一个树形结构,其中configfs_subsystem是根节点,config_group表示配置项组,config_item表示单个配置项。子配置项通过链表连接在一起,形成父子关系。
configfs_subsystem
1234 | struct configfs_subsystem { struct config_group su_group; struct mutex su_mutex;}; |
struct configfs_subsystem结构体中包含struct config_group结构体,struct config_group结构体如下所示:
config_group
1234567 | struct config_group { struct config_item cg_item; struct list_head cg_children; struct configfs_subsystem *cg_subsys; struct list_head default_groups; struct list_head group_entry;}; |
struct config_group结构体中包含struct config_item结构体,struct config_item结构体如下所示:
config_item
12345678910 | struct config_item { char *ci_name; char ci_namebuf[CONFIGFS_ITEM_NAME_LEN]; //目录的名字 struct kref ci_kref; struct list_head ci_entry; struct config_item *ci_parent; struct config_group *ci_group; const struct config_item_type *ci_type; //目录下属性文件和属性操作 struct dentry *ci_dentry;}; |
struct config_item结构体中包含了struct config_item_type结构体,struct config_item_type结构体如下所示
config_item_type
1234567 | struct config_item_type { struct module *ct_owner; struct configfs_item_operations *ct_item_ops; //item(目录)的操作方法 struct configfs_group_operations *ct_group_ops; //group(容器)的操作方法 struct configfs_attribute **ct_attrs; //属性文件的操作方法 struct configfs_bin_attribute**ct_bin_attrs; //bin 属性文件的操作方法}; |
struct config_item_type包含了许多重要数据结构:
struct configfs_item_operations *ct_item_opsitem(目录)的操作方法struct configfs_group_operations *ct_goup_opsgroup(容器)的操作方法struct configfs_attribute **ct_attrs属性文件的操作方法struct configfs_bin_attribute **ct_bin_attrsbin 属性文件的操作方法
每个
config_item(或config_group)在初始化时必须绑定一个config_item_type。这个结构决定了该 item 在 sysfs 中表现为何种“可操作对象”。
configfs_item_operations
1234567891011 | struct configfs_item_operations { // 当 item 的引用计数归零时调用 void (*release)(struct config_item *); // 是否允许在 src 和 target 之间建立符号链接(`ln -s`) int (*allow_link)(struct config_item *src, struct config_item *target); // 当链接被删除时调用 void (*drop_link)(struct config_item *src, struct config_item *target);}; |
release()
| 项目 | 说明 |
|---|---|
| 原型 | void (*release)(struct config_item *); |
| 触发 | 引用计数为 0 |
| 职责 | kfree / 资源释放 |
| 必须 | ✅ 必须 |
configfs_group_operations
1234567891011121314151617 | struct configfs_group_operations { //创建 item 的方法,在 group 下面使用 mkdir 命令会调用这个方法 struct config_item *(*make_item)(struct config_group *group, const char *name); //创建 group 的方法,当用户执行 `mkdir <name>` 且希望创建子 group 时调用 struct config_group *(*make_group)(struct config_group *group, const char *name); // (可选)当 item 配置完成后“提交”时调用(较少使用) int (*commit_item)(struct config_item *item); // 当 item 即将被移除前通知(可用于清理资源) void (*disconnect_notify)(struct config_group *group, struct config_item *item); // 当 item 被 `rmdir` 删除后调用(注意:此时 item 已从目录树移除),通常用于解除与 group 的关联 void (*drop_item)(struct config_group *group, struct config_item *item);}; |
make_item()
| 项目 | 说明 |
|---|---|
| 原型 | struct config_item *(*make_item)(struct config_group *, const char *name); |
| 触发 | 用户 mkdir |
| 功能 | 动态创建 item |
| 必须 | 若允许创建 item |
make_group()
| 项目 | 说明 |
|---|---|
| 原型 | struct config_group *(*make_group)(struct config_group *, const char *name); |
| 触发 | mkdir |
| 功能 | 创建子 group(多级目录) |
drop_item()
| 项目 | 说明 |
|---|---|
| 原型 | void (*drop_item)(struct config_group *, struct config_item *); |
| 触发 | rmdir |
| 职责 | config_item_put() |
| 必须 | ✅ 是 |
struct configfs_attribute
12345678910 | struct configfs_attribute { const char *ca_name; // 属性文件的名字 struct module *ca_owner;// 属性文件文件的所属模块 umode_t ca_mode; // 属性文件访问权限 // 读取属性时调用,返回字节数,具体功能需要自行实现。 ssize_t (*show)(struct config_item *, char *); // 写入属性时调用,具体功能需要自行实现。 ssize_t (*store)(struct config_item *, const char *, size_t);}; |
关键数据结构关系图

ConfigFS API
核心 API
config_group_init()
| 项目 | 说明 |
|---|---|
| 函数定义 | void config_group_init(struct config_group *group); |
| 头文件 | #include <linux/configfs.h> |
| 参数 group | 要初始化的 config_group |
| 功能 | 初始化一个 group 的基础结构(不带 name/type) |
| 典型场景 | 初始化 subsystem 的 su_group |
| 返回值 | 无 |
config_group_init_type_name()
| 项目 | 说明 |
|---|---|
| 函数定义 | void config_group_init_type_name(struct config_group *group, const char *name, const struct config_item_type *type); |
| 头文件 | #include <linux/configfs.h> |
| 参数 group | 要初始化的 group |
| 参数 name | group 在 configfs 中显示的目录名 |
| 参数 type | 对应的 config_item_type |
| 功能 | 初始化 group + 设置名字 + 绑定 type |
| 典型场景 | 创建可见目录节点 |
| 返回值 | 无 |
config_item_init_type_name()
| 项目 | 说明 |
|---|---|
| 函数定义 | void config_item_init_type_name(struct config_item *item, const char *name, const struct config_item_type *type); |
| 头文件 | #include <linux/configfs.h> |
| 参数 item | config_item 对象 |
| 参数 name | item 名字 |
| 参数 type | item 类型 |
| 功能 | 初始化一个 item 并绑定类型 |
| 典型场景 | make_item 中使用 |
| 返回值 | 无 |
configfs_register_subsystem()
| 项目 | 说明 |
|---|---|
| 函数定义 | int configfs_register_subsystem(struct configfs_subsystem *subsys); |
| 头文件 | #include <linux/configfs.h> |
| 参数 subsys | 要注册的 configfs 子系统 |
| 功能 | 在/sys/kernel/config/下注册子系统目录 |
| 效果 | 创建/sys/kernel/config/<name> |
| 返回值 | 成功:0 失败:负错误码 |
configfs_unregister_subsystem()
| 项目 | 说明 |
|---|---|
| 函数定义 | void configfs_unregister_subsystem(struct configfs_subsystem *subsys); |
| 功能 | 注销整个 configfs 子系统 |
| 效果 | 删除子系统目录及所有子项 |
| 返回值 | 无 |
configfs_register_group()
| 项目 | 说明 |
|---|---|
| 函数定义 | int configfs_register_group(struct config_group *parent, struct config_group *group); |
| 参数 parent | 父 group |
| 参数 group | 要注册的子 group |
| 功能 | 在父目录下注册一个 group |
| 特点 | ✅ 静态 group(用户不能 rmdir) |
| 返回值 | 成功:0 |
configfs_unregister_group()
| 项目 | 说明 |
|---|---|
| 函数定义 | void configfs_unregister_group(struct config_group *group); |
| 功能 | 注销 group |
| 注意 | 仅适用于 register_group 注册的 group |
config_item_put()
| 项目 | 说明 |
|---|---|
| 函数定义 | void config_item_put(struct config_item *item); |
| 功能 | 减少引用计数 |
| 触发 | 引用计数为 0 → 调用 release |
| 常见位置 | drop_item 回调中 |
| 返回值 | 无 |
属性(attribute)相关
可以利用CONFIGFS_ATTR相关hong
CONFIGFS_ATTR_RO()
| 项目 | 说明 |
|---|---|
| 宏定义 | CONFIGFS_ATTR_RO(prefix, name) |
| 生成 | 只读属性 |
| 要求函数 | prefix_name_show() |
| 生成变量 | prefixattr_name |
CONFIGFS_ATTR_WO()
| 项目 | 说明 |
|---|---|
| 宏定义 | CONFIGFS_ATTR_WO(prefix, name) |
| 生成 | 只写属性 |
| 要求函数 | prefix_name_store() |
CONFIGFS_ATTR()
| 项目 | 说明 |
|---|---|
| 宏定义 | CONFIGFS_ATTR(prefix, name) |
| 生成 | 读写属性 |
示例
注册configFS子系统
12345678910111213141516171819202122232425262728293031323334353637383940414243 | static const struct config_item_type myconfig_item_type = { .ct_owner = THIS_MODULE, .ct_item_ops = NULL, .ct_group_ops = NULL, .ct_attrs = NULL, // .ct_bin_attrs = NULL,};static struct configfs_subsystem myconfigfs_subsystem = { .su_group = { .cg_item = { .ci_namebuf = "myconfigfs", .ci_type = &myconfig_item_type, }, },};static int __init myconfigfs_init(void){ // 初始化config_group config_group_init(&myconfigfs_subsystem.su_group); // 注册子系统 configfs_register_subsystem(&myconfigfs_subsystem); return 0;}static void __exit myconfigfs_exit(void){ configfs_unregister_subsystem(&myconfigfs_subsystem);}module_init(myconfigfs_init);module_exit(myconfigfs_exit);MODULE_LICENSE("GPL");MODULE_AUTHOR("even629<asqwgo@outlook.com>");MODULE_DESCRIPTION("This is a test sample for configfs "); |
加载后可以在/sys/kernel/config目录下看到注册的子系统myconfigfs
12 | $ ls /sys/kernel/configdevice-tree myconfigfs |
注册group容器
12345678910111213141516171819202122232425262728293031323334353637383940414243444546474849505152535455565758 | // 在myconfigfs下创建mygroupstatic struct config_group mygroup;// mygroup_config_item_type,用于描述mygroup的配置项类型static const struct config_item_type mygroup_config_item_type = { .ct_owner = THIS_MODULE, .ct_item_ops = NULL, .ct_group_ops = NULL, .ct_attrs = NULL,};// myconfig_item_type,用于描述配置项类型的结构体static const struct config_item_type myconfig_item_type = { .ct_owner = THIS_MODULE, .ct_group_ops = NULL,};static struct configfs_subsystem myconfigfs_subsystem = { .su_group = { .cg_item = { .ci_namebuf = "myconfigfs", .ci_type = &myconfig_item_type, }, },};static int __init myconfigfs_group_init(void){ // 初始化配置组 config_group_init(&myconfigfs_subsystem.su_group); // 注册子系统 configfs_register_subsystem(&myconfigfs_subsystem); // 初始化配置组"mygroup" config_group_init_type_name(&mygroup, "mygroup", &mygroup_config_item_type); // 在子系统中配置组"mygroup" configfs_register_group(&myconfigfs_subsystem.su_group, &mygroup); return 0;}static void __exit myconfigfs_group_exit(void){ // 注销子系统 configfs_unregister_subsystem(&myconfigfs_subsystem);}module_init(myconfigfs_group_init);module_exit(myconfigfs_group_exit);MODULE_LICENSE("GPL");MODULE_AUTHOR("even629<asqwgo@outlook.com>");MODULE_DESCRIPTION("This is a sample for configfs: register group"); |
测试
1234 | $ ls /sys/kernel/config/device-tree myconfigfs$ ls /sys/kernel/config/myconfigfs/mygroup |
用户空间创建item
我们已经成功在/sys/kernel/config/目录下创建了myconfigfs子系统,并在这个子系统下创建了mygroup容器,但是mygroup容器下不能使用 mkdir 创建 item
1234567891011121314151617181920212223242526272829303132333435363738394041424344454647484950515253545556575859606162636465666768697071727374757677787980 | static struct config_group mygroup;struct myitem { struct config_item item;};void myitem_release(struct config_item *item){ struct myitem *mitem = container_of(item, struct myitem, item); kfree(mitem); pr_info("%s\n", __func__);}struct configfs_item_operations myitem_ops = { .release = myitem_release,};static struct config_item_type mygroup_config_item_type = { .ct_owner = THIS_MODULE, .ct_item_ops = &myitem_ops,};struct config_item *rootgroup_make_item(struct config_group *group, const char *name){ struct myitem *my_config_item; pr_info("%s\n", __func__); my_config_item = kzalloc(sizeof(*my_config_item), GFP_KERNEL); config_item_init_type_name(&my_config_item->item, name, &mygroup_config_item_type); return &my_config_item->item;}struct configfs_group_operations rootgroup_ops = { .make_item = rootgroup_make_item,};static struct config_item_type rootgroup_config_item_type = { .ct_owner = THIS_MODULE, .ct_group_ops = &rootgroup_ops,};static struct configfs_subsystem myconfigfs_subsystem = { .su_group = { .cg_item = { .ci_namebuf = "myconfigfs", .ci_type = &rootgroup_config_item_type, }, },};static int __init myconfigfs_test_init(void){ // 初始化配置组 config_group_init(&myconfigfs_subsystem.su_group); // 注册子系统 configfs_register_subsystem(&myconfigfs_subsystem); // 初始化配置组mygroup config_group_init_type_name(&mygroup, "mygroup", &mygroup_config_item_type); // 将mygroup挂到myconfigfs_subsystem.su_group下面 configfs_register_group(&myconfigfs_subsystem.su_group, &mygroup); return 0;}static void __exit myconfigfs_test_exit(void){ // 注销myconfigfs_subsystem configfs_unregister_subsystem(&myconfigfs_subsystem);}module_init(myconfigfs_test_init);module_exit(myconfigfs_test_exit);MODULE_LICENSE("GPL");MODULE_AUTHOR("even629<asqwgo@outlook.com>");MODULE_DESCRIPTION("this is a test sample for configfs"); |
测试:
1234567891011121314 | ~ $ insmod configfs_make_item_test.ko[ 12.066995] configfs_make_item_test: loading out-of-tree module taints kernel.~ $ ls /sys/kernel/config/device-tree myconfigfs~ $ ls /sys/kernel/config/myconfigfs/mygroup~ $ cd /sys/kernel/config/myconfigfs//sys/kernel/config/myconfigfs $ lsmygroup/sys/kernel/config/myconfigfs $ mkdir test[ 43.220027] rootgroup_make_item/sys/kernel/config/myconfigfs $ ls test/sys/kernel/config/myconfigfs $ rmdir test[ 55.003042] myitem_release |
完善drop和release
release和drop_item是两个不同的成员字段,用于不同的目的:
release成员字段是在struct config_item_type结构体中定义的一个回调函数指针。它指向一个函数,当 configfs 中的配置项被释放或删除时,内核会调用该函数来执行相应的资源释放操作。它通常用于释放与配置项相关的资源,比如释放动态分配的内存、关闭打开的文件描述符等。drop_item是在struct configfs_group_operations结构体中定义的一个回调函数指针。它指向一个函数,当 configfs 中的配置组(group)被删除时,内核会调用该函数来处理与配置组相关的操作。这个函数通常用于清理配置组的状态、释放相关的资源以及执行其他必要的清理操作。drop_item函数在删除配置组时被调用,而不是在删除单个配置项时被调用。
release成员字段用于配置项的释放操作,而drop_item成员字段用于配置组的删除操作。它们分别在不同的上下文中执行不同的任务,但都与资源释放和清理有关。
123456789101112131415161718192021222324252627282930313233343536373839404142434445464748495051525354555657585960616263646566676869707172737475767778798081828384858687 | struct myitem { struct config_item conf_item;};void child_release(struct config_item *item){ struct myitem *myitem = container_of(item, struct myitem, conf_item); kfree(myitem); pr_info("%s\n", __func__);}static struct configfs_item_operations child_item_ops = { .release = child_release,};static struct config_item_type child_config_item_type = { .ct_owner = THIS_MODULE, .ct_item_ops = &child_item_ops,};struct config_item *root_make_item(struct config_group *group, const char *name){ struct myitem *myitem; myitem = kzalloc(sizeof(*myitem), GFP_KERNEL); config_item_init_type_name(&myitem->conf_item, name, &child_config_item_type); pr_info("%s\n", __func__); return &myitem->conf_item;}// 当 configfs 中的配置组(group)被删除时(root目录下创建的group),内核会调用该函数来处理与配置组相关的操作void root_drop_item(struct config_group *group, struct config_item *item){ struct myitem *myitem = container_of(item, struct myitem, conf_item); config_item_put(&myitem->conf_item); pr_info("%s\n", __func__);}static struct configfs_group_operations root_configfs_group_ops = { .make_item = root_make_item, .drop_item = root_drop_item,};static const struct config_item_type root_config_item_type = { .ct_owner = THIS_MODULE, .ct_group_ops = &root_configfs_group_ops,};static struct configfs_subsystem test_configfs_subsystem = { .su_group = { .cg_item = { .ci_namebuf = "myconfigfs", .ci_type = &root_config_item_type, }, },};static struct config_group child_group1;static int __init configfs_test_init(void){ config_group_init(&test_configfs_subsystem.su_group); configfs_register_subsystem(&test_configfs_subsystem); // 初始化配置组child_group1 config_group_init_type_name(&child_group1, "child_group1", &child_config_item_type); configfs_register_group(&test_configfs_subsystem.su_group, &child_group1); return 0;}static void __exit configfs_test_exit(void){ configfs_unregister_subsystem(&test_configfs_subsystem);}module_init(configfs_test_init);module_exit(configfs_test_exit);MODULE_LICENSE("GPL");MODULE_AUTHOR("even629<asqwgo@outlook.com>");MODULE_DESCRIPTION("This is a test description for configfs"); |
测试:
123456789101112 | $ insmod configfs_release_and_drop_test.ko[ 11.641528] configfs_release_and_drop_test: loading out-of-tree module taints kernel.$ cd /sys/kernel/config/myconfigfs//sys/kernel/config/myconfigfs $ lschild_group1/sys/kernel/config/myconfigfs $ mkdir test[ 26.684113] root_make_item/sys/kernel/config/myconfigfs $ rmdir test[ 30.148208] root_drop_item[ 30.148397] child_release/sys/kernel/config/myconfigfs $ rmdir child_group1/rmdir: 'child_group1/': Operation not permitted |
child_group1是通过configfs_register_group静态注册的子组(subgroup),默认是“固定”的,不能被用户空间删除。
| 函数 | 调用时机 | 责任 | 是否必须 |
|---|---|---|---|
root_drop_item | rmdir 开始时,由父 group 调用 | 解除 item 与 group 的关联,减少引用计数 | ✅ 必须(否则无法触发 release) |
child_release | 引用计数归零时自动调用 | 释放 item 自身内存和资源 | ✅ 必须(否则内存泄漏) |
注册attribute
我们成功创建了 item,但是 item 下面没有创建属性和操作项。
123456789101112131415161718192021222324252627282930313233343536373839404142434445464748495051525354555657585960616263646566676869707172737475767778798081828384858687888990919293949596979899100101102103104105106107108109110111112113114115 | struct myitem { struct config_item conf_item; int size; void *addr;};void child_release(struct config_item *item){ struct myitem *myitem = container_of(item, struct myitem, conf_item); kfree(myitem); pr_info("%s\n", __func__);}static struct configfs_item_operations child_item_ops = { .release = child_release,};ssize_t myread_show(struct config_item *item, char *page){ struct myitem *myitem = container_of(item, struct myitem, conf_item); memcpy(page, myitem->addr, myitem->size); pr_info("%s\n", __func__); return myitem->size;}ssize_t mywrite_store(struct config_item *item, const char *page, size_t size){ struct myitem *myitem = container_of(item, struct myitem, conf_item); myitem->addr = kmemdup(page, size, GFP_KERNEL); myitem->size = size; pr_info("%s\n", __func__); return myitem->size;}// 创建只读配置项myreadCONFIGFS_ATTR_RO(my, read);// 创建只写配置项mywriteCONFIGFS_ATTR_WO(my, write);static struct configfs_attribute *my_attrs[] = { &myattr_read, &myattr_write, NULL,};static struct config_item_type child_config_item_type = { .ct_owner = THIS_MODULE, .ct_item_ops = &child_item_ops, .ct_attrs = my_attrs };struct config_item *root_make_item(struct config_group *group, const char *name){ struct myitem *myitem; myitem = kzalloc(sizeof(*myitem), GFP_KERNEL); config_item_init_type_name(&myitem->conf_item, name, &child_config_item_type); pr_info("%s\n", __func__); return &myitem->conf_item;}// 当 configfs 中的配置组(group)被删除时(root目录下创建的group),内核会调用该函数来处理与配置组相关的操作void root_drop_item(struct config_group *group, struct config_item *item){ struct myitem *myitem = container_of(item, struct myitem, conf_item); config_item_put(&myitem->conf_item); pr_info("%s\n", __func__);}static struct configfs_group_operations root_configfs_group_ops = { .make_item = root_make_item, .drop_item = root_drop_item,};static const struct config_item_type root_config_item_type = { .ct_owner = THIS_MODULE, .ct_group_ops = &root_configfs_group_ops,};static struct configfs_subsystem test_configfs_subsystem = { .su_group = { .cg_item = { .ci_namebuf = "myconfigfs", .ci_type = &root_config_item_type, }, },};static struct config_group child_group1;static int __init configfs_test_init(void){ config_group_init(&test_configfs_subsystem.su_group); configfs_register_subsystem(&test_configfs_subsystem); // 初始化配置组child_group1 config_group_init_type_name(&child_group1, "child_group1", &child_config_item_type); configfs_register_group(&test_configfs_subsystem.su_group, &child_group1); return 0;}static void __exit configfs_test_exit(void){ configfs_unregister_subsystem(&test_configfs_subsystem);}module_init(configfs_test_init);module_exit(configfs_test_exit);MODULE_LICENSE("GPL");MODULE_AUTHOR("even629<asqwgo@outlook.com>");MODULE_DESCRIPTION("This is a test description for configfs"); |
测试:
12345678910111213141516171819 | $ insmod configfs_attribute_test.ko[ 37.565258] configfs_attribute_test: loading out-of-tree module taints kernel.$ cd /sys/kernel/config//sys/kernel/config $ lsdevice-tree myconfigfs/sys/kernel/config $ cd myconfigfs//sys/kernel/config/myconfigfs $ lschild_group1/sys/kernel/config/myconfigfs $ cd child_group1//sys/kernel/config/myconfigfs/child_group1 $ lsread write/sys/kernel/config/myconfigfs/child_group1 $ echo 1 > write[ 71.704345] mywrite_store/sys/kernel/config/myconfigfs/child_group1 $ cat read[ 75.550669] myread_show1/sys/kernel/config/myconfigfs/child_group1 $ cat read[ 78.938556] myread_show1 |
实现多级目录
123456789101112131415161718192021222324252627282930313233343536373839404142434445464748495051525354555657585960616263646566676869707172737475767778798081828384858687888990919293949596979899100101102103104105106107108109110111112113114115116117118119120121122123124125126127128129130131132133134135136137138139140 | struct myitem { struct config_item conf_item; int size; void *addr;};struct mygroup { struct config_group conf_group;};void child_item_release(struct config_item *item){ struct myitem *myitem = container_of(item, struct myitem, conf_item); kfree(myitem); pr_info("%s\n", __func__);}static struct configfs_item_operations child_item_ops = { .release = child_item_release,};// static struct configfs_group_operations child_group_ops = {// };ssize_t myread_show(struct config_item *item, char *page){ struct myitem *myitem = container_of(item, struct myitem, conf_item); if (myitem->size > 0 && myitem->addr != NULL) memcpy(page, myitem->addr, myitem->size); pr_info("%s\n", __func__); return myitem->size;}ssize_t mywrite_store(struct config_item *item, const char *page, size_t size){ struct myitem *myitem = container_of(item, struct myitem, conf_item); myitem->addr = kmemdup(page, size, GFP_KERNEL); myitem->size = size; pr_info("%s\n", __func__); return myitem->size;}CONFIGFS_ATTR_RO(my, read);CONFIGFS_ATTR_WO(my, write);struct configfs_attribute *child_item_attribute[] = { &myattr_read, &myattr_write, NULL,};static struct config_item_type child_item_config_item_type = { .ct_owner = THIS_MODULE, .ct_item_ops = &child_item_ops, .ct_attrs = child_item_attribute,};// 二级文件夹static struct config_item_type child_group_config_item_type = { .ct_owner = THIS_MODULE, // .ct_group_ops = &child_group_ops, .ct_group_ops = NULL,};// root folderstruct config_item *root_make_item(struct config_group *group, const char *name){ struct myitem *myitem; myitem = kzalloc(sizeof(*myitem), GFP_KERNEL); config_item_init_type_name(&myitem->conf_item, name, &child_item_config_item_type); pr_info("%s\n", __func__); return &myitem->conf_item;}struct config_group *root_make_group(struct config_group *group, const char *name){ struct mygroup *mygroup; mygroup = kzalloc(sizeof(*mygroup), GFP_KERNEL); config_group_init_type_name(&mygroup->conf_group, name, &child_group_config_item_type); pr_info("%s\n", __func__); return &mygroup->conf_group;}void root_drop_item(struct config_group *group, struct config_item *item){ config_item_put(item); pr_info("%s\n", __func__);}static struct configfs_group_operations root_group_ops = { .make_item = root_make_item, .make_group = root_make_group, .drop_item = root_drop_item,};static struct config_item_type root_config_item_type = { .ct_owner = THIS_MODULE, .ct_group_ops = &root_group_ops,};static struct configfs_subsystem configfs_test_subsystem = { .su_group = { .cg_item = { .ci_namebuf = "myconfigfs", .ci_type = &root_config_item_type, }, },};static struct config_group mygroup;static int __init configfs_test_init(void){ config_group_init(&configfs_test_subsystem.su_group); configfs_register_subsystem(&configfs_test_subsystem); config_group_init_type_name(&mygroup, "mygroup", &child_group_config_item_type); configfs_register_group(&configfs_test_subsystem.su_group, &mygroup); return 0;}static void __exit configfs_test_exit(void){ configfs_unregister_group(&mygroup);}module_init(configfs_test_init);module_exit(configfs_test_exit);MODULE_LICENSE("GPL");MODULE_AUTHOR("even629<asqwgo@outlook.com>");MODULE_DESCRIPTION("This is a test sample for configfs"); |
需要注意的是:用户执行mkdir /sys/kernel/config/myconfigfs/xxx, ConfigFS 首先调用.make_item(如果定义了),失败则尝试调用.make_group(如果定义了)
dtbocfg 驱动分析
接下来我们来分析设备树插件驱动dtbocfg.ko代码:
123456789 | static struct configfs_subsystem dtbocfg_root_subsys = { .su_group = { .cg_item = { .ci_namebuf = "device-tree", .ci_type = &dtbocfg_root_type, }, }, .su_mutex = __MUTEX_INITIALIZER(dtbocfg_root_subsys.su_mutex),}; |
这段代码定义了一个名为dtbocfg_root_subsys的configfs_subsystem结构体实例,
首先,dtbocfg_root_subsys.su_group是一个config_group结构体,它表示子系统的根配置项组。在这里,该结构体的cg_item字段表示根配置项组的基本配置项。
.ci_namebuf = "device-tree":配置项的名称设置为device-tree,表示该配置项的名称为device-tree。
.ci_type = &dtbocfg_root_type:配置项的类型设置为dtbocfg_root_type,这是一个自定义的配置项类型。接下来,.su_mutex字段是一个互斥锁,用于保护子系统的操作。在这里,使用了__MUTEX_INITIALIZER宏来初始化互斥锁。
总结:上面的代码创建了一个名为device-tree的子系统,它的根配置项组为空。可以在该子系统下添加更多的配置项和配置项组,用于动态配置和管理设备树相关的内核对象。
12 | $ ls /sys/kernel/config/devicetree usb_gadget |
驱动代码入口部分:
12345678910111213141516171819202122232425262728293031 | static int __init dtbocfg_module_init(void){ int retval = 0; pr_info("%s\n", __func__); // 初始化 configfs 组 config_group_init(&dtbocfg_root_subsys.su_group); config_group_init_type_name(&dtbocfg_overlay_group, "overlays", &dtbocfg_overlays_type); // 注册子系统 retval = configfs_register_subsystem(&dtbocfg_root_subsys); if (retval != 0) { pr_err("%s: couldn't register subsys\n", __func__); goto register_subsystem_failed; } // 注册组 retval = configfs_register_group(&dtbocfg_root_subsys.su_group, &dtbocfg_overlay_group); if (retval != 0) { pr_err("%s: couldn't register group\n", __func__); goto register_group_failed; } pr_info("%s: OK\n", __func__); return 0;register_group_failed: configfs_unregister_subsystem(&dtbocfg_root_subsys);register_subsystem_failed: return retval;} |
这段代码是一个初始化函数dtbocfg_module_init(),用于初始化和注册 ConfigFS 子系统和配置项组。
- 首先,通过
config_group_init()函数初始化了dtbocfg_root_subsys.su_group,即子系统的根配置项组。 - 使用
config_group_init_type_name()函数初始化了dtbocfg_overlay_group,表示名为overlays的配置项组,并指定了配置项组的类型为dtbocfg_overlays_type,这是一个自定义的配置项类型。 - 调用
configfs_register_subsystem()函数注册了dtbocfg_root_subsys子系统。如果注册失败,将打印错误信息,并跳转到register_subsystem_failed标签处进行错误处理。 - 调用
configfs_register_group()函数注册了dtbocfg_overlay_group配置项组,并将其添加到dtbocfg_root_subsys.su_group下。
这段代码的作用是初始化和注册一个名为device-tree的 ConfigFS 子系统,并在其下创建一个名为overlays的配置项组。
即Linux 系统下,在device-tree子系统下创建了overlays容器
12 | $ ls /sys/kernel/config/device-tree/overlays |
参考资料
kernel/Documentation/filesystems/configfs目录下的configfs.txt。
kernel/samples/configfs目录下的configfs_sample.c