
Timeline
Timeline
2025-01-10
init
This article introduces how to set up a UEFI development environment based on edk2 on Linux, including downloading the edk2 source code, installing build tools, and demonstrating through a HelloWorld example the process of writing DSC, INF, and C code, compiling to generate target files for x64 and aarch64 platforms, running in Emulator and QEMU, and debugging with gdb. The article also shows the HelloStd example, explaining how to call the standard C library in UEFI.
Basic Environment Setup
This is my hardware environment and operating system
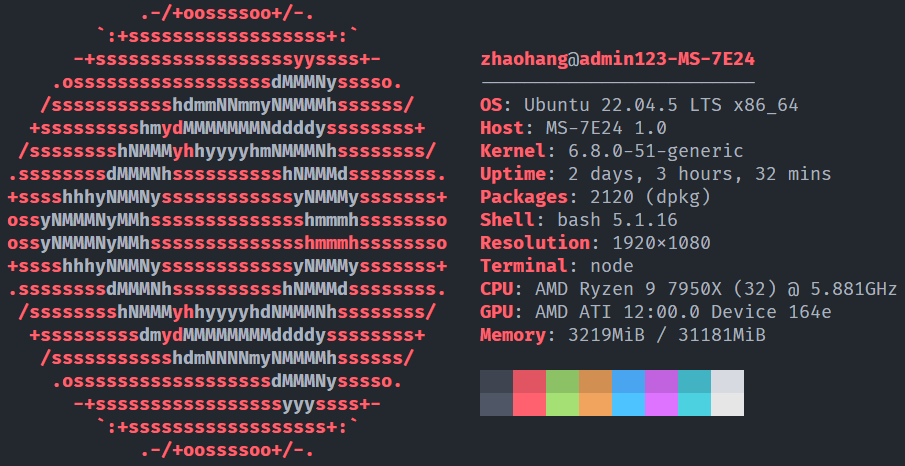
Download the edk2 source code
123456789101112131415161718 | # Install required software packagessudo apt updatesudo apt install gitmkdir -p ~/UEFIcd UEFIgit clone "https://github.com/tianocore/edk2.git"cd edk2# Use this branchgit checkout origin/stable/202408git submodule update --init --recursivegit branch# Check whether all submodules have been correctly initialized. If the submodules are not fully downloaded, there will be some problems during compilation.git submodule statuscd -# Download the edk2-libc code, mainly to use the C standard library in UEFI development.git clone https://github.com/tianocore/edk2-libc.git# Create a code folder to store our own codemkdir -p code |
Install build tools
12345678 | # Download some basic software packagessudo apt-get install python3 python3-distutils uuid-dev build-essential bison flex nasm acpica-tools gcc# Install the ARM compiler, mainly for compiling for aarch64mkdir -p ~/UEFI/toolchaincd ~/UEFI/toolchainwget https://developer.arm.com/-/media/Files/downloads/gnu-a/8.2-2019.01/gcc-arm-8.2-2019.01-x86_64-aarch64-elf.tar.xztar -xf gcc-arm-8.2-2019.01-x86_64-aarch64-elf.tar.xzcd - |
HelloWorld
Next, use a HelloWorld example to compile UEFI code for the x64 or aarch64 target platform, support running in Emulator and QEMU, and finally debug the program with gdb.
Code
12345 | touch HelloWorld.dsctouch HelloWorld.inftouch HelloWorld.c# This command-line tool can generate UUIDs. The UUIDs in the DSC and INF files later are generated this way.uuidgen |
HelloWorld.dsc
The DSC file is a package description file, in whichDefinesall fields in it are mandatory.
For paths in LibraryClasses, you can find them with the following command
12345 | cd edk2# Take UefiApplicationEntryPoint as an examplegrep UefiApplicationEntryPoint -r ./ --include=*.inf | grep LIBRARY_CLASS# Find by GUIDgrep -i 752F3136 -r ./ --exclude-dir=Build |
The format of LibraryClasses is
1 | LibraryClassName|Path/To/LibInstanceName.inf |
For a complete explanation of the DSC file, refer to the following link:

1234567891011121314151617181920212223242526272829303132333435363738 | [Defines] DSC_SPECIFICATION = 0x0001001A PLATFORM_GUID = c08977d4-6e87-42f6-bf5c-4d41cfe7ba53 PLATFORM_VERSION = 0.01 PLATFORM_NAME = HelloWorld SKUID_IDENTIFIER = DEFAULT SUPPORTED_ARCHITECTURES = AARCH64|X64 BUILD_TARGETS = DEBUG|RELEASE|NOOPT OUTPUT_DIRECTORY = $(PKG_OUTPUT_DIR)[LibraryClasses] BaseLib|MdePkg/Library/BaseLib/BaseLib.inf BaseMemoryLib|MdePkg/Library/BaseMemoryLib/BaseMemoryLib.inf DevicePathLib|MdePkg/Library/UefiDevicePathLib/UefiDevicePathLib.inf MemoryAllocationLib|MdePkg/Library/UefiMemoryAllocationLib/UefiMemoryAllocationLib.inf PrintLib|MdePkg/Library/BasePrintLib/BasePrintLib.inf UefiLib|MdePkg/Library/UefiLib/UefiLib.inf UefiHiiServicesLib|MdeModulePkg/Library/UefiHiiServicesLib/UefiHiiServicesLib.inf ShellCEntryLib|ShellPkg/Library/UefiShellCEntryLib/UefiShellCEntryLib.inf HiiLib|MdeModulePkg/Library/UefiHiiLib/UefiHiiLib.inf UefiApplicationEntryPoint|MdePkg/Library/UefiApplicationEntryPoint/UefiApplicationEntryPoint.inf UefiBootServicesTableLib|MdePkg/Library/UefiBootServicesTableLib/UefiBootServicesTableLib.inf UefiRuntimeServicesTableLib|MdePkg/Library/UefiRuntimeServicesTableLib/UefiRuntimeServicesTableLib.inf DebugLib|MdePkg/Library/BaseDebugLibNull/BaseDebugLibNull.inf PcdLib|MdePkg/Library/BasePcdLibNull/BasePcdLibNull.inf[LibraryClasses.ARM,LibraryClasses.AARCH64] NULL|ArmPkg/Library/CompilerIntrinsicsLib/CompilerIntrinsicsLib.inf NULL|MdePkg/Library/BaseStackCheckLib/BaseStackCheckLib.inf[LibraryClasses.X64] RegisterFilterLib|MdePkg/Library/RegisterFilterLibNull/RegisterFilterLibNull.inf[Components] HelloWorld.inf |
HelloWorld.inf
The INF file is the configuration file for an edk2 app, in which
- [Defines] This section defines basic information about a module
- BASE_NAME: the name of the app
- FILE_GUID can be generated with the uuidgen command. UEFI uses GUIDs to distinguish different modules.
- MODULE_TYPE: fill in UEFI here_APPLICATION
- ENTRY_POINT: the name of the main function in the C code
- [Sources] The source code of the module, usually .c and .h files
- [Packages] The packages that need to be used
- [LibraryClasses] The libraries that need to be used
For a complete explanation of the INF file, refer to the following link:

Below is a simple module definition
12345678910111213141516171819202122 | # Variables defined to be used during the build process[Defines] INF_VERSION = 1.25 BASE_NAME = HelloWorld FILE_GUID = 5455334b-dbd9-4f95-b6ed-5ae261a6a0c1 MODULE_TYPE = UEFI_APPLICATION VERSION_STRING = 1.0 ENTRY_POINT = UefiMain# Source code[Sources] HelloWorld.c# Required packages[Packages] MdePkg/MdePkg.dec # Contains Uefi and UefiLib# Required Libraries[LibraryClasses] UefiApplicationEntryPoint # Uefi application entry point UefiLib # UefiLib UefiBootServicesTableLib |
HelloWorld.c
12345678910 | EFI_STATUSEFIAPIUefiMain(IN EFI_HANDLE ImageHandle, IN EFI_SYSTEM_TABLE *SystemTable) { Print(L"Hello World!!!\n"); SystemTable->BootServices->Stall(10000000); return EFI_SUCCESS;} |
Build script
First, we need to create a script to set environment variables
12 | touch env.shchmod a+x env.sh |
env.sh
123456789101112131415161718192021222324252627 | # Project name, also the source directory of the source codeexport PROJ_NAME="HelloWorld"# DSC file nameexport DSC_NAME="HelloWorld"# INF file nameexport INF_NAME="HelloWorld"# It is also the name of the generated *.efi, defined in the BASE_NAME of the INFexport INF_BASE_NAME="HelloWorld"# UEFI working directoryexport UEFI_WORKSPACE="$HOME/UEFI"# EDK II pathexport EDK_PATH="$UEFI_WORKSPACE/edk2"# EDK II libc pathexport EDK_LIBC_PATH="$UEFI_WORKSPACE/edk2-libc"# Application code pathexport APP_PATH="$UEFI_WORKSPACE/code/$PROJ_NAME"# Build output directoryexport PKG_OUTPUT_DIR="$APP_PATH/Build"# Emulator pathexport EMULATOR_PATH="$EDK_PATH/Build/EmulatorX64/DEBUG_GCC5/X64"# Package path setting, supports multiple paths, separated by colonsexport PACKAGES_PATH="$EDK_PATH:$EDK_LIBC_PATH:$APP_PATH"# Specify the Python interpreterexport PYTHON_COMMAND="/usr/bin/python3"# Confirm the setup is completeecho "Environment variables for $PROJ_NAME project are configured." |
Next, write a script to compile our code for the x64 target platform
12 | touch build-x64.shchmod a+x build-x64.sh |
build-x64.sh
123456789101112131415161718192021 | set -etrap "Exiting" INT# environment variablessource env.shexport GCC5=/usr/bin/gcccd $EDK_PATHsource edksetup.shcd -# Building BaseToolsmake -C $EDK_PATH/BaseTools# Here set the -b parameter to DEBUG, use RELEASE when deploying# -p --platform=# -m --module=# -a --arch=# -b --buildtarget=# -t --tagname=build -p $APP_PATH/$DSC_NAME.dsc -m $APP_PATH/$INF_NAME.inf -a X64 -t GCC5 -b DEBUG -D PKG_OUTPUT_DIR=$PKG_OUTPUT_DIR |
Compiling to the aarch64 platform is the same
12 | touch build-aarch64.shchmod a+x build-aarch64.sh |
build-aarch64.sh
123456789101112131415161718 | set -etrap "Exiting" INT# environment variablessource env.shexport GCC5_AARCH64_PREFIX=$UEFI_WORKSPACE/toolchain/gcc-arm-8.2-2019.01-x86_64-aarch64-elf/bin/aarch64-elf-cd $EDK_PATHsource edksetup.shcd -# Building BaseToolsmake -C $EDK_PATH/BaseToolsbuild -p $APP_PATH/$DSC_NAME.dsc -m $APP_PATH/$INF_NAME.inf -a AARCH64 -t GCC5 -b DEBUG -D PKG_OUTPUT_DIR=$PKG_OUTPUT_DIR |
Run
Running the Emulator
Finally, we write a script to run it on the emulator that comes with edk2. Note that**This requires you to have a GUI environment.**If you only have a command line, skip this step and see the next section for running with QEMU.
12 | touch run.shchmod a+x run.sh |
run.sh
12345678910111213141516171819 | set -etrap "Exiting" INTsource env.shexport GCC5=/usr/bin/gcc# Emulator compilation: once compiled, you don't need to compile again.cd $EDK_PATHsource edksetup.shbuild -p $EDK_PATH/EmulatorPkg/EmulatorPkg.dsc -t GCC5 -a X64sudo mkdir -p $EMULATOR_PATH/UEFI_Disksudo cp $APP_PATH/Build/DEBUG_GCC5/X64/$INF_BASE_NAME.efi $EMULATOR_PATH/UEFI_Disk/cd $EMULATOR_PATH./Host |
QEMU run
First, compile and install QEMU. Here I choose version 8.1.5. If you don’t get the expected results, consider using this version of QEMU.
123456789101112 | git clone https://gitlab.com/qemu-project/qemu.gitcd qemugit checkout stable-8.1sudo apt install python3-venv python3-pip python3-setuptools python3-sphinx ninja-build pkg-config libglib2.0-dev libpixman-1-dev# x86_64./configure --target-list=x86_64-softmmumake -j$(nproc)sudo make install# aarch64./configure --target-list=aarch64-softmmumake -j$(nproc)sudo make install |
Next, write a script to run it with QEMU. Some parameters here are for debugging with GDB in the next section, but it doesn’t matter if you just want to run it with QEMU.
12 | touch debug.shchmod a+x debug.sh |
debug-x64.sh
123456789101112131415161718192021222324252627282930313233343536373839 | set -etrap "Exiting" INT# environment variablessource env.shexport GCC5=/usr/bin/gcc# Once compiled, there is no need to compile again.cd $EDK_PATHsource edksetup.shbuild -a X64 -p OvmfPkg/OvmfPkgX64.dsc -t GCC5 -b DEBUG #-D SOURCE_DEBUG_ENABLEcd $APP_PATHmkdir -p _ovmf_dbgcd _ovmf_dbgrm -f debug.log# It is incompatible with the default QEMU in the Ubuntu 22.04 software repository; you need to upgrade QEMU to v8.1.5.cp $EDK_PATH/Build/OvmfX64/DEBUG_GCC5/FV/OVMF.fd ./mkdir -p UEFI_Diskcp $APP_PATH/Build/DEBUG_GCC5/X64/$INF_BASE_NAME.efi ./UEFI_Disk/cp $APP_PATH/Build/DEBUG_GCC5/X64/$INF_BASE_NAME.debug ./UEFI_Disk/# -s enables GDB debugging, listening on 127.0.0.1:1234 by default.# -bios OVMF.fd specifies the OVMF firmware file, which is a QEMU firmware that supports UEFI.# -debugcon file:debug.log redirects debug output to the debug.log file.# -global isa-debugcon.iobase=0x402 configures the I/O base address of the debug console.qemu-system-x86_64 \-s \-bios OVMF.fd \-drive format=raw,file=fat:rw:UEFI_Disk/ \-net none \-debugcon file:debug.log \-global isa-debugcon.iobase=0x402 \-nographic |
This script first compiles OVMF (Open Virtual Machine Firmware). OVMF is a firmware based on EDKII that can run under the QEMU x86-64 virtual machine. This makes debugging and experimenting with UEFI firmware easier, whether for testing OS booting or using the (built-in) EFI shell.
The OVMF firmware (the UEFI implementation for QEMU) is split into two files:
- OVMF_CODE.fd: contains the actual UEFI firmware.
- OVMF_VARS.fd: acts as a ‘template’ for emulating persistent NVRAM storage.
All virtual machine instances can share the system-wide read-only OVMF from the ovmf package_CODE.fd file, but each instance needs a private, writable OVMF_VARS.fd copy.
In QEMU, you can specify OVMF_CODE.fd and OVMF_VARS.fd separately, or use a simplified form:
123456789 | # Specify separatelyqemu-system-x86_64 -drive if=pflash,format=raw,readonly,file=Build/OvmfX64/RELEASE_GCC5/FV/OVMF_CODE.fd \ -drive if=pflash,format=raw,file=Build/OvmfX64/RELEASE_GCC5/FV/OVMF_VARS.fd \ -nographic \ -net none# Simplified formqemu-system-x86_64 -drive if=pflash,format=raw,file=Build/OvmfX64/RELEASE_GCC5/FV/OVMF.fd \ -nographic \ -net none |
Run debug-x64.sh, and if all goes well, the following interface will appear, which is the UEFI Shell.
123456789101112 | UEFI Interactive Shell v2.2EDK IIUEFI v2.70 (EDK II, 0x00010000)Mapping table FS0: Alias(s):HD0a1:;BLK1: PciRoot(0x0)/Pci(0x1,0x1)/Ata(0x0)/HD(1,MBR,0xBE1AFDFA,0x3F,0xFBFC1) BLK0: Alias(s): PciRoot(0x0)/Pci(0x1,0x1)/Ata(0x0) BLK2: Alias(s): PciRoot(0x0)/Pci(0x1,0x1)/Ata(0x0)Press ESC in 2 seconds to skip startup.nsh or any other key to continue.Shell> |
In this shell, type fs0: (note the English colon), then type HelloWorld.efi to run our program, expecting the output “Hello World!!!”
In the Shell, if pressing Backspace doesn’t respond, you can press Ctrl+H instead.
12345678910111213141516171819202122 | UEFI Interactive Shell v2.2EDK IIUEFI v2.70 (EDK II, 0x00010000)Mapping table FS0: Alias(s):HD0a1:;BLK1: PciRoot(0x0)/Pci(0x1,0x1)/Ata(0x0)/HD(1,MBR,0xBE1AFDFA,0x3F,0xFBFC1) BLK0: Alias(s): PciRoot(0x0)/Pci(0x1,0x1)/Ata(0x0) BLK2: Alias(s): PciRoot(0x0)/Pci(0x1,0x1)/Ata(0x0)Press ESC in 2 seconds to skip startup.nsh or any other key to continue.Shell> fs0:FS0:\> lsDirectory of: FS0:\01/08/2025 22:23 82 gdb_commands.txt01/10/2025 20:22 184,544 HelloWorld.debug01/10/2025 20:22 5,760 HelloWorld.efi01/10/2025 12:22 1,391 NvVars 4 File(s) 191,777 bytes 0 Dir(s)FS0:\> HelloWorld.efiHello World!!! |
To exit QEMU, press Ctrl+A, release it and then press X
Below is the aarch64 version.
debug-aarch64.sh
12345678910111213141516171819202122232425262728293031323334 | set -etrap "Exiting" INT# environment variablessource env.shexport GCC5_AARCH64_PREFIX=$UEFI_WORKSPACE/toolchain/gcc-arm-8.2-2019.01-x86_64-aarch64-elf/bin/aarch64-elf-# Once compiled, there is no need to compile again.cd $EDK_PATHsource edksetup.shbuild -a AARCH64 -p ArmVirtPkg/ArmVirtQemu.dsc -t GCC5 -b RELEASEcd $APP_PATH/$INF_NAMEmkdir -p _armvirt_dbgcd _armvirt_dbgrm -f debug.log# It is incompatible with the default QEMU in the Ubuntu 22.04 software repository; you need to upgrade QEMU to v8.1.5.cp $EDK_PATH/Build/ArmVirtQemu-AARCH64/RELEASE_GCC5/FV/QEMU_EFI.fd ./mkdir -p UEFI_Diskcp $APP_PATH/$INF_NAME/Build/DEBUG_GCC5/AARCH64/$INF_BASE_NAME.efi ./UEFI_Disk/cp $APP_PATH/$INF_NAME/Build/DEBUG_GCC5/AARCH64/$INF_BASE_NAME.debug ./UEFI_Disk/#qemu commandqemu-system-aarch64 \-machine virt,kernel_irqchip=on,gic-version=3 \-cpu cortex-a57 -m 1G \-drive format=raw,file=fat:rw:UEFI_Disk/ \-bios QEMU_EFI.fd \-net none \-nographic |
Debugging
Debugging UEFI programs with gdb is a bit troublesome, but you can use scripts to automate some operations. The overall process is as follows:
- Run debug.sh, then enter the UEFI Shell and run the code (same operation as running with qemu in the previous section; the main purpose here is to, in _ovmf_dbg/debug.log, get the driver startup address)
- Open another terminal and run the script addr.sh below.
- In _ovmf_dbg/UEFI_Disk directory, run gdb -x gdb_commands.txt
- Set a breakpoint in gdb, for example break UefiMain
- Add gdb debug target remote localhost:1234
- Run, type c to jump to the first breakpoint
- Run your code in the UEFI Shell
addr-x64.sh
123456789101112131415161718192021222324252627282930313233343536373839404142434445464748495051525354555657585960616263 | source env.shcd _ovmf_dbglogfile="debug.log"line=$(grep -oP "Loading driver at 0x[0-9a-fA-F]+ EntryPoint=0x[0-9a-fA-F]+ $INF_BASE_NAME\.efi" "$logfile" | tail -n 1)# Use regular expressions to extract the two addressesif [[ $line =~ Loading\ driver\ at\ (0x[0-9a-fA-F]+)\ EntryPoint=(0x[0-9a-fA-F]+)\ $INF_BASE_NAME\.efi ]]; then address0="${BASH_REMATCH[1]}" address1="${BASH_REMATCH[2]}" echo "Loading driver at $address0" echo "EntryPoint=$address1"else echo "Error: No matching line found, maybe you need to run $INF_BASE_NAME in qemu first" exit 0ficd UEFI_Disk# Use objdump to get the file header information and extract the File off of .text and .datatext_offset=$(objdump -h "$INF_BASE_NAME.efi" | awk ' /\.text/ {print $6} # Extract the File off of .text')data_offset=$(objdump -h "$INF_BASE_NAME.efi" | awk ' /\.data/ {print $6} # Extract the File off of .data')# Output the extracted resultsecho ".text file off: $text_offset"echo ".data file off: $data_offset"# Calculatetext_addr=$((0x${address0#0x} + 0x${text_offset}))data_addr=$((0x${address0#0x} + 0x${data_offset}))# Use hexadecimal format when outputting resultsprintf "text_addr: 0x%X data_addr: 0x%X\n" $text_addr $data_addrrm -rf gdb_commands.txt# Create the gdb_commands.txt file and write content to it.cat <<EOL > gdb_commands.txtfile ${INF_BASE_NAME}.efiadd-symbol-file ${INF_BASE_NAME}.debug 0x$(printf "%X" $text_addr) -s .data 0x$(printf "%X" $data_addr)EOL# Output the file content to confirm.echo "gdb_commands.txt has been created with the following content:"printf "\n"cat gdb_commands.txtprintf "\n"echo "run the following command to debug"echo "cd _ovmf_dbg/UEFI_Disk"echo "gdb -x gdb_commands.txt"echo "break UefiMain"echo "target remote localhost:1234"echo "c" |
HelloStd
Another example: using edk-libc to call standard C library programs in UEFI.
You can copy HelloWorld.dsc, modify the GUID based on it, and then remember to modify [Components] to HelloStd.inf, and finally in the DSC’s [LibraryClassesAt the end of ], add a line of the following code.
HelloStd.dsc
1 | !include StdLib/StdLib.inc |
Next is HelloStd.inf. First, [DefinesIn ], change ENTRY_POINT to ShellCEntryLib, [PackagesIn ], add the two packages StdLib/StdLib.dec and ShellPkg/ShellPkg.dec, [LibraryClassesIn ], remove UefiApplicationEntryPoint, add the two libraries LibC and LibStdio. Below is the declaration of HelloStd.inf.
HelloStd.inf
12345678910111213141516171819202122232425 | # Variables defined to be used during the build process[Defines] INF_VERSION = 1.25 BASE_NAME = HelloStd FILE_GUID = d0956d2b-c033-45af-8ef2-76c9d30518ec MODULE_TYPE = UEFI_APPLICATION VERSION_STRING = 1.0 ENTRY_POINT = ShellCEntryLib# Source code[Sources] HelloStd.c# Required packages[Packages] MdePkg/MdePkg.dec # Contains Uefi and UefiLib StdLib/StdLib.dec ShellPkg/ShellPkg.dec# Required Libraries[LibraryClasses] # UefiApplicationEntryPoint # Uefi application entry point UefiLib # UefiLib LibC LibStdio |
Then we can call standard library programs in UEFI.
HelloStd.c
123456789101112131415161718 | int main(IN int Argc, IN char **Argv) { EFI_TIME curTime; printf("HelloStd!!!\n"); gBS->Stall(2000); gRT->GetTime(&curTime, NULL); printf("Current Time: %d-%d-%d %02d:%02d:%02d\n", curTime.Year, curTime.Month, curTime.Day, curTime.Hour, curTime.Minute, curTime.Second); return 0;} |
Next, change PROJ in env.sh._NAME、DSC_NAME、INF_NAME、INF_Just set BASE_NAME and you can compile. Running, debugging, and other operations are the same as described in HelloWorld.