Timeline
Timeline
2025-10-14
init
This article introduces Kubernetes (k8s), a containerized cluster management system open-sourced by Google. It elaborates on its core features such as automatic bin packing, self-healing, horizontal scaling, service discovery, rolling updates, as well as the cluster architecture composed of Master and Node. It also details core concepts like Pod, Controller, and Service. The article further summarizes two cluster setup methods: kubeadm and binary packages, introduces the kubectl command-line tool and YAML file writing conventions, and finally delves into key technologies such as Pod implementation mechanisms, image pull policies, and resource limits.
Kubernetes Overview and Features
k8s Overview
- k8s is a containerized cluster management system open-sourced by Google in 2014.
- Use k8s for containerized application deployment
- Using k8s facilitates application scaling
- The goal of k8s is to make deploying containerized applications simpler and more efficient.
k8s Features
- Automatic bin packing
- Automatic repair (self-healing capability)
- Horizontal scaling
- Service discovery
- Rolling updates
- Version rollback
- Secret and configuration management (similar to hot deployment)
- Storage orchestration
- Batch processing
k8s cluster architecture components
Master (control node) and Node (worker node)
(1) Master components
- apiserver
Unified entry point of the cluster, using RESTful API, with data stored in etcd.
- scheduler
Node scheduling: selects a node for application deployment.
- controller-manager
Handles routine background tasks in the cluster; each resource corresponds to a controller.
- etcd
Storage system, used to save cluster-related data.
(2) Node components
- kubelet
The representative dispatched by the master to the node, managing local containers.
- kube-proxy
Provides network proxy and implements load balancing and other operations.
K8s core concepts.
- Pod
- Minimum deployment unit.
- A collection of containers.
- Shared network.
- Lifecycle is short-lived.
- Controller
- Ensure the expected number of pod replicas.
- Stateless application deployment.
- Stateful application deployment.
- Ensure all nodes run the same pod.
- One-time tasks and scheduled tasks.
- Service
Define access rules for a group of pods.
Master (master node): The machine that controls Kubernetes nodes, and is also where job tasks are created.
Node: These machines execute assigned tasks under the control of the Kubernetes master node.
Pod: A collection of one or more containers, deployed as a whole to a single node. Containers in the same pod share IP address, inter-process communication (IPC), hostname, and other resources. Pod abstracts the network and storage of underlying containers, making container migration within the cluster more convenient.
Replication controller: Controls the number of instances of a pod running on the cluster.
Service: Separates service content from specific pods. The Kubernetes service proxy is responsible for automatically distributing service requests to the correct pod, no matter where the pod moves in the cluster, or even if it is replaced.
Kubelet: This daemon runs on each worker node, responsible for fetching the container list and ensuring that the declared containers are started and running normally.
kubectl: This is the command-line configuration tool for Kubernetes.
K8s cluster setup.
- Environment platform planning
- Single master cluster

Disadvantage: if the master goes down, it’s over
- Multi-master cluster

High-availability cluster
- Server hardware configuration requirements
- Test environment:
master: 2 cores, 4G RAM, 20G disk
node: 4 cores, 8G RAM, 40G disk
- Production environment:
Higher requirements
- Methods for deploying a k8s cluster
- kubeadm
A k8s deployment tool that provides kubeadm init and kubeadm join for quickly deploying Kubernetes clusters.
- Binary packages
Download the release binary packages from GitHub, and deploy each component separately.
Setup using kubeadm
https://kubernetes.io/zh-cn/docs/setup/production-environment/tools/kubeadm/install-kubeadm/
1234567891011121314151617181920212223242526272829303132 | # Set the server hostname$ hostnamectl set-hostname <hostname>$ yum install -y kubelet-1.18.0 kubeadm-1.18.0 kubectl-1.18.0# Set to start on boot$ systemctl enable kubelet# Deploy Kubernetes Master, execute on the master node# Since the default image pull address k8s.gcr.io is inaccessible in China, specify the Alibaba Cloud mirror registry address here.$ kubeadm init \--apiserver-advertise-address=192.168.31.61 \--image-repository registry.aliyuncs.com/google_containers \--kubernetes-version v1.17.0 \--service-cidr=10.96.0.0/12 \--pod-network-cidr=10.244.0.0/16# Use the kubectl tool$ mkdir -p $HOME/.kube$ sudo cp -i /etc/kubernetes/admin.conf $HOME/.kube/config$ sudo chown $(id -u):$(id -g) $HOME/.kube/config# View the current nodes$ kubectl get nodes# Join Kubernetes Node# Execute on 192.168.31.62/63 (Node nodes, not the master node)# To add new nodes to the cluster, run the kubeadm join command output by kubeadm init$ kubeadm join 192.168.31.61:6443 --token esce21.q6hetwm8si29qxwn \--discovery-token-ca-cert-hashsha256:00603a05805807501d7181c3d60b478788408cfe6cedefedb1f97569708be9c5# Install the Pod network plugin$ kubectl apply -f https://raw.githubusercontent.com/coreos/flannel/master/Documentation/kube-flannel.yml# Test the Kubernetes cluster# Create a pod in the Kubernetes cluster to verify that it is running normally:$ kubectl create deployment nginx --image=nginx$ kubectl expose deployment nginx --port=80 --type=NodePort$ kubectl get pod,svc |
- Install 3 virtual machines and install the operating system
- Initialize the three installed operating systems
- Install docker, kubelet, kubeadm, and kubectl on the three nodes, and change the Docker source
- Run the kubeadm init command on the master node to initialize
- Run the kubeadm join command on the node nodes to add them to the current cluster
Binary package deployment
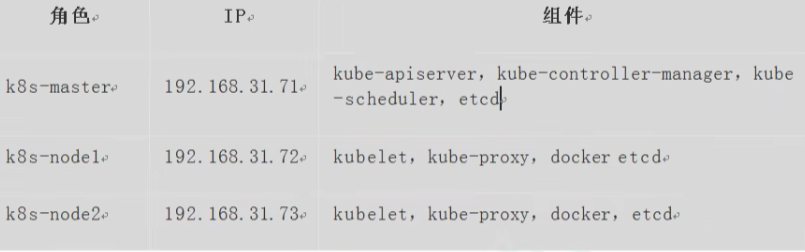
- Create multiple virtual machines and install the Linux operating system
- Operating system initialization
- Generate self-signed certificates for etcd and apiserver
- Deploy the etcd cluster
- Deploy master components
kube-apiserver,kube-controller-manager,kube-scheduler,etcd
- Deploy node components
kubelet,kube-proxy,docker,etcd
- Deploy the cluster network
kubectl, the command-line tool for k8s clusters
kubectl is the command-line tool for Kubernetes clusters. With kubectl, you can manage the cluster itself and install and deploy containerized applications on the cluster.
12 | $ kubectl [command] [type] [name] [flags]$ kubectl --help |
YAML file description
File writing format
Indentation is used to represent hierarchical relationships
Do not use the Tab key for indentation
Add a space after the colon
Generally, indent two spaces at the beginning
Indent one space after a character
— indicates the start of a new YAML file
Use # to represent comments
YAML file example

| field | Description |
|---|---|
| apiVersion | API version |
| kind | Resource type |
| metadata | Resource metadata |
| spec | Resource spec |
| replicas | Replica count |
| selector | Label selector |
| template | Pod template |
| metadata | Pod metadata |
| spec | Pod spec |
| container | Container configuration |
How to quickly write YAML files
- usekubectl createGenerate YAML files with commands
1 | $ kubectl create deployment web --image=nginx -o yaml --dry-run > web1.yaml |
Kubernetes core technology
Pod
Pod overview
A Pod is the smallest unit that can be created (deployed) and managed in the k8s system
k8s does not directly handle containers, but rather Pods. A Pod can contain multiple containers (a collection of containers)
Containers in a Pod share a network namespace
Each Pod has a special Pause container called the ‘root container’. The image corresponding to the Pause container is part of the k8s platform. In addition to the Pause container, each Pod also contains one or more closely related user business containers.
Pods are ephemeral
The purpose of Pods
- Docker is used to create containers; one Docker corresponds to one container, one container has processes, and one container runs one application.
- Pod is a multi-process design that can run multiple applications; a Pod has multiple containers, and each container runs one application.
- Pods exist to enable close interaction:
- Interaction between two applications
- Calls between networks
- Two applications need to call each other frequently
Pod implementation mechanism
- Shared network.
Containers themselves are isolated from each other. K8s uses the Pod’s Pause container (infra container) to add other business containers into the Pause container, so that all business containers are in the same namespace, enabling network sharing.
- Shared storage
Pod persistent data: log data, business data
Use Volume data volumes for persistent storage

Pod image pull policy

imagePullPolicy
IfNotPresent: default value, pull the image only when it does not exist on the host machine
Always: pull the image every time a Pod is created
Never: the Pod will never actively pull this image; it needs to be pulled manually
Pod resource limits


1c = 1000m (1 core CPU)
Pod restart mechanism

restartPolicy
Always: always restart the container after it terminates; default policy
OnFailure: restart the container only when it exits abnormally (exit code non-zero)
Never: never restart the container when it terminates
Pod health check
Container check:
Cannot detect Java heap memory overflow (status is still running)
Application-level health check:

echo $? indicates whether the previous command on Linux executed successfully.
Pod creation process

- master node
createpod – apiserver – etcd
scheduler – apiserver – etcd – scheduling algorithm, schedules the pod to a certain node.
- node
kubelet – apiserver – reads etcd to get the pod assigned to the current node – docker creates the container.
Attributes affecting scheduling
Pod resource limits: resources
Node selector labels affect Pod scheduling


You need to label the node first.
12 | $ kubectl label node k8snode1 env_role=prod$ kubectl get nodes k8snode1 --show-labels |
- Node affinity affects Pod scheduling
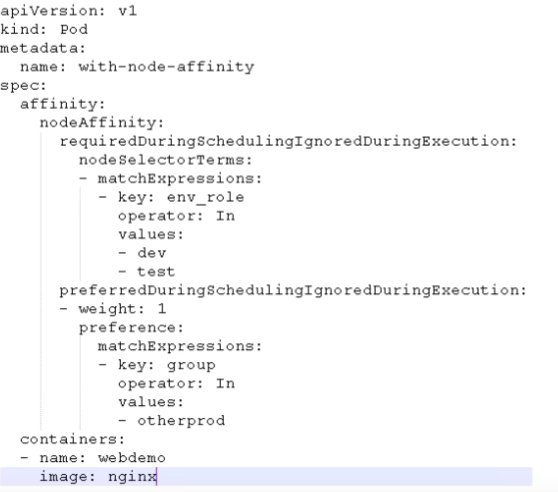
Node affinity nodeAffinity is basically the same as nodeSelector; it determines which nodes Pods are scheduled to based on node label constraints.
(1) Hard affinity (requireDuringSchedulingIgnoreDuringExecution)
The constraint must be satisfied.
(2) Soft affinity (preferredDuringSchedulingIgnoredDuringExecution)
Try to satisfy, not guaranteed.
Commonly used operators:
In NotIn Exists Gt Lt DoesNotExists
Anti-affinity: Using NotIn and DoesNotExists
- Taints and Tolerations
- Basic introduction:
nodeSelector and nodeAffinity: Pods are scheduled to certain nodes, a Pod attribute, implemented at scheduling time
Taint: nodes are not assigned for normal scheduling, it is a node attribute
- Scenario
Dedicated nodes
Configure nodes with specific hardware
Taint-based eviction
12 | # View the taint status of the current node$ kubectl describe node k8smaster | grep Taint |
There are three taint values:
NoSchedule: definitely not scheduled
PreferNoSchedule: try not to be scheduled
NoExecute: will not be scheduled, and will also evict existing Pods on the Node
Add a taint to a node
kubectl taint node [node] key=value: one of the three taint values
12345678910111213 | $ kubectl get pods$ kubectl create deployment web --image=nginx$ kubectl get pods -o wide# Create 4 more$ kubectl scale deployment web --replicas=5$ kubectl taint node [node] key=value# Delete pod$ kubectl delete deployment web$ kubectl get podsNo resources found in default namespace$ kubectl taint node k8snode1 env_role=yes:NoSchedule$ kubectl describe node k8snode1 | grep Taint |
Delete taint
12 | $ kubectl taint node k8snode1 env_role:NoSchedule-$ kubectl describe node k8snode1 | grep Taint |
Taint toleration:

Controller
What is a Controller
An object that manages and runs containers on the cluster
Relationship between Pod and Controller
Pods implement application operations through Controllers, such as scaling, rolling updates, etc.
- The relationship between Pod and Controller is established through labels

Pod and Controller establish a relationship through labels

Deployment use cases
- Deploy stateless applications
- Manage Pods and ReplicaSets
- Deployment, rolling updates, and other features
Use cases: web services, microservices
Deploy applications using Deployment (YAML)
123456789 | # Export YAML file$ kubectl create deployment web --image=nginx --dry-run -o yaml > web.yaml# Deploy using YAML$ kubectl apply -f web.yaml$ kubectl get nodes# Publish externally and expose ports$ kubectl expose deployment web --port=80 --type=NodePort --target-port=80 --name=web1 -o yaml > web1.yaml$ kubectl apply -f web1.yaml$ kubectl get nodes -o wide |
Application upgrade, rollback, and elastic scaling
12345678910 | # Application upgrade$ kubectl set image deployment web nginx=nginx:1.15# Check upgrade status$ kubectl rollout status deployment web# View historical versions$ kubectl rollout history deployment web# Roll back to the previous version$ kubectl rollout undo deployment web# Elastic scaling$ kubectl scale deployment web --replicas=10 |
Difference between stateless and stateful
- Stateless
- Pods are considered identical (all replicas are the same)
- No ordering requirements
- No need to consider which node to run on
- Can scale and expand freely
- Stateful
- All the above factors need to be considered
- Make each Pod independent, maintain Pod startup order and uniqueness (unique network identifiers, persistent storage, ordering, e.g., MySQL primary-replica)
Deploying Stateful Applications
- Headless service:
- ClusterIP: node
StatefulSetDeploy Stateful Applications


After execution, check the pods. There are 3 Pods, each with a unique name.
Check the svc, ClusterIP is None
Difference between deployment and statefulset: statefulset has identity (unique identifier)
- Generate domain names based on hostname + according to certain rules
- Unique domain name
Format: hostname.service name.namespace.svc.cluster.local
example: nginx-statefulset-0.nginx.default.svc
Deploying DaemonSet
- Run one Pod on each node; newly added nodes also run a Pod.
- Example: install data collection tools on each node

12345 | $ kubectl delete statefulset --all$ kubectl delete svc nginx$ kubectl delete svc web$ kubectl apply -f ds.yaml$ kubectl exec -it ds-test-cbk6cv bash |
Job (one-time task) and CronJob (scheduled task)

1234567 | $ kubectl create -f job.yaml$ kubectl get pods -o wide$ kubectl get jobspi-qpqff Completed$ kubectl logs pi-qpqff# Delete$ kubectl delete -f job.yaml |
Scheduled tasks:

1234 | $ kubectl apply -f cronjob.yaml$ kubectl get pods$ kubectl get cronjobs$ kubectl logs hello-1599100140-wkn79 |
Service
What is a Service?
Define access rules for a group of Pods
Why Service exists
Prevent Pods from being lost (service discovery)

Service discovery Define access policies for a group of Pods (load balancing)

Relationship between Pod and Service
Establish relationships based on labels

Common Service types
- ClusterIP: for internal cluster use
- NodePort: for external access to applications
- LoadBalancer: for external access to applications, public cloud
1234 | $ kubectl get svc$ kubectl expose deployment web --port=80 --target-port=80 --dry-run -o yaml > service1.yaml$ kubectl apply -f service1.yaml$ kubectl get svc |
Applications deployed on nodes in the internal network are generally not accessible from the external network:
Use a machine with external network access, install nginx as a reverse proxy
Manually add accessible nodes to nginx
LoadBalancer: public cloud, load balancing controller
Configuration management
Secret
Purpose: Store encrypted data in etcd, allowing Pod containers to access it by mounting a Volume
Scenario: credentials
base64 encoding
1 | $ echo -n "admin" | base64 |
- Create a Secret to encrypt data

12 | $ kubectl create -f secret.yaml$ kubectl get secret |
- Mount as variables into the Pod container
valueFrom

1234 | $ kubectl apply -f secret-val.yaml$ kubectl get pods$ kubectl exec -it mypod bash$ echo $SECRET_USERNAME |
- Mount as a Volume to the data volume


123456 | $ kubectl delete -f secret-val.yaml$ kubectl apply -f secret-vol.yaml$ kubectl get pods$ kubectl exec -it mypod bash$ ls /etc/foo$ cat /etc/foo/username |
ConfigMap
Purpose: Store unencrypted data in etcd, allowing Pods to mount it into containers as variables or Volumes
Scenario: configuration files
- Create a configuration file
123 | $ kubectl delete secret --all$ kubectl delete Pod --all$ vim redis.properties |
- Create a ConfigMap
1234 | $ kubectl create configmap redis-config --from-file=redis.properties# view$ kubectl get cm$ kubectl describe cm redis-config |
- Mount as a Volume into the Pod container

123 | $ kubectl apply -f cm.yaml# View logs$ kubectl logs mypod |
- Mounting as variables
(1) Create YAML, declare variable information, and create ConfigMap

(2) Mount as variables
12 | $ kubectl apply -f myconfig.yaml$ kubectl get cm |

1234 | $ kubectl apply -f config-var.yaml$ kubectl get pods$ kubectl get cm$ kubectl logs mypod |
K8s cluster security mechanism
Overview
When accessing the k8s cluster, three steps are required to complete specific operations.
(1) Authentication
(2) Authorization (permission)
(3) Admission control
When accessing, the process must go through the apiserver, which acts as a unified coordinator, like a doorman. During access, a certificate, token, or username+password is required. If accessing a pod, a serviceAccount is required.
Step 1: Authentication
- Transport security: Port 8080 is not exposed externally, only accessible internally; port 6443 is used externally.
- Authentication: Common methods for client identity authentication:
- HTTPS certificate authentication, based on CA certificate
- HTTP token authentication, identifying users via token
- HTTP basic authentication, username+password authentication
Step 2: Authorization
- Authorization operations based on RBAC
- Role-based access control
Step 3: Admission Control
- It is the list of admission controllers. If the list allows the content, it passes.
RBAC: Role-Based Access Control
Role Based Access Control
- Role
role: Role, access permissions for a specific namespace
clusterRole: access permissions for all namespaces
1234 | # View namespaces$ kubectl get ns# Create namespace$ kubectl create ns roletest |
- Role binding
- roleBinding: binds a role to a subject
- ClusterRoleBinding: binds a cluster role to a subject
- Subject
- user: User
- group: User group
- serviceAccount: Service account
RBAC implements authorization
1234 | # 1. Create a namespace$ kubectl create ns roledemo# 2. Create a Pod in the new namespace$ kubectl run nginx --image=nginx -n roledemo |

12345 | # 3. Create a role$ vim rbac-role.yaml$ kubectl apply -f rbac-role.yaml# View roles in the namespace$ kubectl get role -n roledemo |

1234 | # 4. Create a role binding$ vim rbac-rolebinding.yaml$ kubectl apply -f rbac-rolebinding.yaml$ kubectl get role,rolebinding -n roledemo |
- Use certificates

1234 | $ vim rbac-user.sh$ cp /root/TLS/k8s/ca* ./$ bash rbac.sh$ kubectl get pods -n roledemo |
Ingress
Overview
- Expose the port number externally, access via IP + port number, implemented using NodePort in Service
- NodePort drawbacks
- A port is opened on every node. Access is achieved by using any node’s IP plus the exposed port.
- It means each port can only be used once, and one port corresponds to one application.
- In actual access, domain names are used, and requests are routed to services on different ports based on different domain names.
Relationship between Ingress and Pod
- Pods and Ingress are associated through Service.
- Ingress acts as a unified entry point, and Service associates a group of Pods.

Using Ingress
Expose applications externally using Ingress
- Create an nginx application and expose the port externally.
12345 | $ kubectl create deployment web --image=nginx$ kubectl get pods$ kubectl get deploy$ kubectl expose deployment web --port=80 --target-port=80 --type=NodePort$ kubectl get svc |
- Deploy Ingress Controller

1234 | $ kubectl apply -f ingress-con.yaml# Check the status of the ingress controller$ kubectl get pods -n ingress-nginx# Create Ingress rules |

1234 | $ vim ingress-h.yaml$ kubectl apply -f ingress-h.yaml$ kubectl get pods -n ingress-nginx -o wide$ kubectl get ing |
Helm
Overview
The basic process of deploying applications before:
Write YAML files: Deployment, Service, Ingress
If you use the previous method to deploy a single application or an application with a few services, it is more appropriate.
If deploying a microservices project, there may be dozens of services. Each service has its own set of YAML files, requiring maintenance of a large number of YAML files, making version management very inconvenient.
What problems can Helm solve?
- Using Helm, these YAML files can be managed as a whole.
- Achieve efficient reuse of YAML
- Use Helm for application-level version management
Helm Introduction
Helm is a package management tool for Kubernetes, just like package managers on Linux such as yum/apt, which can easily deploy previously packaged YAML files to Kubernetes.
Three important concepts
helm
- It is a command-line client tool.
Chart
- It packages YAML, a collection of YAML files.
Release
- Deploy entities based on charts, application-level version management.

https://helm.sh/docs/intro/quickstart/
Install
https://helm.sh/docs/intro/install/
Add repository
123 | $ helm repo add brigade https://brigadecore.github.io/charts"brigade" has been added to your repositories$ helm search repo brigade |
Use Helm to quickly deploy applications
- Use commands to search for applications
1 | $ helm search repo 名称 |
- Select and install based on search results
1 | $ helm install 安装之后的名称 搜索之后的名称 |
- View the status after installation
12 | $ helm list$ helm status 安装后的名称 |
example
123456 | $ helm search repo weave$ helm install ui stable/weave-scope$ kubectl get pods$ kubectl get svc# Found that the port is not exposed, need to change to nodePort$ kubectl edit svc ui-weave-scope |
How to create your own Chart
- Use commands to create a chart
12 | $ helm create mychart$ cd mychart |
- Chart.yaml: configuration information for the current chart properties
- templates: write YAML files and place them in this directory
- values.yaml: global variables that YAML files can use
- Create two YAML files under the templates folder
- deployment.yaml
- service.yaml
12345 | $ kubectl create deployment web1 --image=nginx --dry-run -o yaml > deployment.yaml$ kubectl create deployment web1 --image=nginx$ kubectl expose deployment web1 --port=80 --target-port=80 --type=NodePort --dry-run -o yaml > service.yaml$ kubectl delete deployment web1 |
- Install mychart
123 | $ helm install web1 mychart/$ kubectl get pods$ kubectl get svc |
- Application upgrade
123 | $ helm upgrade chart名称 chart文件夹# example$ helm upgrade web1 mychart/ |
Achieve efficient reuse of YAML
By passing parameters, dynamically render templates, and generate YAML content by dynamically passing in parameters
- Define variables and values in values.yaml
- Get the defined variables and values in specific YAML files
- YAML files generally differ in these places
- image
- tag
- label
- port
- replicas
- Define variables and values in values.yaml
12345 | replicas: 1image: nginxtag: 1.16label: nginxport: 80 |
- Use variables defined in values.yaml in the YAML files under templates
- Use global variables via expressions
1 | {{.Values.变量名称}} |
for example
123 | {{ .Release.Name}}-deploy{{.Values.image}} |
1 | $ helm install --dry-run web2 mychart/ |
Persistent storage
The emptyDir volume is local storage. After the pod restarts, the data no longer exists, so persistent storage is needed for the data.
NFS network storage
After the pod restarts, the data is still there.
Step 1: Find a server as the NFS server.
(1) Install NFS
1 | $ yum install -y nfs-utils |
(2) Set the mount path
12 | $ vim /etc/exports/data/nfs *(rw,no_root_squash) |
(3) The external mount path needs to be created first.
1 | $ mkdir /data/nfs |
Step 2: Install NFS on the node nodes of the k8s cluster.
1 | $ yum install -y nfs-utils |
Step 3: Start the NFS service on the NFS server.
12 | $ systemctl start nfs$ ps -elf | grep nfs |
Step 4: Deploy applications in the k8s cluster to use NFS persistent network storage.
123 | $ mkdir pv$ cd pv$ vim nfs-nginx.yaml |

1 | $ kubectl describe pod nginx-dep1-79x79jg79-9sn8gx |
PV and PVC
- PV: Persistent storage, abstracts storage resources, and provides an externally callable interface (producer).
- PVC: Users call it without needing to care about internal implementation details (consumer).
- Implementation process:

1 | $ vim pvc.yaml |


1 | $ kubectl apply -f pvc.yaml |
1 | $ vim pv.yaml |

12345 | $ kubectl apply -f pv.yaml$ kubectl get pv,pvc$ kubectl get pods$ kubectl exec -it nginx-dep1-79u99x9g68s bash$ ls /usr/share/nginx/html |
k8s cluster resource monitoring
Monitoring metrics
- Cluster monitoring
- Node resource utilization
- Number of nodes
- Running pods
- Pod monitoring
- Container metrics
- Application
Monitoring platform
prometheus+Grafana
(1) prometheus
- Open source
- Monitoring, alerting, database
- Periodically scrape the status of monitored components using HTTP protocol
- No complex integration process required, just use HTTP interface to access
(2) Grafana
- Open source data analysis and visualization tool
- Supports multiple data sources
Deployment:
https://developer.aliyun.com/article/836300
Set up a high-availability cluster

High-availability cluster technology

Deployment

https://kubernetes.io/zh-cn/docs/setup/production-environment/tools/kubeadm/high-availability/
Deploy a Java project
Container delivery process

